Creating Data Packages for TAK Configuration/Enrollment

Change Log
14Jun2023 - Updated minor typo in the Auto-Enrollment and Soft-Cert .pref with the use of cert vs. certs. Updated everything to use certs for folder URL. Credit: A. Johansson & J. Bloomberg for finding this.
01Oct2023 - Added the ATAK Preference Key
28Nov2023 - Updated the MANIFEST.xml to include the UID after a recent security update.
Creating a data package for TAK configuration/enrollment provides a turnkey solution for new clients. To summarize as a TAK administrator after provisioning the TAK credentials or certificate issuance process all that is required by the end user is a compressed file. I will cover two deployment options. One will cover soft certificate deployment the other will cover certificate auto-enrollment deployments. A soft-certificate deployment (my terminology) is the manual certificate issuance process in which a signed certificate is bundled with the trusted certificate and passed to the TAK client. The certificate auto-enrollment only requires the trusted certificate and TAK credentials to be passed as part of the TAK enrollment process.
The Basic Requirements
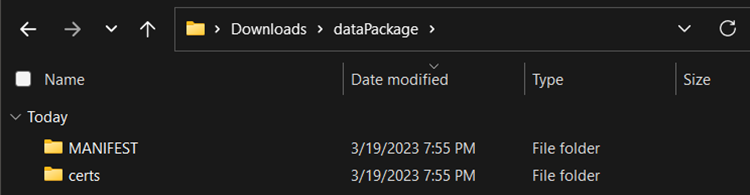
At a minimum, the data package should have a preference, manifest, and trusted certificate. Additional files depend on your deployment method and can support files such as plugins or predefined map sources. Begin start by creating a simple file structure for organizational purposes. Create a folder called dataPackage and within this folder create a certs and MANIFEST directory.
Within the certs directory, we will create a new file called config.pref. The config.pref contains important information such as our TAK Server URL, certificate information, and other preferences under the com.atakmap.app_preferences preferences category.
config.pref when utilizing multiple connections on one client.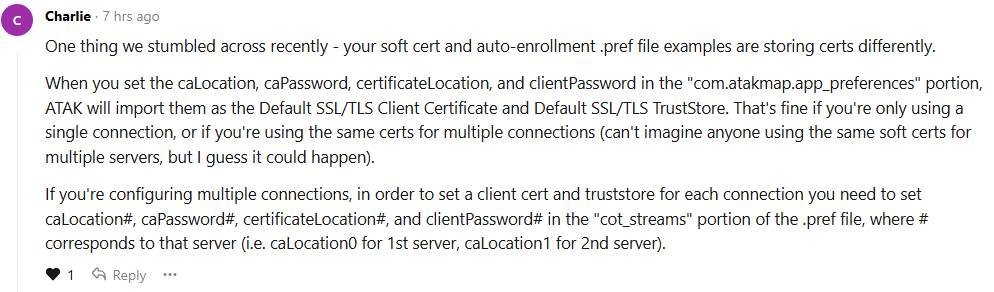
config.pref
Depending on your desired deployment method the config.pref at a minimum will contain the following information. The following attribute strings will need to be changed to match your environment:
<entry key="connectString0" class="class java.lang.String">TAKSERVER:8089:SSL</entry>
<entry key="caPassword" class="class java.lang.String">PASSWORD</entry>
<entry key="clientPassword" class="class java.lang.String">PASSWORD</entry>
For the certificate auto-enrollment deployment method there is no clientPassword attribute.
To establish a callsign on import change the following string; however, the user can change this after import:
<entry key="locationCallsign" class="class java.lang.String">CALLSIGN</entry>
Soft-Certificate Deployment
<?xml version='1.0' encoding='ASCII' standalone='yes'?>
<preferences>
  <preference version="1" name="cot_streams">
    <entry key="count" class="class java.lang.Integer">1</entry>
    <entry key="description0" class="class java.lang.String">TAK Server</entry>
    <entry key="enabled0" class="class java.lang.Boolean">true</entry>
    <entry key="connectString0" class="class java.lang.String">TAKSERVER:8089:ssl</entry>
  </preference>
  <preference version="1" name="com.atakmap.app_preferences">
    <entry key="displayServerConnectionWidget" class="class java.lang.Boolean">true</entry>
    <entry key="caLocation" class="class java.lang.String">cert/caCert.p12</entry>
    <entry key="caPassword" class="class java.lang.String">PASSWORD</entry>
    <entry key="clientPassword" class="class java.lang.String">PASSWORD</entry>
    <entry key="certificateLocation" class="class java.lang.String">cert/clientCert.p12</entry>
    <entry key="locationCallsign" class="class java.lang.String">CALLSIGN</entry>
    <entry key="locationTeam" class="class java.lang.String">Green</entry>
    <entry key="atakRoleType" class="class java.lang.String">Team Lead</entry>
  </preference>
</preferences>
Soft-Certificate Deployment config.pref
Certificate Auto-Enrollment Deployment
<?xml version='1.0' encoding='ASCII' standalone='yes'?>
<preferences>
  <preference version="1" name="cot_streams">
    <entry key="count" class="class java.lang.Integer">1</entry>
    <entry key="description0" class="class java.lang.String">TAK Server</entry>
    <entry key="enabled0" class="class java.lang.Boolean">true</entry>
    <entry key="connectString0" class="class java.lang.String">TAKSERVER:8089:ssl</entry>
    <entry key="caLocation0" class="class java.lang.String">cert/caCert.p12</entry>
    <entry key="caPassword0" class="class java.lang.String">PASSWORD</entry>
    <entry key="enrollForCertificateWithTrust0" class="class java.lang.Boolean">true</entry>
    <entry key="useAuth0" class="class java.lang.Boolean">true</entry>
    <entry key="cacheCreds0" class="class java.lang.String">Cache credentials</entry>
  </preference>
  <preference version="1" name="com.atakmap.app_preferences">
    <entry key="displayServerConnectionWidget" class="class java.lang.Boolean">true</entry>
    <entry key="locationCallsign" class="class java.lang.String">CALLSIGN</entry>
	<entry key="locationTeam" class="class java.lang.String">Blue</entry>
	<entry key="atakRoleType" class="class java.lang.String">Team Member</entry>
  </preference>
</preferences>
Certificate Auto-Enrollment config.pref
MANIFEST.xml
The MANIFEST.xml is pretty standard in both deployment options. The name parameter will be the name of our compressed file at the end. Optionally, onRecieveDelete can be changed if you wish the file to be removed on import. This primarily applies to ATAK during the enrollment process. The value of true will delete on import and a value of false will not.
Within the Contents elements we will identify the files and structure within our data package.
Soft-Certificate MANIFEST.xml
<MissionPackageManifest version="2">
  <Configuration>
    <Parameter name="uid" value="a647112f-ce05-4312-a2b4-208d8d8a5fa8"/>
    <Parameter name="name" value="TAK_Server.zip"/>
    <Parameter name="onReceiveDelete" value="true"/>
  </Configuration>
  <Contents>
    <Content ignore="false" zipEntry="certs/config.pref"/>
    <Content ignore="false" zipEntry="certs/caCert.p12"/>
    <Content ignore="false" zipEntry="certs/clientCert.p12"/>
  </Contents>
</MissionPackageManifest>
MANIFEST.xml for Soft-Certificate
Certificate Auto-Enrollment MANIFEST.xml
<MissionPackageManifest version="2">
  <Configuration>
    <Parameter name="uid" value="a647112f-ce05-4312-a2b4-208d8d8a5fa8"/>
    <Parameter name="name" value="TAK_Server.zip"/>
    <Parameter name="onReceiveDelete" value="true"/>
  </Configuration>
  <Contents>
    <Content ignore="false" zipEntry="certs/config.pref"/>
    <Content ignore="false" zipEntry="certs/caCert.p12"/>
  </Contents>
</MissionPackageManifest>
MANIFEST.xml for Certificate Auto-Enrollment
Optional Configurations
In certain deployments, you may want to include plugins or map sources as part of the enrollment process. This procedure is fairly simple and requires you to create new folders and modify the MANIFEST.xml file under the contents element. For example, we will create the plugins and maps directory. In our plugins directory, we will copy over the Data Sync and TAK Chat plugins. For our maps, we will drop in Bing and Google Maps sources. As a result, our MANIFEST.xml should now look like this:
<MissionPackageManifest version="2">
  <Configuration>
    <Parameter name="uid" value="a647112f-ce05-4312-a2b4-208d8d8a5fa8"/>
    <Parameter name="name" value="CALLSIGN"/>
    <Parameter name="name" value="TAK_Server.zip"/>
    <Parameter name="onReceiveDelete" value="true"/>
  </Configuration>
  <Contents>
    <Content ignore="false" zipEntry="certs/config.pref"/>
    <Content ignore="false" zipEntry="certs/caCert.p12"/>
    <Content ignore="false" zipEntry="maps/sGoogleMaps.xml"/>
    <Content ignore="false" zipEntry="maps/sBingMaps.xml"/>
    <Content ignore="false" zipEntry="plugins/DataSync-1.1.0.0-4.7.0.163"/>
    <Content ignore="false" zipEntry="plugins/TAKChat-1.0.0.0-4.7.0.163"/>
  </Contents>
</MissionPackageManifest>
MANIFEST.xml example w/ maps and plugin data
Disabling and Hiding Preferences
In some cases, you want to disable or hide preferences. This allows you to lock down certain items in an enterprise environment. More options can be found here. These settings will be applied in our config.pref file.
<?xml version='1.0' encoding='ASCII' standalone='yes'?>
<preferences>
  <preference version="1" name="cot_streams">
    <entry key="count" class="class java.lang.Integer">1</entry>
    <entry key="description0" class="class java.lang.String">TAK Server</entry>
    <entry key="enabled0" class="class java.lang.Boolean">true</entry>
    <entry key="connectString0" class="class java.lang.String">TAKSERVER:8089:ssl</entry>
  </preference>
  <preference version="1" name="com.atakmap.app_preferences">
    <entry key="displayServerConnectionWidget" class="class java.lang.Boolean">true</entry>
    <entry key="caLocation" class="class java.lang.String">cert/caCert.p12</entry>
    <entry key="caPassword" class="class java.lang.String">PASSWORD</entry>
    <entry key="clientPassword" class="class java.lang.String">PASSWORD</entry>
    <entry key="certificateLocation" class="class java.lang.String">cert/clientCert.p12</entry>
    <entry key="locationCallsign" class="class java.lang.String">CALLSIGN</entry>
    <entry key="locationTeam" class="class java.lang.String">Green</entry>
    <entry key="atakRoleType" class="class java.lang.String">Team Lead</entry>
    <entry key="hidePreferenceItem_locationCallsign" class="class java.lang.Boolean">true</entry>
    <entry key="hidePreferenceItem_networkGpsCategory" class="class java.lang.Boolean">true</entry>
  </preference>
</preferences>
Example config.pref w/ hiding the Callsign and GPS Options
ATAK Preference Key
For additional customizable preferences reference the below file. I did not create this; however, it was shared by Charlie to the TAK Community.
Creating and Importing the Data Package
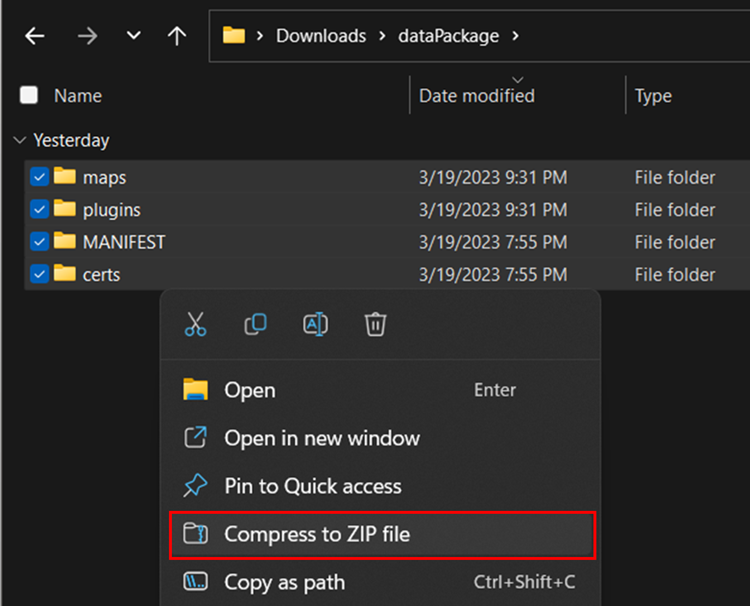
To create the data package highlight our folders (certs, MANIFEST), right-click and compress them to a ZIP Archive. Optionally, if you made the plugins or maps directory do include these folders as well. Rename the compressed file to match the name value within the MANIFEST.xml file.
All that is required is to transfer this data package to the end user to select Import File from the TAK client and select the data package to import. WinTAK supports the drag-and-drop method of import as well.
iTAK Deployment Packages
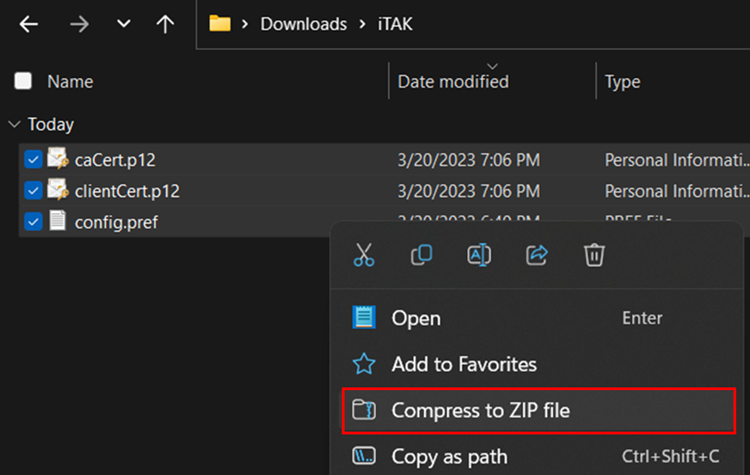
iTAK deployment package file structure is different and that is why I placed it at the end of this guide. iTAK requires the certs and config.pref files only to be within the root of the compressed file. There may be a way to use folders but I have not successfully figured that out so I will show you what I know works at least.
Soft-Certificate Deployment
<?xml version='1.0' standalone='yes'?>
<preferences>
  <preference version="1" name="cot_streams">
    <entry key="count" class="class java.lang.Integer">1</entry>
    <entry key="description0" class="class java.lang.String">TAK Server</entry>
    <entry key="enabled0" class="class java.lang.Boolean">true</entry>
    <entry key="connectString0" class="class java.lang.String">TAKSERVER:8089:ssl</entry>
  </preference>
  <preference version="1" name="com.atakmap.app_preferences">
    <entry key="displayServerConnectionWidget" class="class java.lang.Boolean">true</entry>
    <entry key="caLocation" class="class java.lang.String">cert/caCert.p12</entry>
    <entry key="caPassword" class="class java.lang.String">PASWORD</entry>
    <entry key="clientPassword" class="class java.lang.String">PASSWORD</entry>
    <entry key="certificateLocation" class="class java.lang.String">cert/clientCert.p12</entry>
  </preference>
</preferences>
iTAK Soft-Certificate Deployment config.pref
Certificate Auto-Enrollment Deployment
UNDER CONSTRUCTION
Creating and Importing the Data Package
To create the data package highlight our files (certs, config.pref), right-click and compress them to a ZIP Archive.
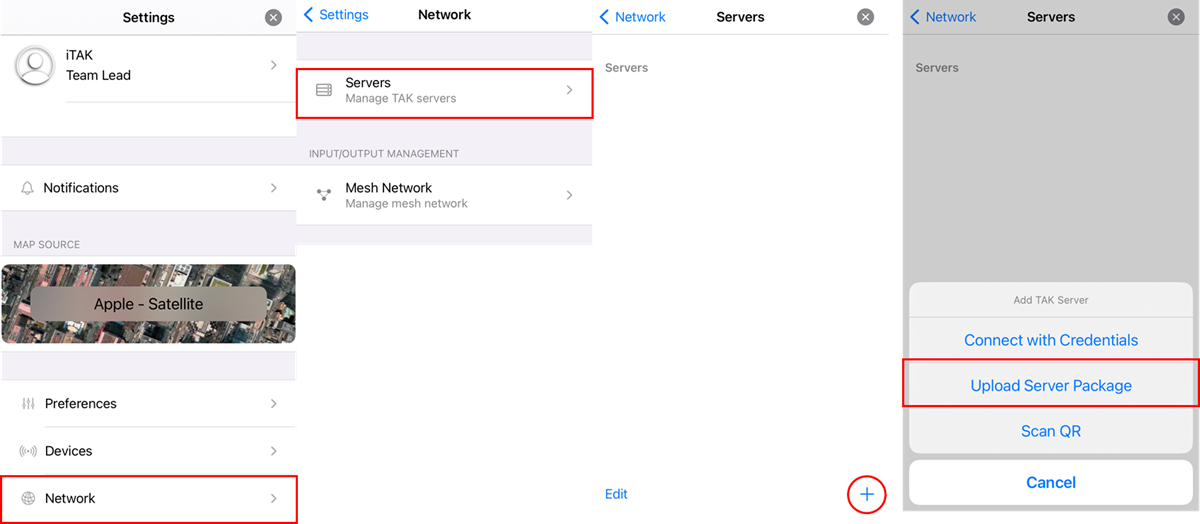
All that is required is to transfer this data package to the end user by selecting Settings, Network, Server, Add Server (+), Upload Server Package from the iTAK menus, and select the data package to import.
Resources
Ref the iTAK structure. Add the MANIFEST.xml and any additional files, update the Manifest and zip all contents under one compressed file.
