Let's Build a Minecraft Server

Why Build a Minecraft Server?
Minecraft is a 3D world-building sandbox. There isn't a goal with playing other than to let your imagination run wild. If you're a fan or just have small children who want to watch their digital creativity shine, then this is for you. If you're not familiar with the Minecraft ecosystem, you will discover that there are a few versions to look out for. The original Minecraft Java Edition and then Bedrock Edition. Most Minecraft servers that are hosted use Java Edition; however, there are Bedrock Edition servers as well.
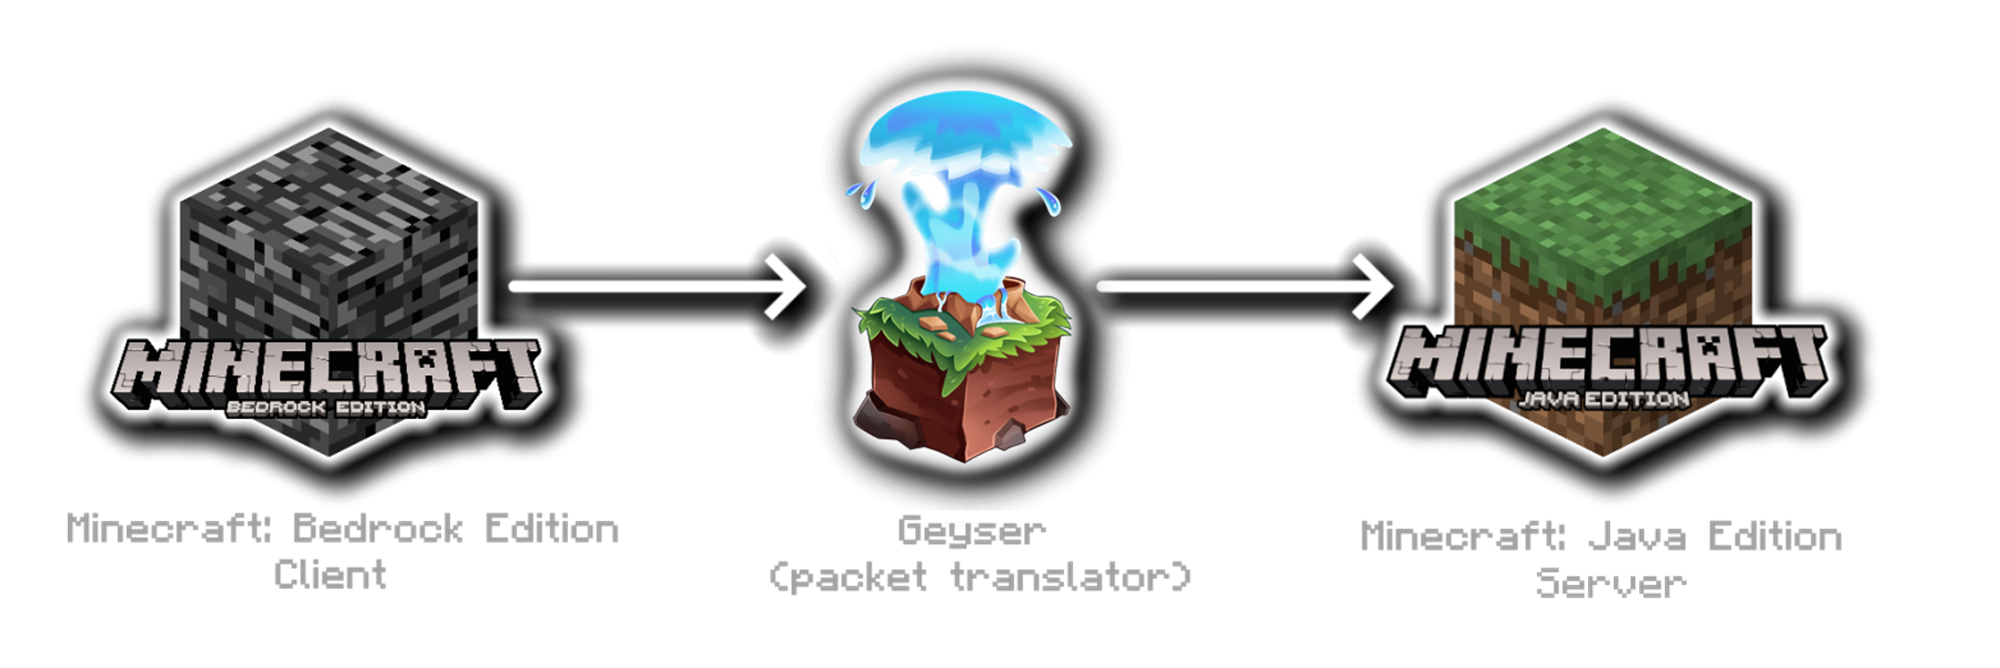
The Minecraft Java Edition client is the original form of Minecraft and is available on most platforms (Windows, Mac, and Linux). Bedrock Edition client is available on Windows, Mobile, and Console platforms. However, the Java and Bedrock Edition is not cross-playable. There is a solution, using a server called GeyserMC.
GeyserMC
GeyserMC is more of a translation engine than a server. It can easily be deployed as a plugin or as a standalone server. Not much else to say other than this will be the core capability that will bridge the two client editions.
Building the Server 3-2-1
Prerequisites
Building the Minecraft server is pretty easy and requires a few things to get started. For this, we are going to build our server on a Linux server (I built mine on Fedora Server 37). If you wanted to do this on Windows you can easily do the same. If you're building your server on Linux you will need to install Java first.
sudo yum install java-17-openjdk java-17-openjdk-headlessPaperMC
For our Minecraft server, we are going to use PaperMC. PaperMC is built off SpigotMC which is another Minecraft server. Both provide a high-performance Minecraft server with increased capabilities (API and features). For the sake of this guide download PaperMC here.
GeyserMC + FloodGate
Next, we will download the GeyserMC Paper-Spigot plugin and Floodgate. Floodgate allows Bedrock account holders to join a Java Edition server without having a Java Edition account. Download the GeyserMC for PaperMC here and Floodgate here.
Installation and Setup
To get started create a directory, in this case, I created one called GeyserMC and placed the PaperMC.jar into this directory. Next, we want to start the server and stop it from downloading and generating our initial configuration files. Start the Minecraft server using the java command, the Xms and Xmx options allow us to adjust the amount of random-access memory (RAM) we allocate to our server instance.
# Start the PaperMC server
java -Xms2G -Xmx2G -jar paper*.jar --nogui
When we start our PaperMC server for the first time we will get an error stating we need to accept the End User License Agreement (EULA) stored in the eula.txt file. Using the sed command we can find and replace text in one command. Once this is done, restart the Minecraft server.
# Accept the EULA
sed -i s/false/true/g eula.txt

# Start the PaperMC server
java -Xms2G -Xmx2G -jar paper*.jar --nogui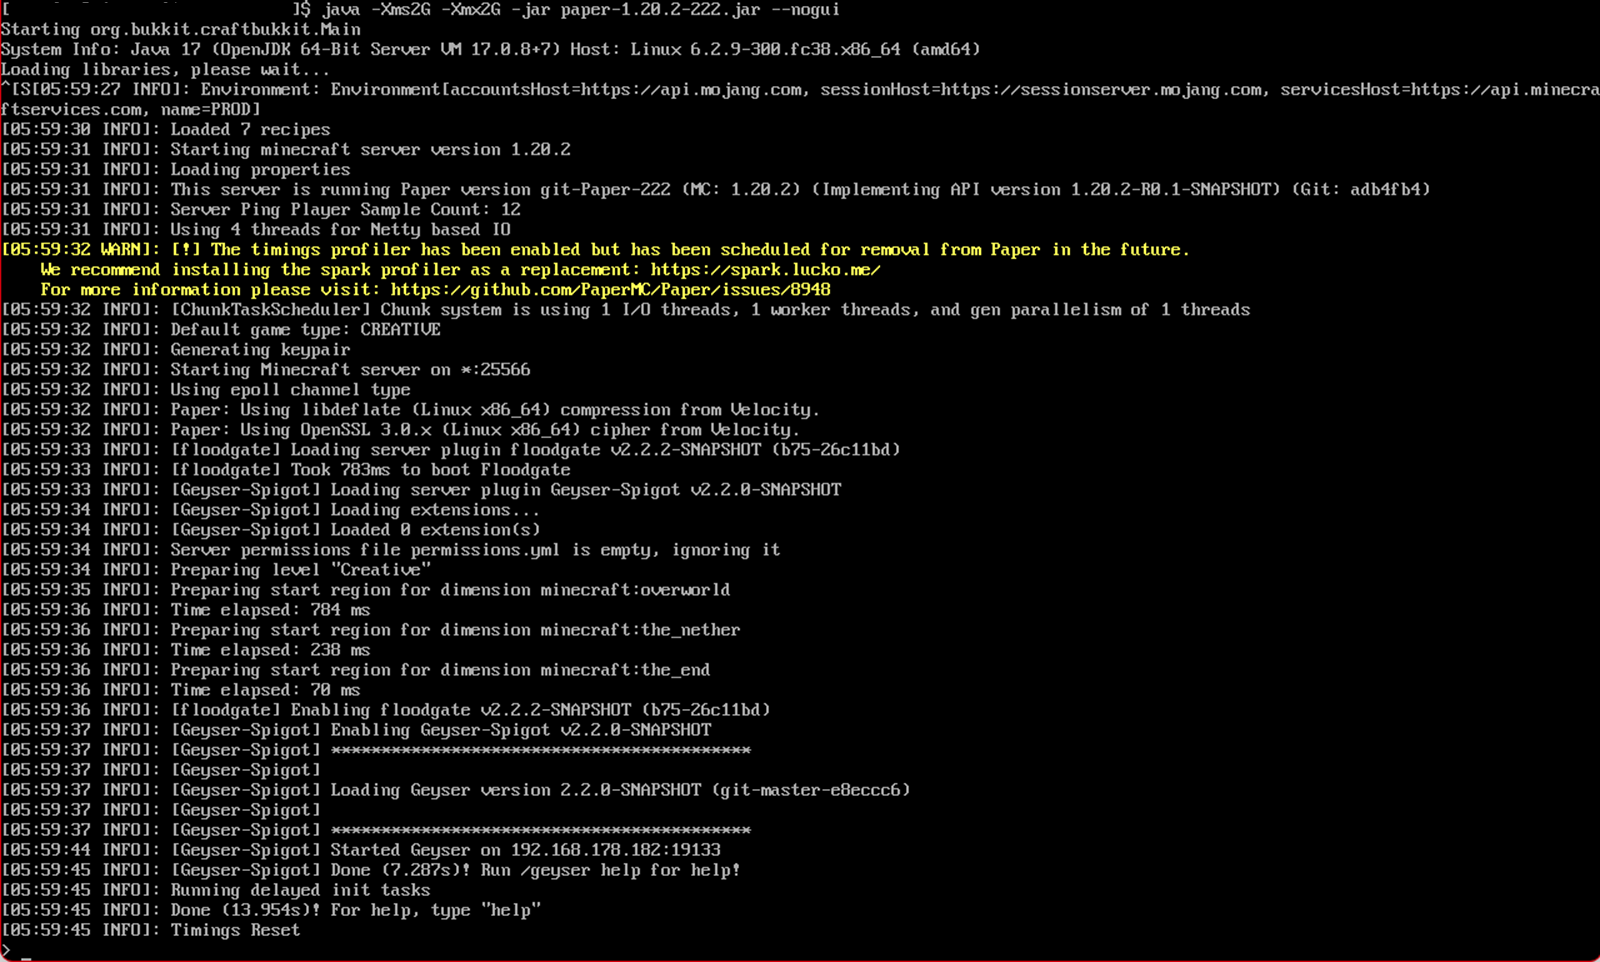
Installing the Plugins
Again, we must stop our Minecraft server so we can install the GeyserMC and Floodgate plugins. These two java files (.jar) must be placed in the plugins directory. Once the two Java files are in the plugins directory, start and stop the Minecraft server again. This will generate a key.pem file via the Floodgate plugin that is required for GeyserMC for the Floodgate integration. Copy the key.pem into the plugins/Geyser-Spigot directory and start the Minecraft Server to complete the initial configuration.
If you have completed everything thus far your directory structure should look like this (excluding misc files):
geyserMC
⊢ server.properties
⊢ eula.txt
⊢ plugins
⊢– Geyser-Spigot.jar
⊢– floodgate-spigot.jar
⊢– floodgate
⊢–– config.yml
⊢–– key.pem
⊢– Geyser-Spigot
⊢–– config.yml
⊢–– key.pem
Updating your server
To update your server is simple. Simply download the updated PaperMC, GeyserMC, and Floodgate stop your server, replace the appropriate files and restart your server.
What's next?
Time to play some Minecraft. However, we need to make some firewall modifications to allow inbound connections. If you built your Minecraft server using Linux your command would be similar to this:
# Add firewall exemptions
sudo firewall-cmd --zone=public --add-port 25565/tcp --add-port 19132/udp --permanent

# Apply our firewall configuration
sudo firewall-cmd --reload
Next, let's set up the clients to connect to our server.
Java Edition
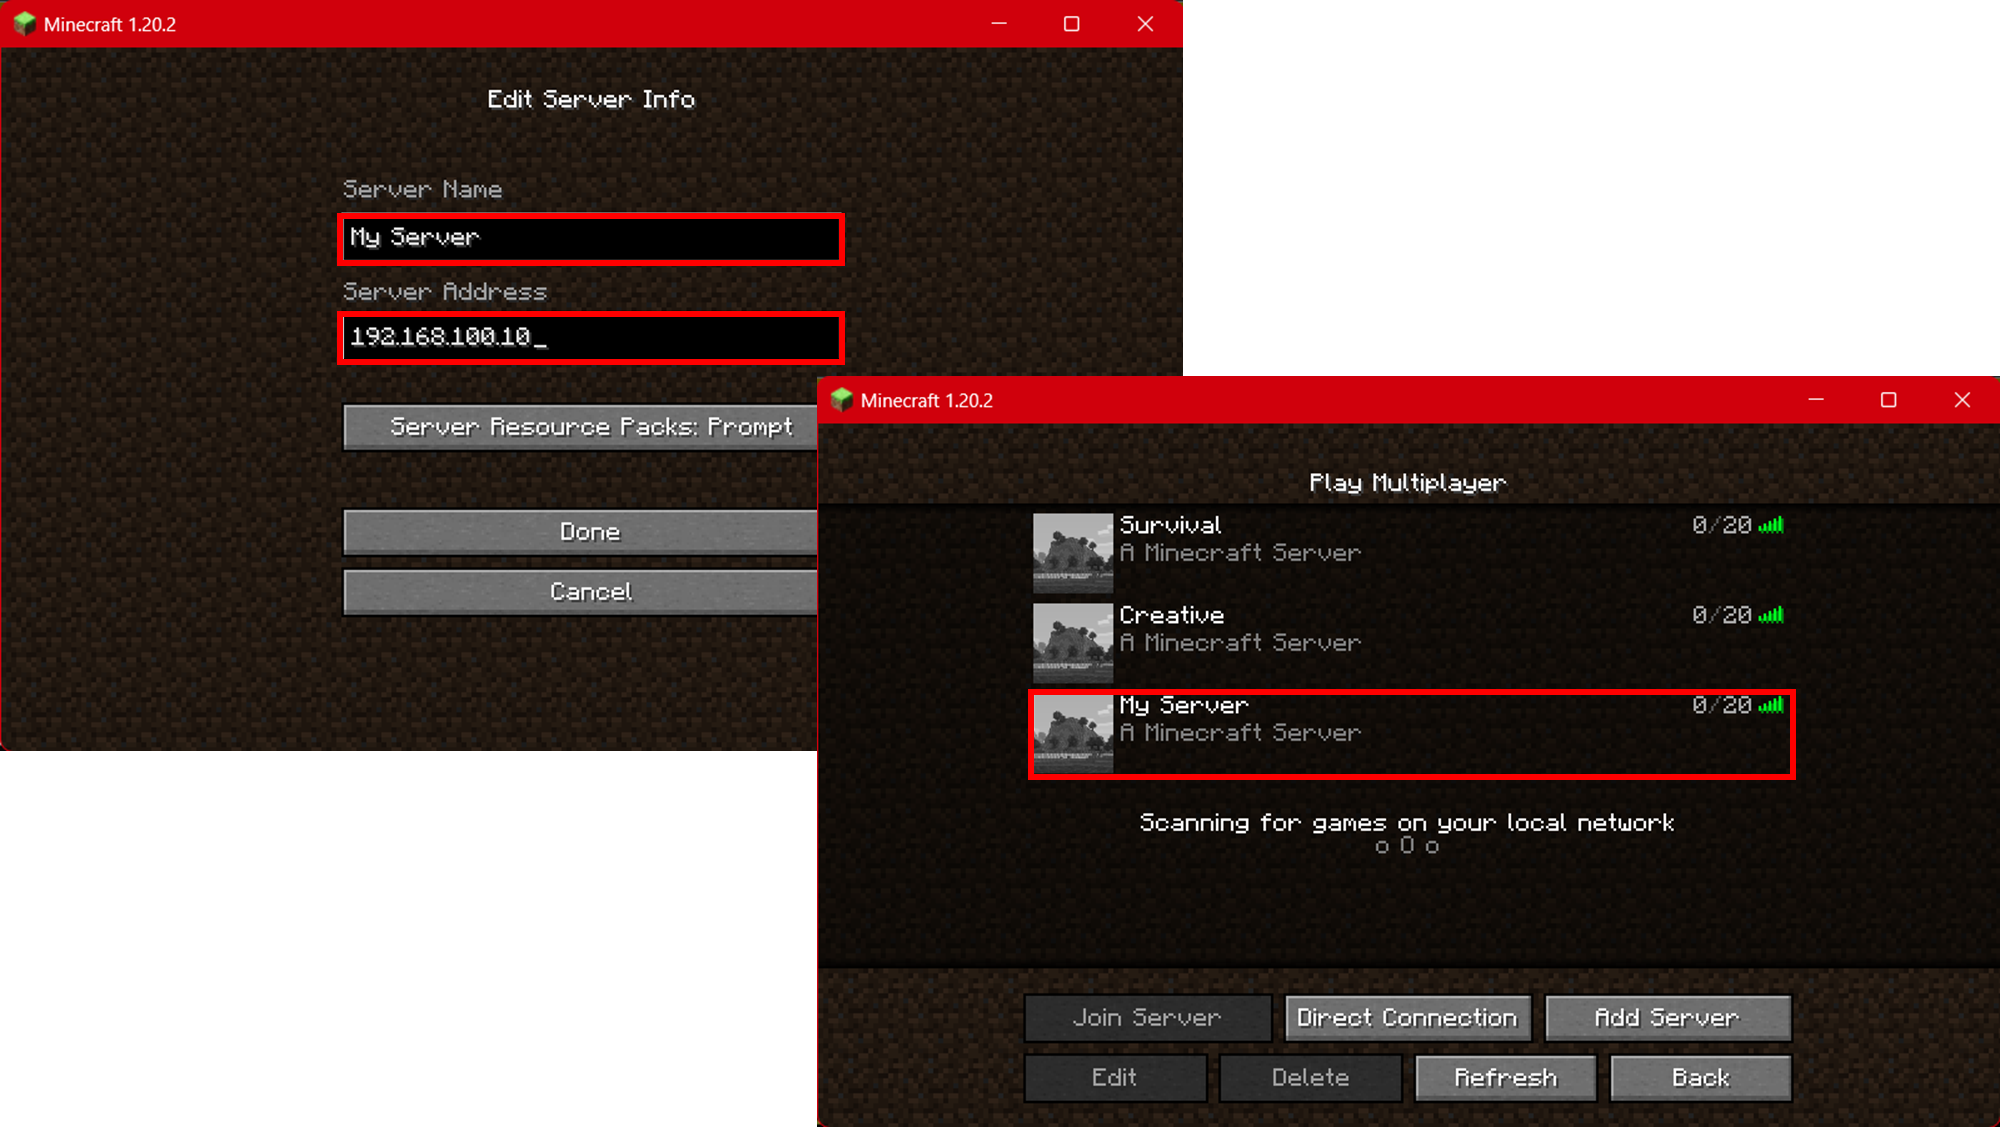
Within Minecraft Java Edition click on Multiplayer and Add Server.
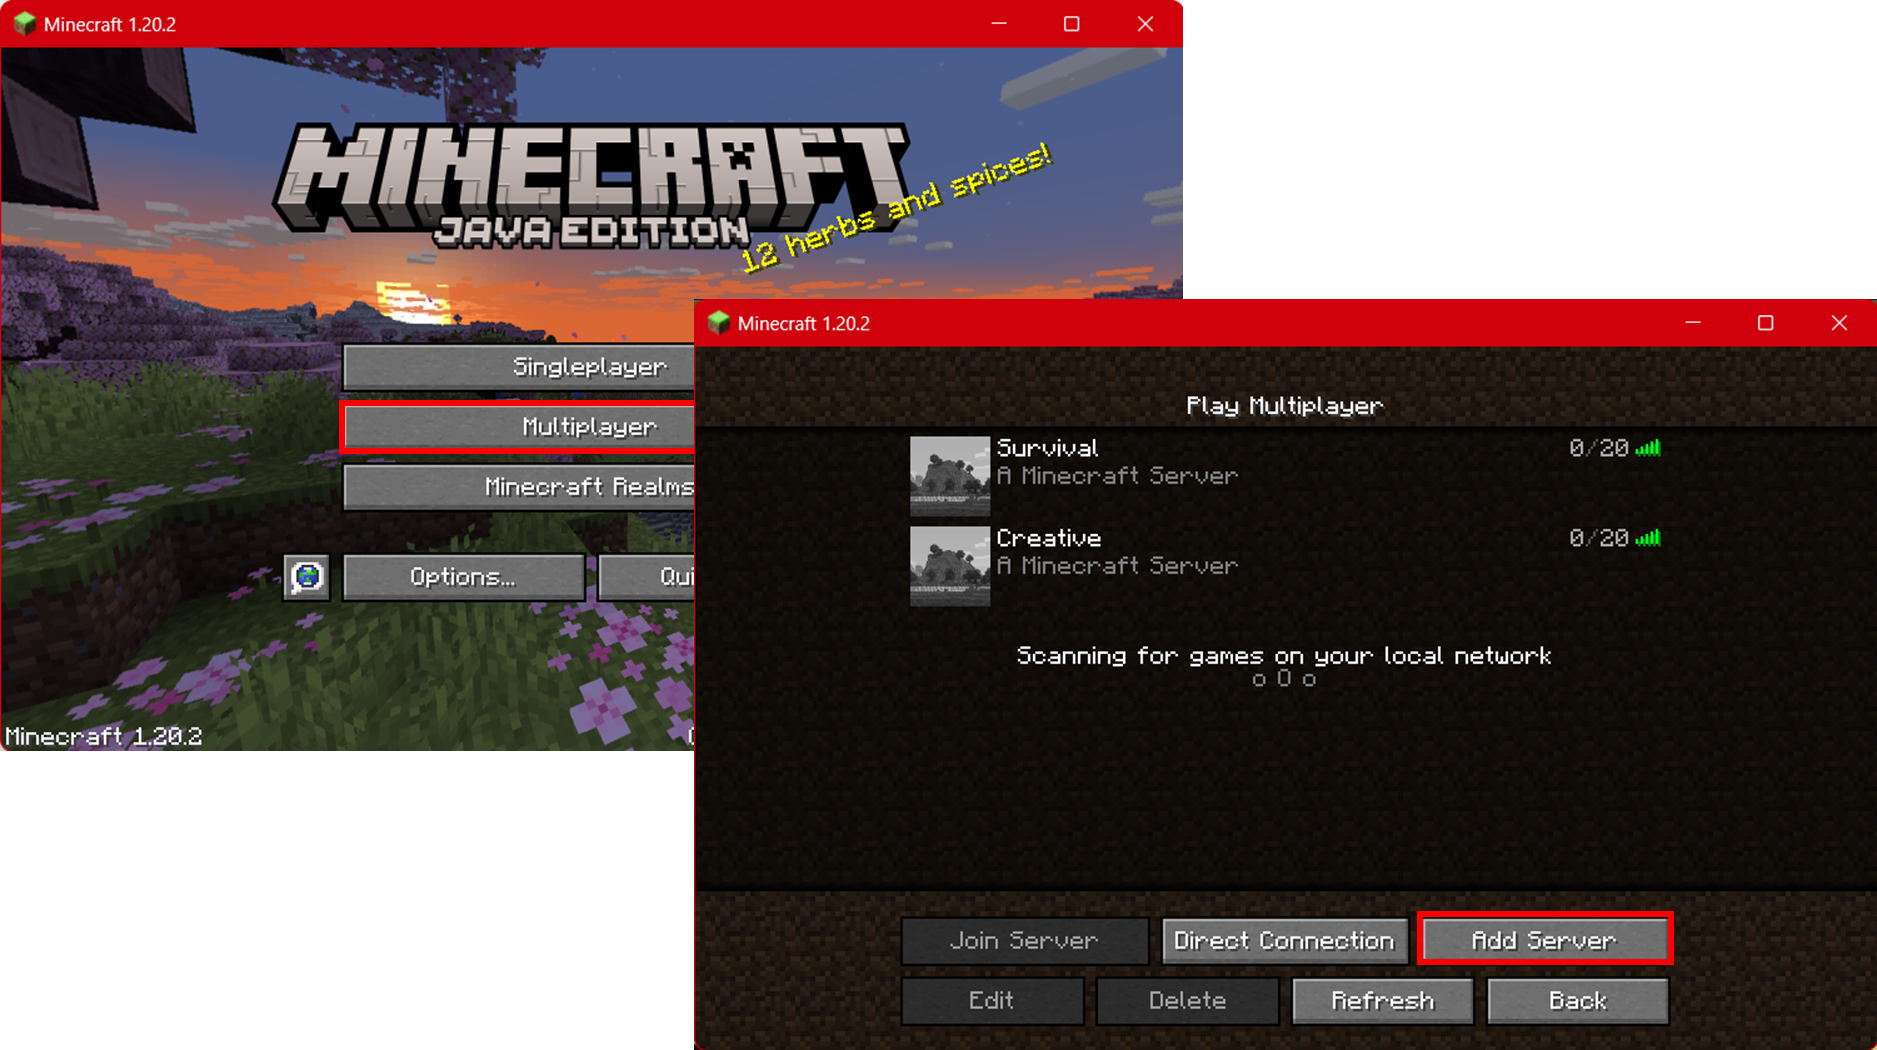
Enter the Server Name and Server Address and keep all defaults. Click Done to save.
Bedrock Edition
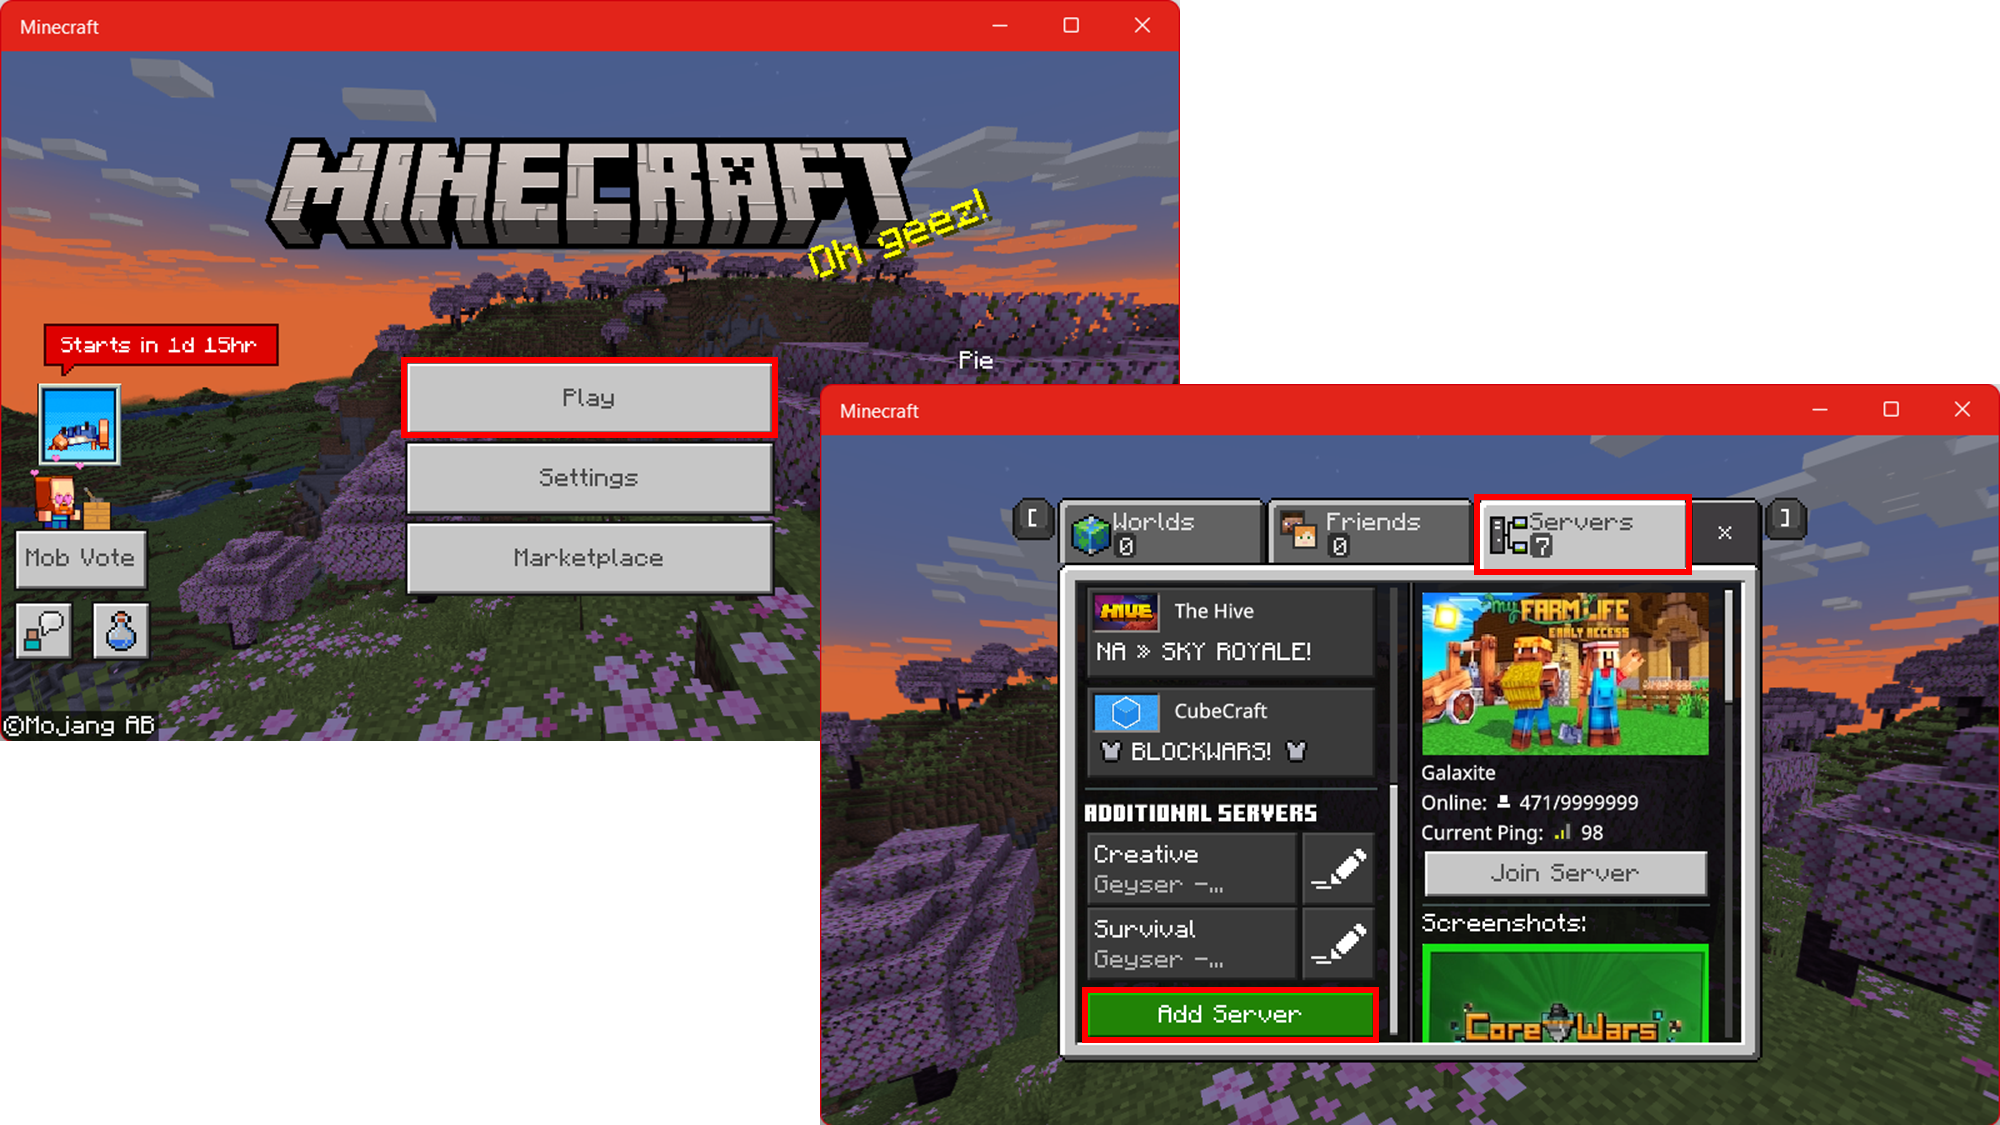
Within Minecraft Bedrock Edition click on Play and select the Servers tab. Scroll down until you get to Additional Servers and click on Add Servers.
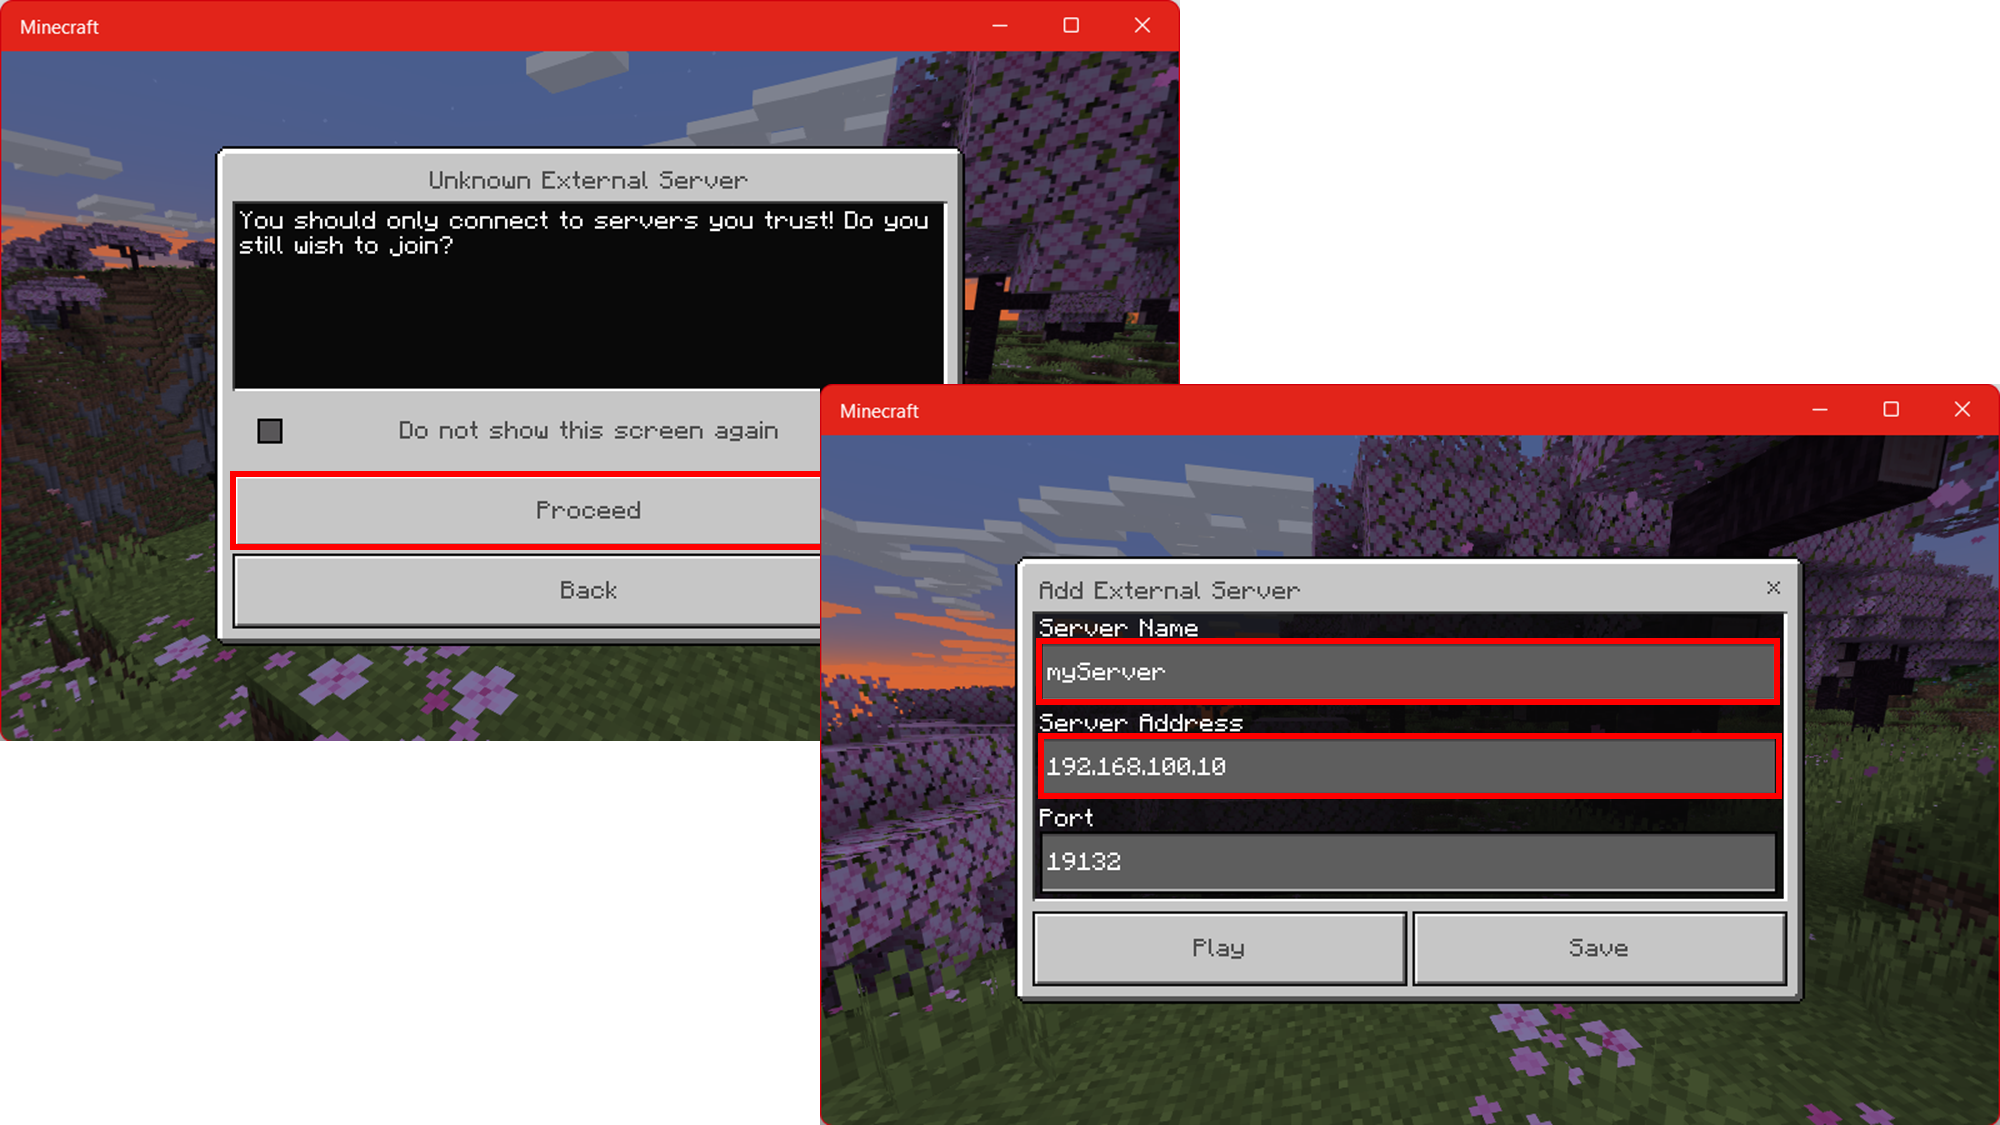
At the warning click Proceed to accept the warning. Enter the Server Name and Server Address and keep all defaults. Click Done to save.
Final Thoughts
To explain what is going on under the hood, when launching PaperMC it is listening on 25565/tcp for the Java Edition clients to connect. GeyserMC is establishing a connection to the local Java Edition server as a client and then listening on 19132/udp for Bedrock Edition clients to connect. This way when a Minecraft client makes a connection to the server it's accessing the correct port associated with its server. You can host multiple Minecraft servers on one host by just incrementing the ports as you go. For example, creating another server on the port 25566/tcp by editing the server.propertiesthe file. Then edit the config.yml within Geyser-Spigot directory to listen on 19133/udp and then connect to the Java Edition server on 25566. Don't forget to adjust your local firewall exemptions respectively.

You will notice that when a Bedrock Edition player joins their account will have a .(dot/period) before their name. This is normal and something to expect.
Additional References
This just covers the basics. If you would like a little more customization in your Minecraft World look into these additional references:
