Creating Custom AD Attributes for ATAK

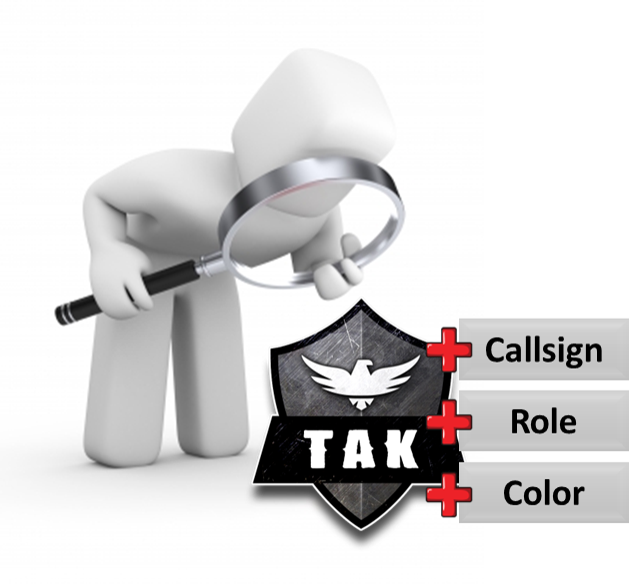
In some deployments, a TAK administrator may want to control certain aspects of the TAK environment. An example would be assigning callsigns and roles based on team assignments to identify and distinguish ATAK devices or enforce certain attributes. To do this we will require an AD/LDAP authentication backend configured prior to configuring these settings on our TAK Server. Custom attributes will need to be created in the AD/LDAP Schema which requires certain restrictive administrative permissions which will be outlined within this guide.
Overview
In this guide, we will cover creating and applying custom attributes to our users in AD/LDAP to apply to our ATAK Clients. Once we have created these custom attributes we will modify the TAK Server core configuration file to apply these attributes to newly enrolled ATAK clients. If an ATAK device is already provisioned the ATAK user will need to reinitiate connection to the TAK Server to apply the newly created attributes. This will require the ATAK operator to delete the current connection and reestablish the connection back to the TAK Server.
Active Directory Schema
To begin we will require some changes to the AD Schema which requires a Domain Administrator to assign a Schema Administrator or perform the task if already a member.
Registering the Schema Manager DLL
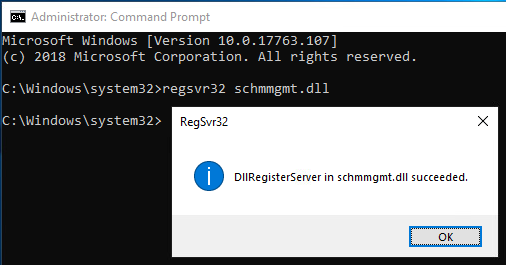
As an administrator with Schema Administrator rights, open an elevated command prompt and type regsvr32 schmmgmt.dll to enable the Schema Manager console.
regsvr32 schmmgmt.dllSchema Manager Console
Upon successful registration of the Schema Manager Console prompt click on Okay and type in MMC to open the Microsoft Management Console.
Once the Microsoft management console opens, click on File, Add or Remove Snap-ins and select Active Directory Schema from the list of available snap-ins. Click Ok to load the snap-in.

Custom Object IDs
Before continuing, we must create a unique Object ID (OID) for each custom attribute. For this task, we will use a PowerShell script to randomly generate an OID which is acceptable if outside parties do not inquire about the OID. For large organizations or corporations request one officially from an International Standards Organization (ISO), Name Registration Authority (NRA). If you're in the United States, the ISO NRA is the American National Standards Institute (ANSI).
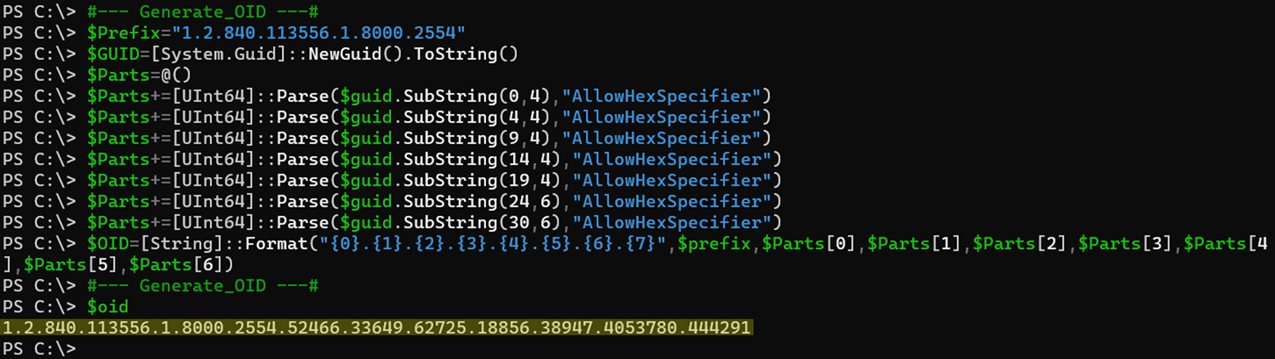
To start copy and paste the below code snippet into a PowerShell window followed by pressing Enter to display the $oid value generated.
#--- Generate_OID ---#
$Prefix="1.2.840.113556.1.8000.2554"
$GUID=[System.Guid]::NewGuid().ToString()
$Parts=@()
$Parts+=[UInt64]::Parse($guid.SubString(0,4),"AllowHexSpecifier")
$Parts+=[UInt64]::Parse($guid.SubString(4,4),"AllowHexSpecifier")
$Parts+=[UInt64]::Parse($guid.SubString(9,4),"AllowHexSpecifier")
$Parts+=[UInt64]::Parse($guid.SubString(14,4),"AllowHexSpecifier")
$Parts+=[UInt64]::Parse($guid.SubString(19,4),"AllowHexSpecifier")
$Parts+=[UInt64]::Parse($guid.SubString(24,6),"AllowHexSpecifier")
$Parts+=[UInt64]::Parse($guid.SubString(30,6),"AllowHexSpecifier")
$OID=[String]::Format("{0}.{1}.{2}.{3}.{4}.{5}.{6}.{7}",$prefix,$Parts[0],$Parts[1],$Parts[2],$Parts[3],$Parts[4],$Parts[5],$Parts[6])
#--- Generate_OID ---#
$oid
Generate_OID.ps1
Repeat this step three (3) times to get three (3) unique OID values. Save these values in a notepad or other text editor to reference later.
Creating the Custom Attributes
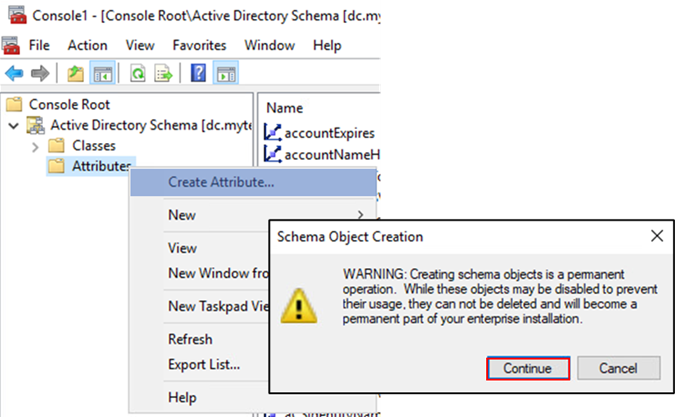
To create our custom attributes select the AD Schema management console window we opened earlier and expand the Active Directory Schema root tree and select the Attributes container. Right-click Attributes and select Create Attribute. A warning prompt will ask you to confirm the Schema Object creation. Click Continue to accept this warning.
A Create New Attribute prompt will display.
For this first value, we will do this together. 🤗
For each value in Unique, X500 Object ID paste the values we saved earlier to generate the OID. In the Common Name field type in tak_callsign, if not done automatically the LDAP Display Name field will display takCallsign otherwise change it to match this value. Next, in the Description type TAK CallSign. From the dropdown select Unicode String and optionally set a Minimum and Maximum value. If your window matches the example below click Ok to create the new custom attribute.
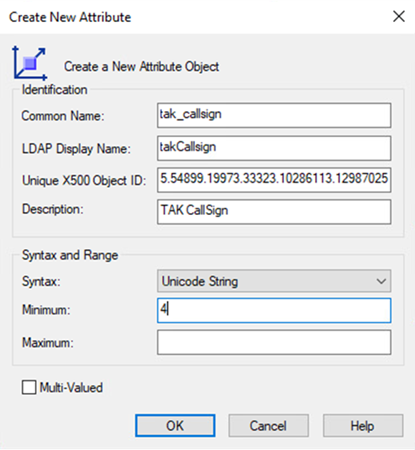
Repeat this creation step two (2) more times to create a maximum of three (3) custom attributes: takCallsign, takRole, and takColor. Below is an example output of the three (3) custom attributes.

Assigning the Custom Attribute to a Class
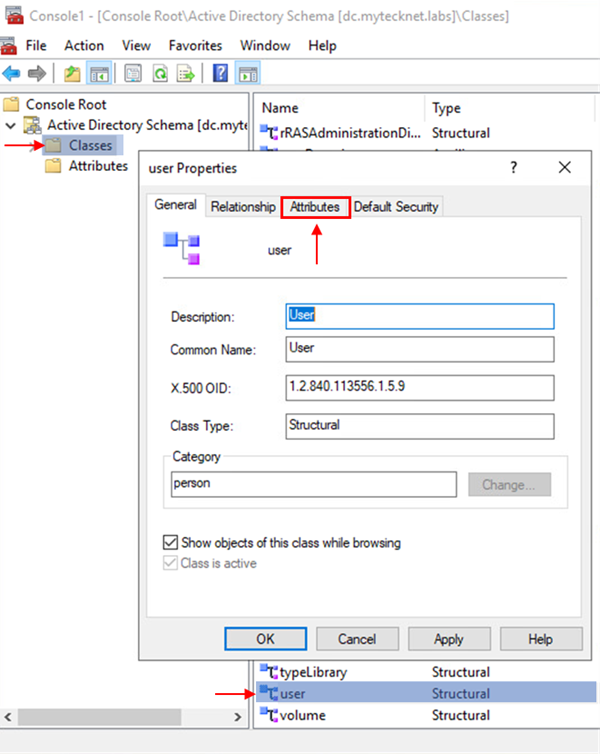
Next, we need to assign our newly created custom attributes to the user class object. To do this we need to click on the Classes container and find the object class with the name user. Once we have found the user object class we need to right-click this object and select Properties. From there click on the Attributes tab.
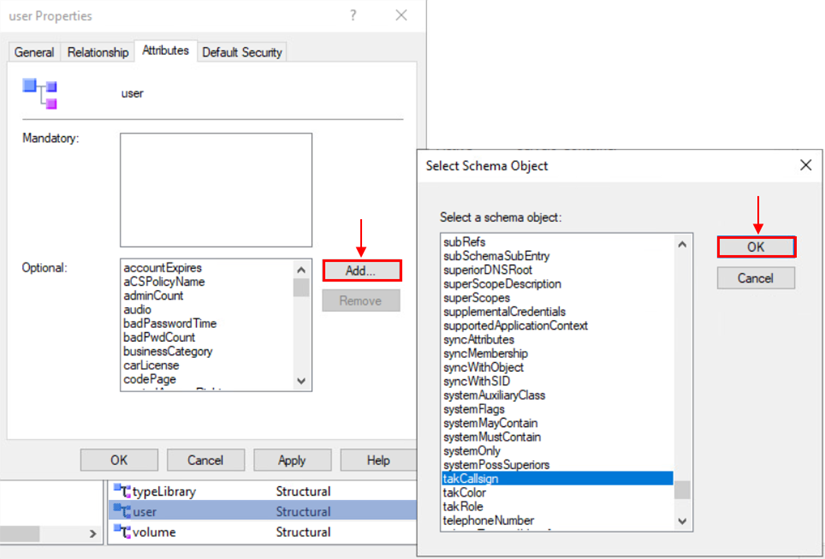
Within the Attributes tab, you will notice the Optional value block. Click on Add and from the list of Schema Objects select takCallsign. Repeat this step two (2) more times adding takRole, and takColor. Once completed click on OK to apply these values to our user object class.
Once this task is completed the AD Schema management console window is no longer needed and can be closed.
Assigning our Custom Attributes to a User
To assign our custom attributes we will use PowerShell to add and assign these new custom attributes to our users. Before we start we need to understand what values are acceptable when assigning the takRole and takColor values.
List of Acceptable Attribute Values
The following toggle boxes contain a list of currently acceptable attribute values within the TAK ecosystem. As new acceptable values are introduced this list will be updated.
List of TAK Roles
- Team Member
- Team Lead
- HQ
- Sniper
- Medic
- Forward Observer
- K9
- RTO
List of TAK Colors
- Black
- Blue
- Brown
- Cyan
- Dark Blue
- Dark Green
- Green
- Magenta
- Maroon
- Orange
- Purple
- Red
- Teal
- White
- Yellow
To assign our custom attributes open an elevated PowerShell prompt. For this task, we will use the Set-ADUser PowerShell Cmdlet with an inline array. The basic syntax for this command is Set-ADUser <sAMAccountName> -Add @{takCallsign = "CALLSIGN"; takRole = "ROLE"; takColor = "COLOR"} If you replaced takCallsign, takRole, or takColor with a different value (e.g., Callsign, Role, or Color) change these values respectively. In the below example, the command Set-ADUser ghost -Add @{takCallsign = "Ghost"; takRole = "Team Lead"; takColor = "Cyan"} will target the user object with the sAMAccountName of Ghost and apply the custom attributes of takCallsign, takRole, and takColor with the values of Ghost, "Team Lead", and Cyan. Notice that "Team Lead" is enclosed in double quotes (") this is because the value contains a space.
# Set the AD Custom Attributes
Set-ADUser <sAMAccountName> -Add @{takCallsign = "CALLSIGN"; takRole = "ROLE"; takColor = "COLOR"}
# Example
#Set-ADUser ghost -Add @{takCallsign = "Ghost"; takRole = "Team Lead"; takColor = "Cyan"}

# Verify AD Custom Attributes
Get-ADUser <sAMAccountName> -Properties sAMAccountName, takCallsign, takRole, takColor
# Example
#Get-ADUser ghost -Properties sAMAccountName, takCallsign, takRole, takColor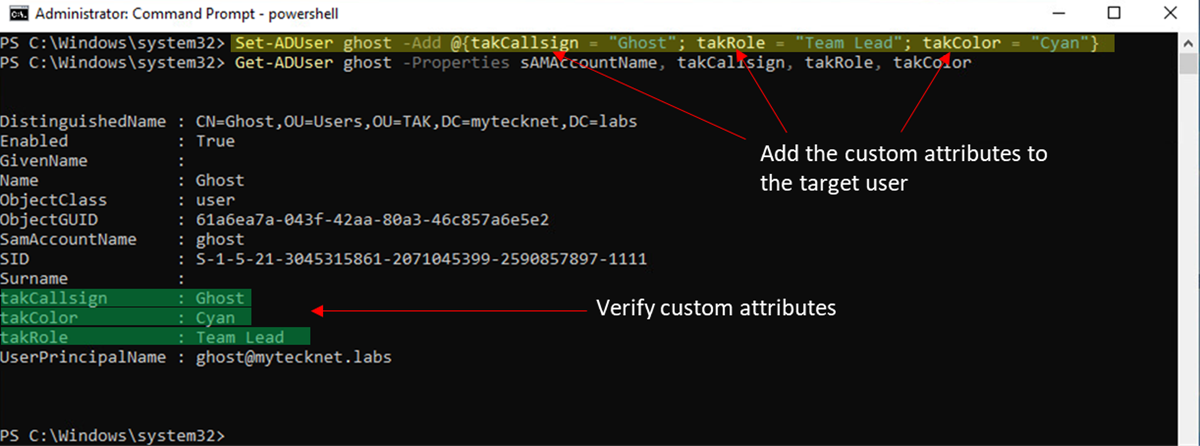
This step will need to be executed for each user if you wish to assign a custom value. To do this in bulk use the following PowerShell script. The SearchBase is referencing the distinguishedName of the OU within Active Directory. In this script, we will assign the takCallsign value to the sAMAccountName for each user. Additionally, the default Role and Color will be "Team Member" and "Cyan"
# Bulk User Custom Attribute Assignment
Get-ADUser -Filter * -SearchBase <OUDistinguishedName> | ForEach-Object {Set-ADUser $_.sAMAccountName -Add @{takCallsign = "$($_.sAMAccountName"; takRole  = "Team Member"; takColor = "Cyan"}}

# Example
#Get-ADUser -Filter * -SearchBase "OU=Users,OU=TAK,DC=mytecknet,DC=labs" | ForEach-Object {Set-ADUser $_.sAMAccountName -Add @{takCallsign = "$($_.sAMAccountName"; takRole  = "Team Member"; takColor = "Cyan"}}
Verifying our Custom Attributes with ldapsearch
The basic syntax is: ldapsearch -LLL -H ldap://FQDN:389 -b 'dc=domain,dc=com' -x -D 'domain\username' -W '(sAMAccountName=ADUser)'Items marked in bold will need to match your environment. An example query would look like this:
# Example ldapsearch string
ldapsearch -LLL -H ldap://mytecknet.labs:389 -b 'dc=mytecknet,dc=labs' -x -D 'mytecknet\tak.service' -W '(sAMAccountName=ghost)'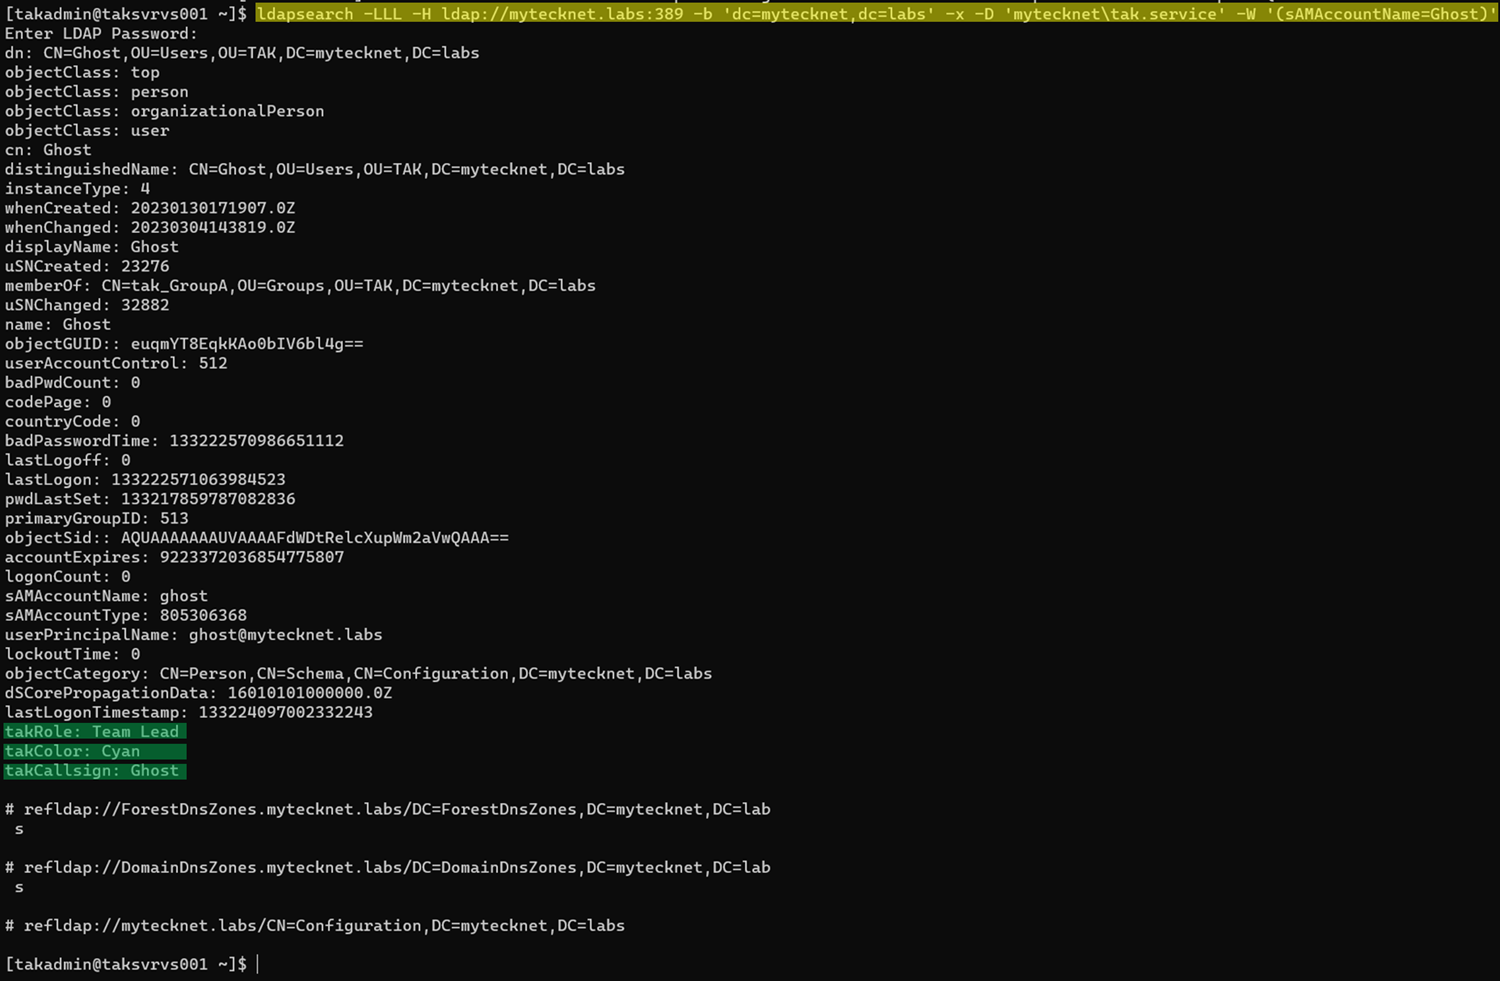
Applying Our Custom Attribute to our TAK Server
If you have been following this far it's now time to apply this to our TAK Server. To do this we will need to edit our core configuration file (CoreConfig.xml). This step assumes you have already integrated your TAK Server with an AD/LDAP authentication backend. If you have not you can find some instructions starting here.
Within our authentication element, we are going to add the following attributes callsignAttribute, colorAttribute, and roleAttribute. The example below shows a fully configured AD configuration implementing these attributes and values.
<auth default="ldap" x509groups="true" x509addAnonymous="false">
	<ldap url="ldap://mytecknet.labs/DC=mytecknet,DC=labs" userstring="mytecknet\{username}" updateinterval="60" groupprefix="CN=tak_" groupNameExtractorRegex="CN=(.*?)(?:,|$)" style="AD" serviceAccountDN="CN=TAK [ServiceACCT],OU=ServiceAccounts,DC=mytecknet,DC=labs" serviceAccountCredential="PASSWORD" groupBaseRDN="OU=Groups,OU=TAK" userBaseRDN="OU=Users,OU=TAK" callsignAttribute="takCallsign" colorAttribute="takColor" roleAttribute="takRole"/>
	<File/>
</auth>
Example configuration with callsign, color, and role attribute values applied
Once you have made the changes to the core configuration restart the takservice.
# Restart the takserver service
sudo systemctl restart takserver
Connecting our ATAK Device to our TAK Server
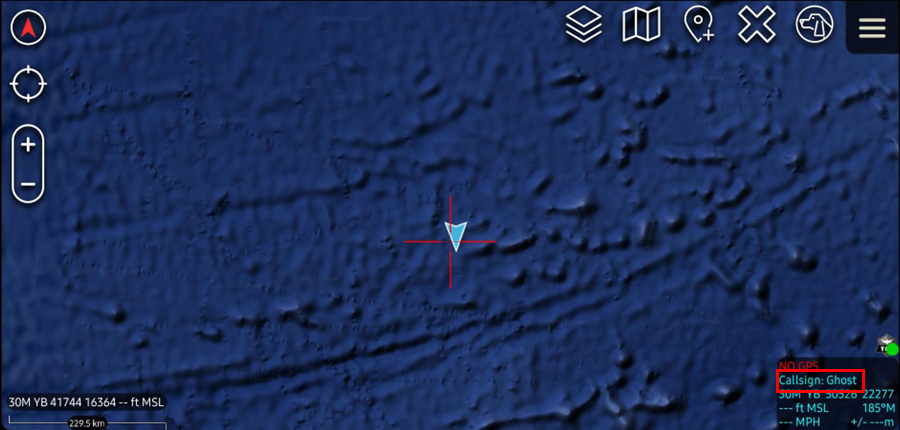
As stated earlier this configuration will only apply to ATAK devices and to new enrollments after the configuration has been applied. If you have older devices configured and connected to your TAK Server you must delete this connection and add the TAK Server connection back. Ensure that you select Use Authentication when connecting to the TAK Server via an ATAK device. If you are using AD/LDAP authentication backend but manually creating client certificates the commonName (CN) used to create the certificate must match the distinguishedName of the target user.
Using Ghost as an example: we will use the following command to create the client certificate. ./makeCert.sh client ghost and transfer the certificate to the ATAK device. Within the ATAK TAK Server Connection configuration, we will select the Use Authentication and enter our AD/LDAP credentials. Additionally, we will import our TAK Server certificate bundle (caCert.p12) and our issued client certificate (clientCert.p12) with respective certificate passwords.
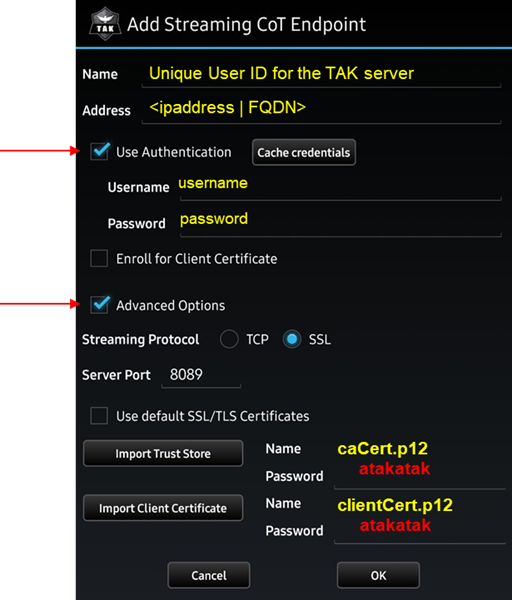
If you are using certificate auto-enrollment, select the Use Authentication and Enroll for a Client Certificate checkboxes and only import the TAK Server certificate bundle (caCert.p12). Upon successful connection to the TAK Server, the Device Profile API will assign the device the Callsign, Role, and Color as defined during the enrollment process.

Conclusion
Hopefully but the end of this guide you will have successfully created custom attributes within the AD schema or the task was completed by a delegated Schema Admin. We have configured our TAK Server to reference these custom attribute values and we have assigned these values to our AD Users. As a confirmation, we have verified the values using either PowerShell Get-ADUser or ldapsearch within the Linux command line. Finally, we have successfully connected our ATAK devices and pulled our custom attributes as expected.
