Managing users and groups in TAK

Change Log
17Mar2023 - Corrected the groupBaseRDN values by removing the fully distinguishedName values and retaining the "OU=XXX,OU=XXX"
10OCt2023 - Added LDAPS CoreConfig.xml example under Configuring AD/LDAP in the CoreConfig
In a previous post let's build a TAK Server - RPM Edition we covered the very basics of building and managing a TAK Server client or user. However, by default users are placed in an anonymous group identified by __ANON__ (double underscore) ANON (double underscore).
What does this mean for me?
Since all users are in the same group, we can easily share information amongst all connected users. Although this may be ideal there may be situations that require users to participate in separate groups.
When managing users, we have one of three ways to move forward. The first we covered in our let's build a TAK Server which is creating users using what is managed by a flat file XML. The second method is using a certificate auto-enrollment feature that leverages this same flat file XML. The last method is to integrate the TAK Server in either an Active Directory (AD) domain or Lightweight Directory Access Protocol (LDAP).
Intro to Groups
So, you want to implement security?
Before moving to create groups, we need to understand how TAK manages groups.
Trust me, it confused me the first time, but I have pictures to help.
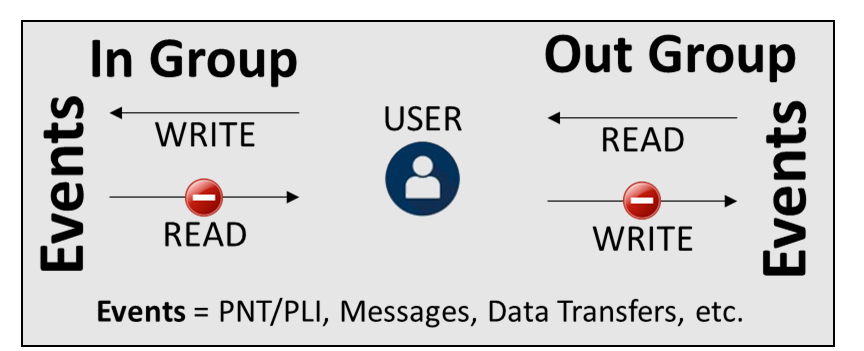
Within groups, we have three roles: in, out, or both. If a user is placed in the In Group, that user's events are transmitted to the group that they are placed in. Per the definition, this sets a user permission to let the user write (but not necessarily read) messages to the specified group. Additionally, the opposite is said if the user is in the Out Group. That user can receive transmitted events from the group they are placed in. This sets a user permission to let the user read (but not necessarily write) messages from the specified group.
In Group Example
Let's use the below image as an example. I have two users Shadow and Ghost who are in Groups A (Shadow) and B (Ghost) for simplicity. However, I want to allow clients within Group A (Shadow) to write to users in the B group (Ghost), but the B group does write or transmit the users in the A group.
See how I said this could be confusing 😵
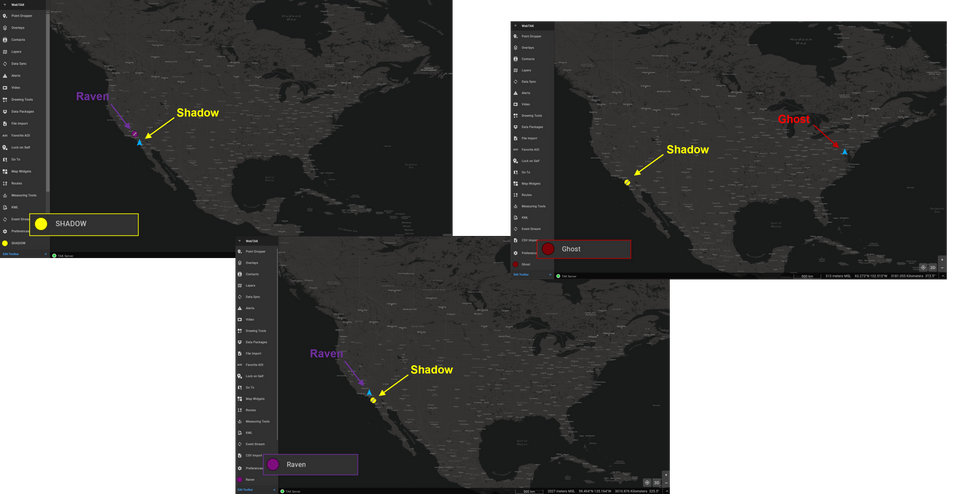
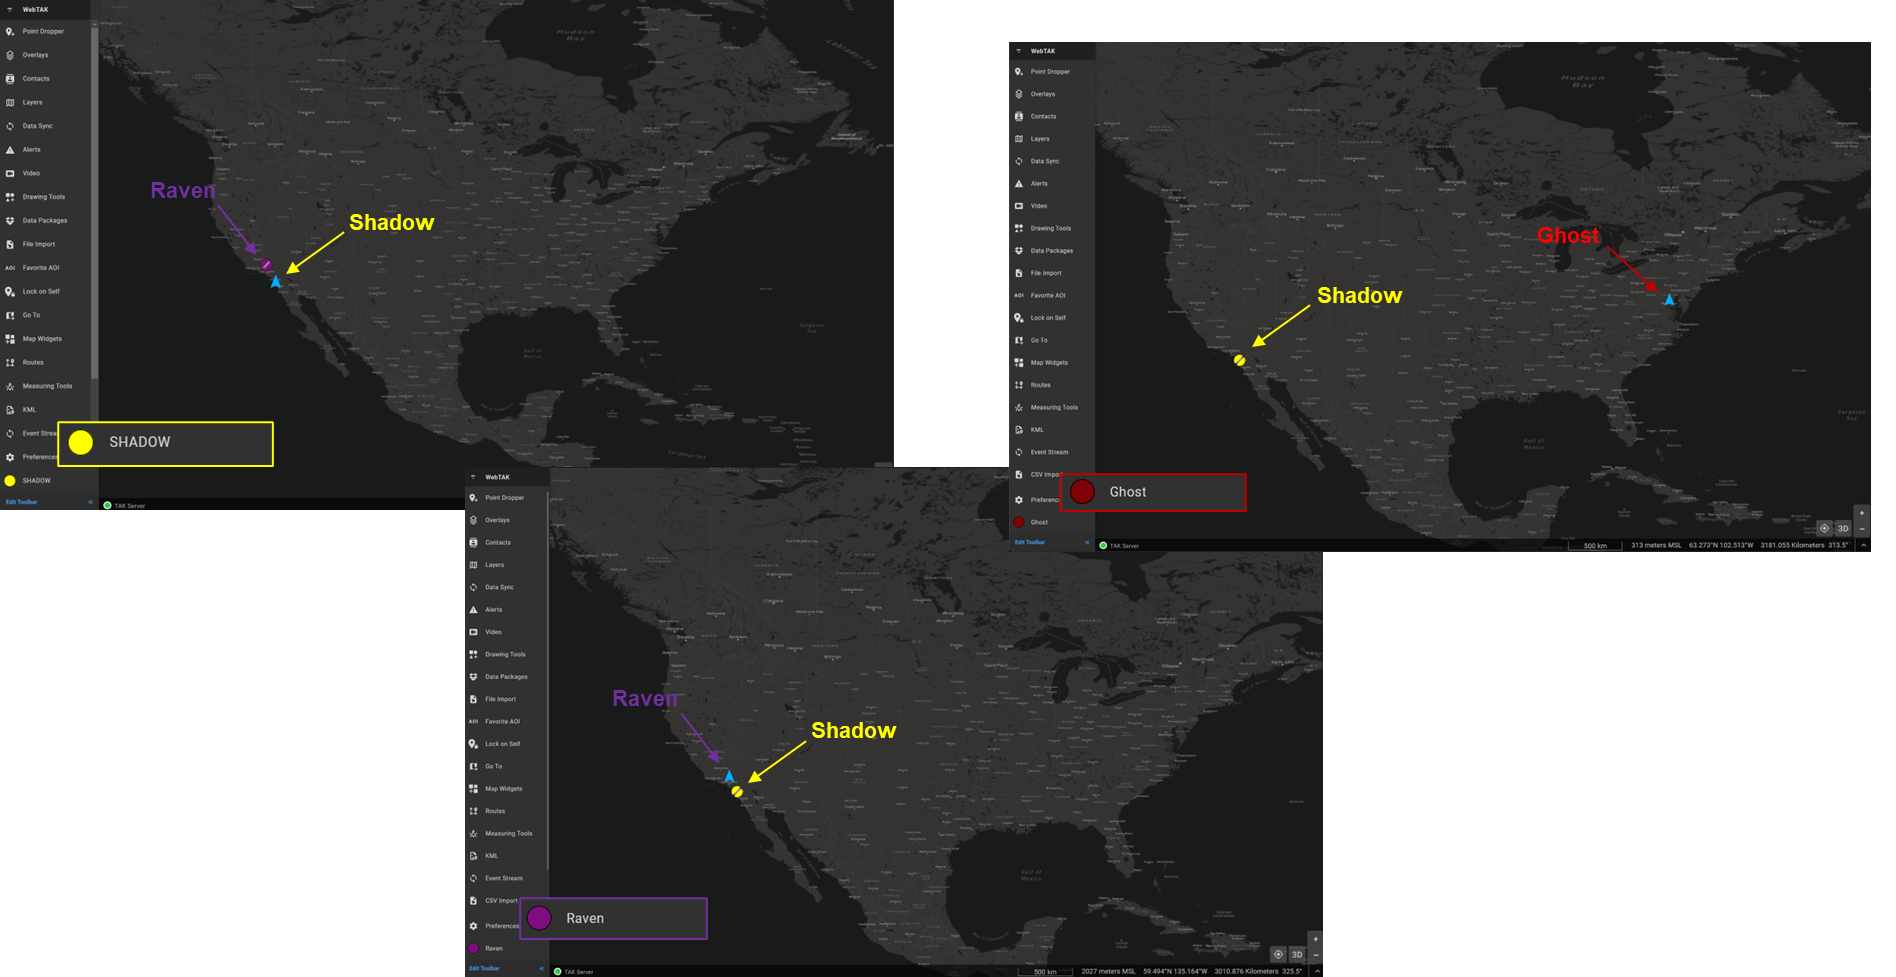
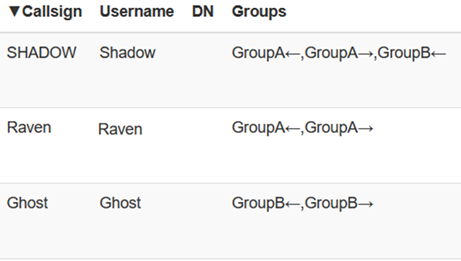
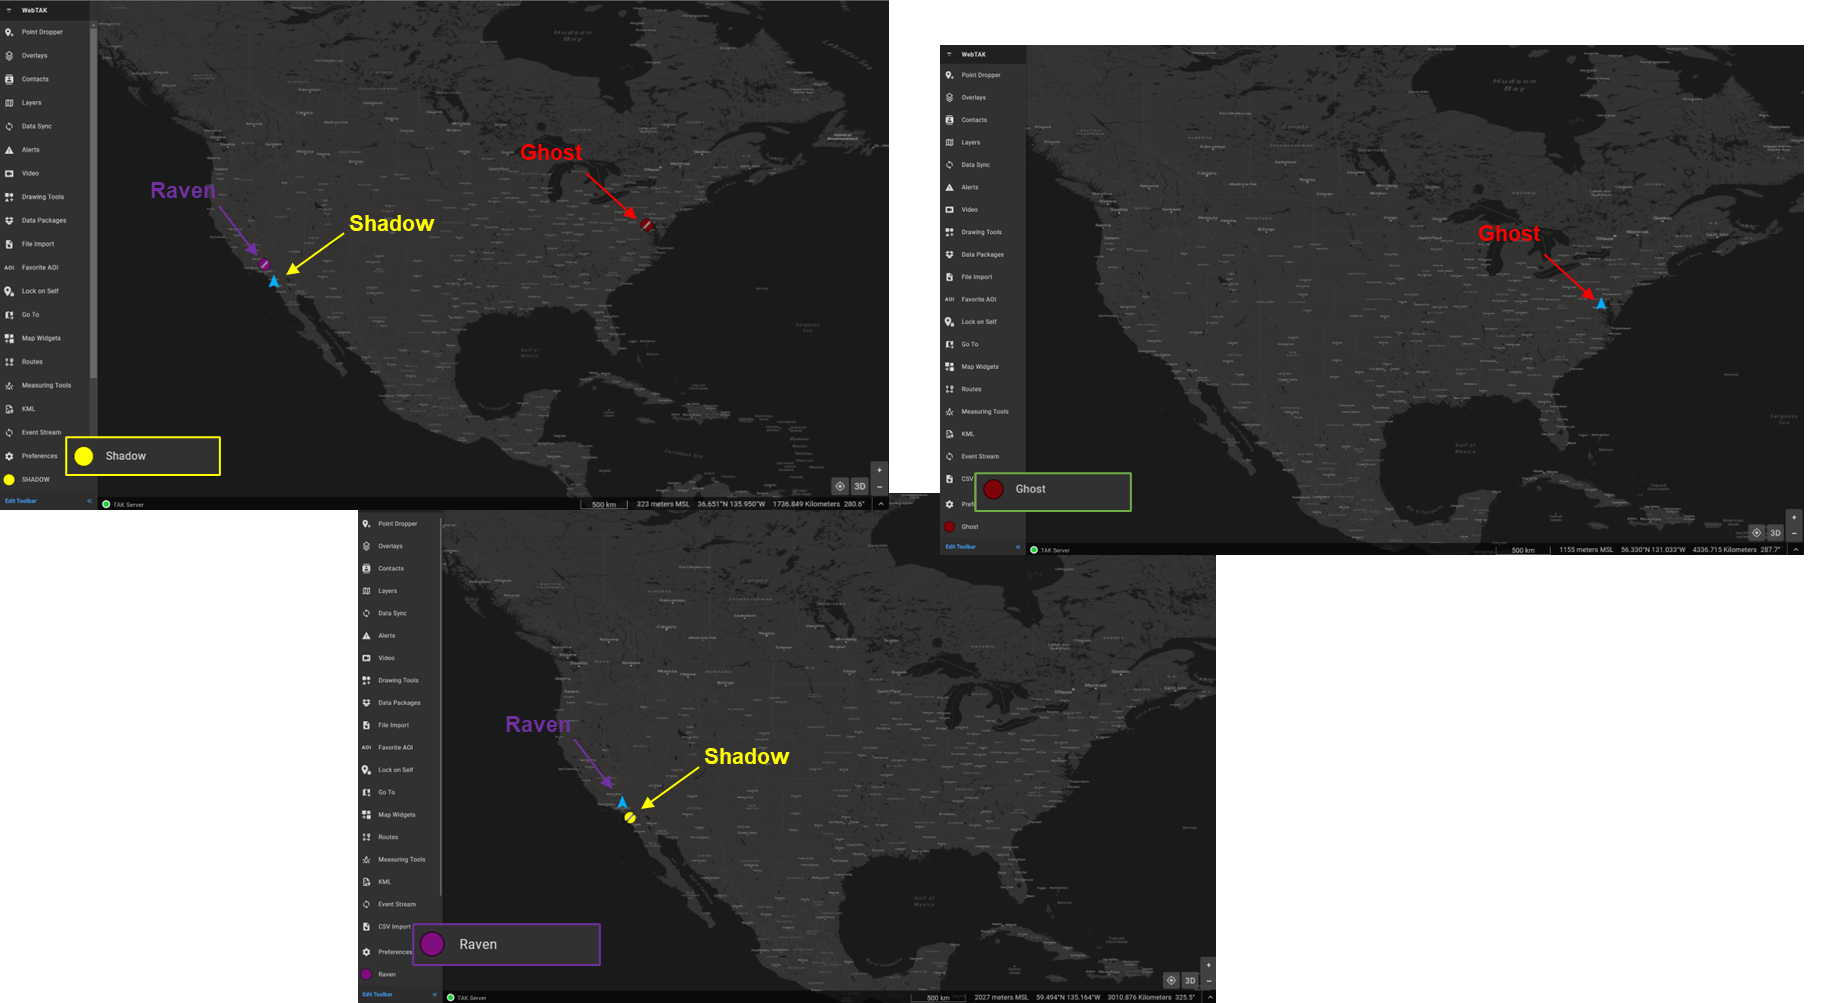
To do this I will place Shadow in the In Group of Group B. This way Shadow continues to participate in Group A but can write information with Group B. Below is the output displayed from both users' perspectives.
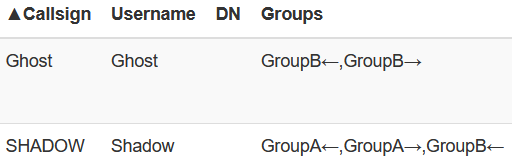
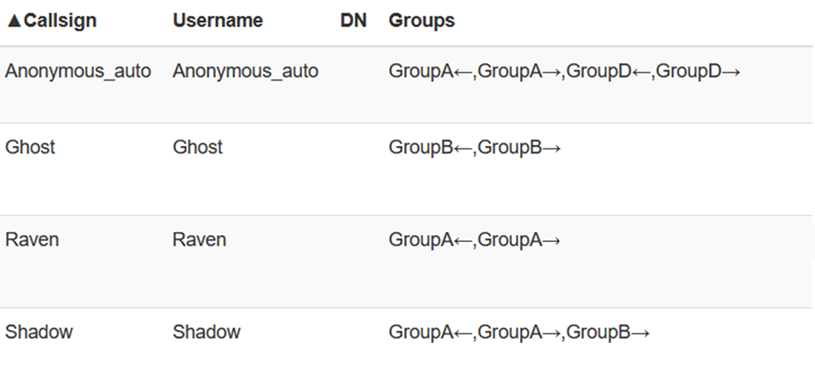
This is what the Client Monitoring page would look like to the administrator (webadmin). For the administrator pay attention to the arrow direction. A left-facing arrow (←) identifies the In Group direction. Below we can see that the user Shadow is participating In Group Group B as well Group A. This means that Shadow can write/transmit events to Group B.
Let me add another user called Raven who is in Group A to demonstrate this even further. We can see that the users Shadow and Raven who are in Group A can still write information amongst themselves. Additionally, we can see that Shadow is able to write information with Ghost only from Group A. This makes Shadow unique in that they are participating in a special way with Group A and B. However, since Shadow is only participating in Group B that means anyone in Group B cannot write information with Group A as seen from Shadow's perspective.
Out Group Example
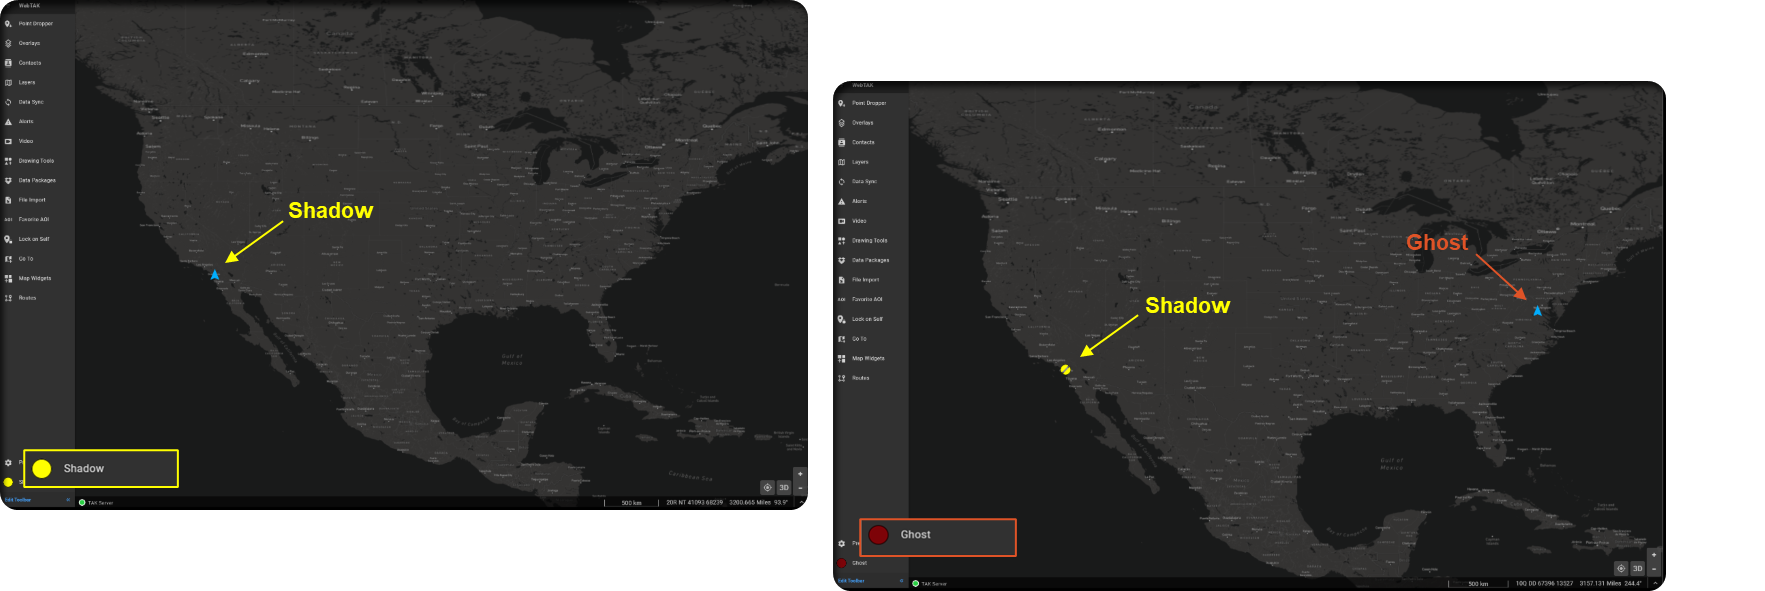
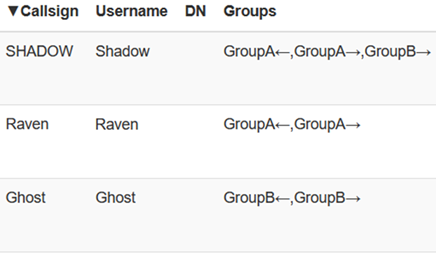
Hopefully, you're still following as we are now going to flip the board. This time we are going to place Shadow in the Out Group for Group B. This means that Shadow can read or receive events from Group B but cannot write or send events. Additionally, Raven can still only see who is in Group A only. This is because Raven only participates in one Group as they did previously.
From the Client Monitoring page, you will notice our arrow direction has changed. It is now a right-facing arrow (→) which identifies the Out Group direction. This means that Shadow who is in the Out Group is reading/receiving events but cannot write them to Group B.
Both Example
If you have followed both examples, then Both should be pretty self-explanatory. When a user is placed in the Both Group that means they are able to read and write information to that identified group. This simply means you get bi-directional information. Most commonly you will be using this but, in the event, you want to limit a user's access to a group you would place them in the In or Out Group respectively.
In/Out Group Matrix
The below figure depicts the way events are either written or read in relation to the user's placement in a group. The way this reads: If the user is in the Out Group they are able to read but not write to the target group. If the user is in the In Group they are able to write but not read from the target group.
Implementing Groups
Using the UserManager tool
Now that we have an understanding of groups within TAK let's actually implement it. I will be demonstrating two ways of implementing groups. Using the UserManager.jar which we used briefly in our let's build a TAK server guide and then using the web administrative dashboard. Assuming you followed all the instructions in the let's build a TAK server we are going to start where we left off. We are first going to create a new client certificate and then second, we will add this user to a group.
# Change to the TAK user
sudo su tak

# Navigate to /opt/tak/certs directory
cd /opt/tak/certs

# Create the client certificate
./makeCert.sh client Denji
Creating the client certificate
Next, we are going to demonstrate how to add a user to a group using the UserManager.jar command. The syntax for adding a user to a group is:
Both Group
UserManager.jar certmod -g <groupname> /opt/tak/certs/files/<commonname>.pem
In Group
UserManager.jar certmod -ig <groupname> /opt/tak/certs/files/<commonname>.pem
Out Group
UserManager.jar certmod -og <groupname> /opt/tak/certs/files/<commonname>.pem
# While still logged in as the TAK user
java -jar /opt/tak/utils/UserManager.jar certmod -g GroupA /opt/tak/certs/files/Denji.pem

# If you accidently exited from the TAK user execute the same command
# This is because you added the user to the tak group previously ref usermod -aG tak command
java -jar /opt/tak/utils/UserManager.jar certmod -g GroupA /opt/tak/certs/files/Denji.pem
Adding a member to a group using UserManager.jar
If you wish to add the user to the In or Out Group, it will look like this:
# Adding the user to the In Group
java -jar /opt/tak/utils/UserManager.jar certmod -ig GroupA /opt/tak/certs/files/Denji.pem

# Adding the user to the Out Group
java -jar /opt/tak/utils/UserManager.jar certmod -og GroupA /opt/tak/certs/files/Denji.pem

# Challange
# Adding a user to multiple groups
java -jar /opt/tak/utils/UserManager.jar certmod -g GroupA -ig GroupB -oG GroupC /opt/tak/certs/files/Denji.pem
Modifying a group membership using UserManager.jar
Once you're done adding the user to a group you will need to copy over the user certificate p12 file for use. Reference the sub-tasks of connecting TAK clients covered in let's build a TAK Server. Additionally, you can actively move users from groups if you have already issued the certificate for use. You do not need to re-create a new cert every time you move, add, or change a user group membership.
What if I need to remove a user from a group?
Unfortunately, using the UserManager.jar for this task is not as easy as our next section using the web administrative dashboard. To remove a user from a group using the UserManager.jar you need to know what groups that user is in first. For this, we will use the UserAuthentication.xml file. This is that flat file XML that is used for authentication. Contained within the flat file XML are the certificate fingerprints and associated groups. This file is located within the /opt/tak/ directory.
An example of the contents looks like this; unique values have been eliminated from this but have been identified/commented on using < >:
<?xml version="1.0" encoding="UTF-8" standalone="yes"?>
<UserAuthenticationFile xmlns="http://bbn.com/marti/xml/bindings">
	<User identifier="Shadow" fingerprint="<fingerpring>" password="<hashedPassword>" passwordHashed="true">
        <groupList>GroupA</groupList>
        <groupListOUT>GroupB</groupListOUT>
	</User>
</UserAuthenticationFile>
UserAuthentication.xml
What you're looking for within this file is groupList, groupListOUT, or groupListIN which correspond to the In, Out, and Both Group memberships. If we edit this file directly, we must restart the takserver service to apply.
In the XML we see that the user Shadow is in GroupA (Both) and then in the Out Group for GroupB. If we wanted to remove Shadow from GroupB we would execute the following command:
# Removing Shadow from GroupB but retain GroupA
java -jar /opt/tak/utils/UserManager.jar certmod -g GroupA /opt/tak/certs/files/Denji.pem

# Removing Shadow from GroupA but retain Out Group in GroupB
java -jar /opt/tak/utils/UserManager.jar certmod -og GroupB /opt/tak/certs/files/Denji.pem
Removing Shadow from GroupB
Managing Users and Groups via the Web
If you thought using UserManager was hard this is easy. Quite literally. For this process, we will use the Mozilla Firefox web browser and access our web administrative dashboard by navigating to:
https://<takserverip>:8443/
When prompted, select our webadmin certificate if prompted.
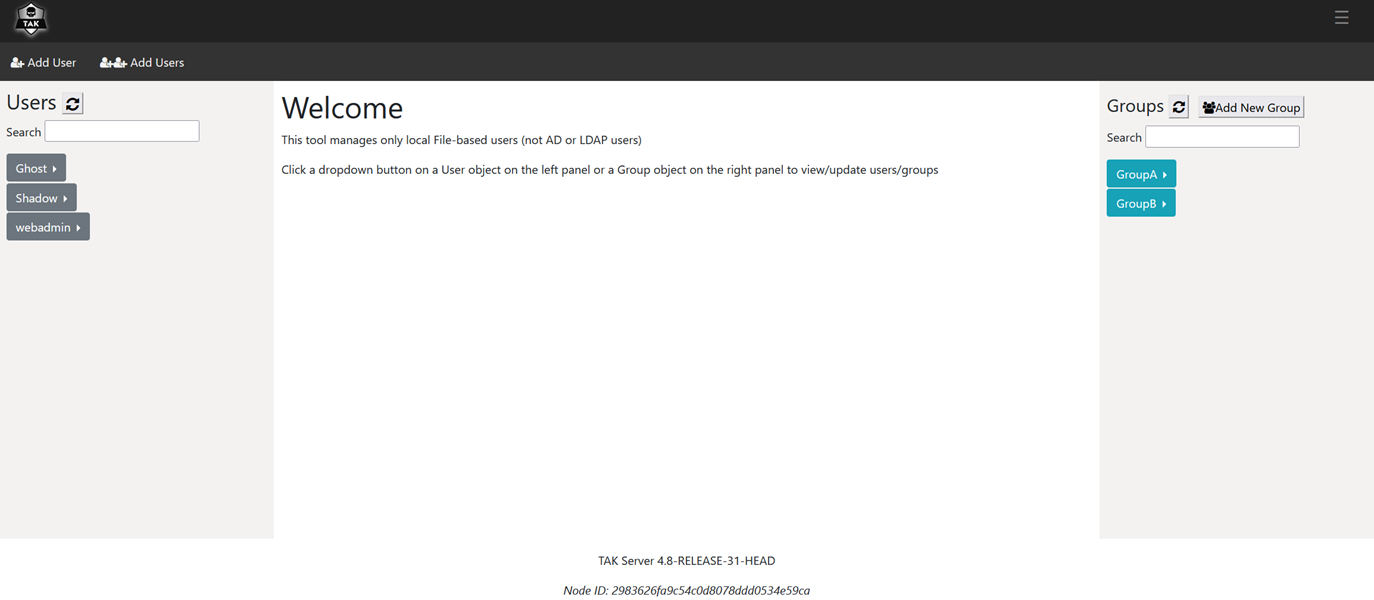
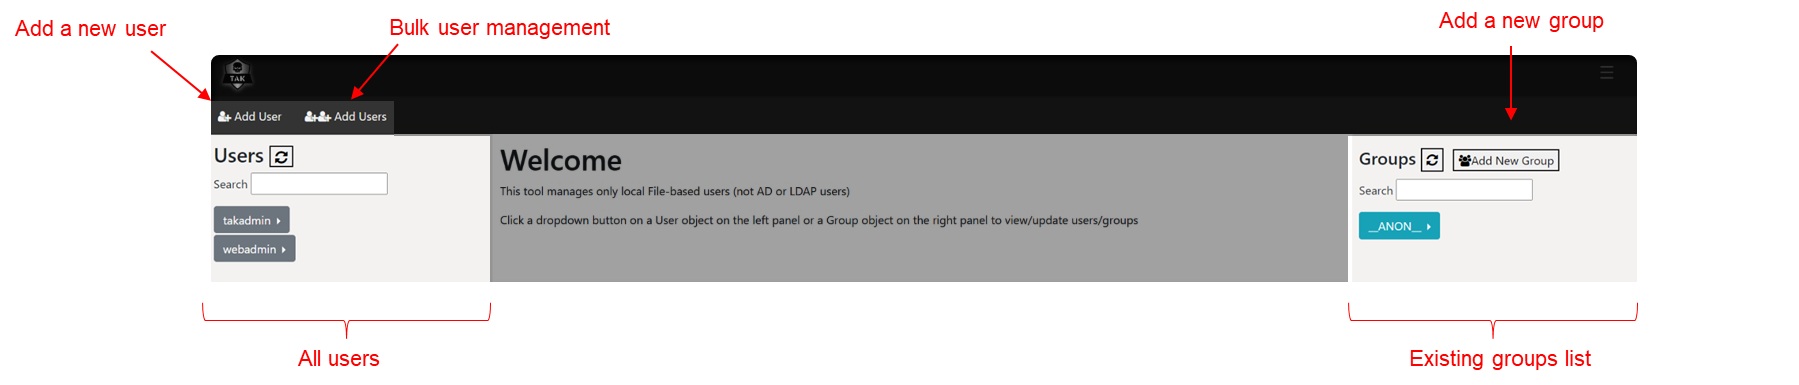
When you first access the web administrative dashboard it will show you the TAK Server metrics dashboard. To manage our users and groups we need to open the menu identified by the hamburger menu (≡) at the top right and select Administrative >>Manage Users. Once the page loads you will be presented with three columns. The leftmost column is where our users will be and the rightmost column will list our groups. From here we have multiple options and tools at our disposal. We can add a new user or from bulk and then we can add new groups.
Management using this interface is drag and drop. You start by selecting a user from the user column and then dragging the group into the respective group membership or creating a new group and dragging that object into the target group. Here is an example of Shadow's group membership used earlier.

Once you have made the respective changes click on Update to apply them immediately. You may additionally want to delete a user or group. To delete a user, click on the target user and select Delete User.
Using Input-based Grouping
Input-based groups use an open port on the TAK Server to place common TAK clients into a group using multiple inbound connections. In our setup, we are using TCP port 8089 as our inbound port for TAK clients using a secure connection (SSL/TLS). This means all connected clients utilize port 8089 to connect to our TAK Server and we can manage them into groups using the methods above. If we wanted to create groups based on connections we could create a new inbound port based on an open port to assign groups to clients. The clients would still share the same authentication method with the TAK Server however, based on the input port would be placed in statically configured groups.
There are various ways to deploy and use this method; however, I will cover how to configure this using both the web administrative dashboard and editing the CoreConfig file.
Determining Open Ports
Before we attempt to configure our input we need to determine what ports are open on our TAK Server. Once a port has been identified and configured additional configuration considerations such as enabling additional port forwarding or opening ports in our external firewall should be conducted. To determine which ports are in use we will use one of the following commands to view listening ports. These are ports that are active on our TAK Server and seeking connections and we cannot use these. From the output ensure that the port you have in mind is not in use.
# View active listening ports
# Based on your distro some commands will not be available
sudo lsof -i -P -n | grep LISTEN
sudo netstat -tulpn | grep LISTEN
sudo ss -tulpn | grep LISTEN
List of commands to view LISTENING ports
Modifying our host firewall
Once we have identified a target port for our new input we need to modify our host firewall to allow this connection in. Similar to how we modified our firewall during our setup we will execute the same commands.
# Add the port to our firewall, for example 8087/tcp
sudo firewall-cmd --zone=public --add-port 8087/tcp --permanent

# Reload the firewall to accept our changes
sudo firewall-cmd --reload

# Verify our change
sudo firewall-cmd --list-all
Modifying the host firewall using firewall-cmd
Adding Inputs via the web administrative dashboard
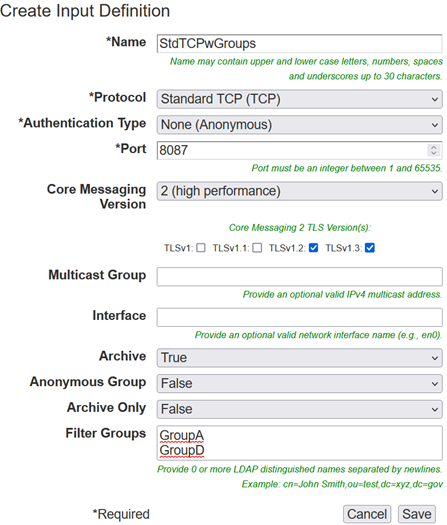
To add inputs using the web administrative dashboard navigate to the hamburger menu (≡) at the top right and select Configuration >> Input and Data Feeds. From there you will select Add Input (Server Port) to configure our input port. All items identified by the asterisk (*) are required. Give your input a unique name followed by selecting Standard TCP and None (Anonymous) as our Protocol and Authentication Type. At the bottom, we are going to identify the groups that will apply to this input. This can be new groups or existing groups from other ports. Click on Save to apply our settings immediately.
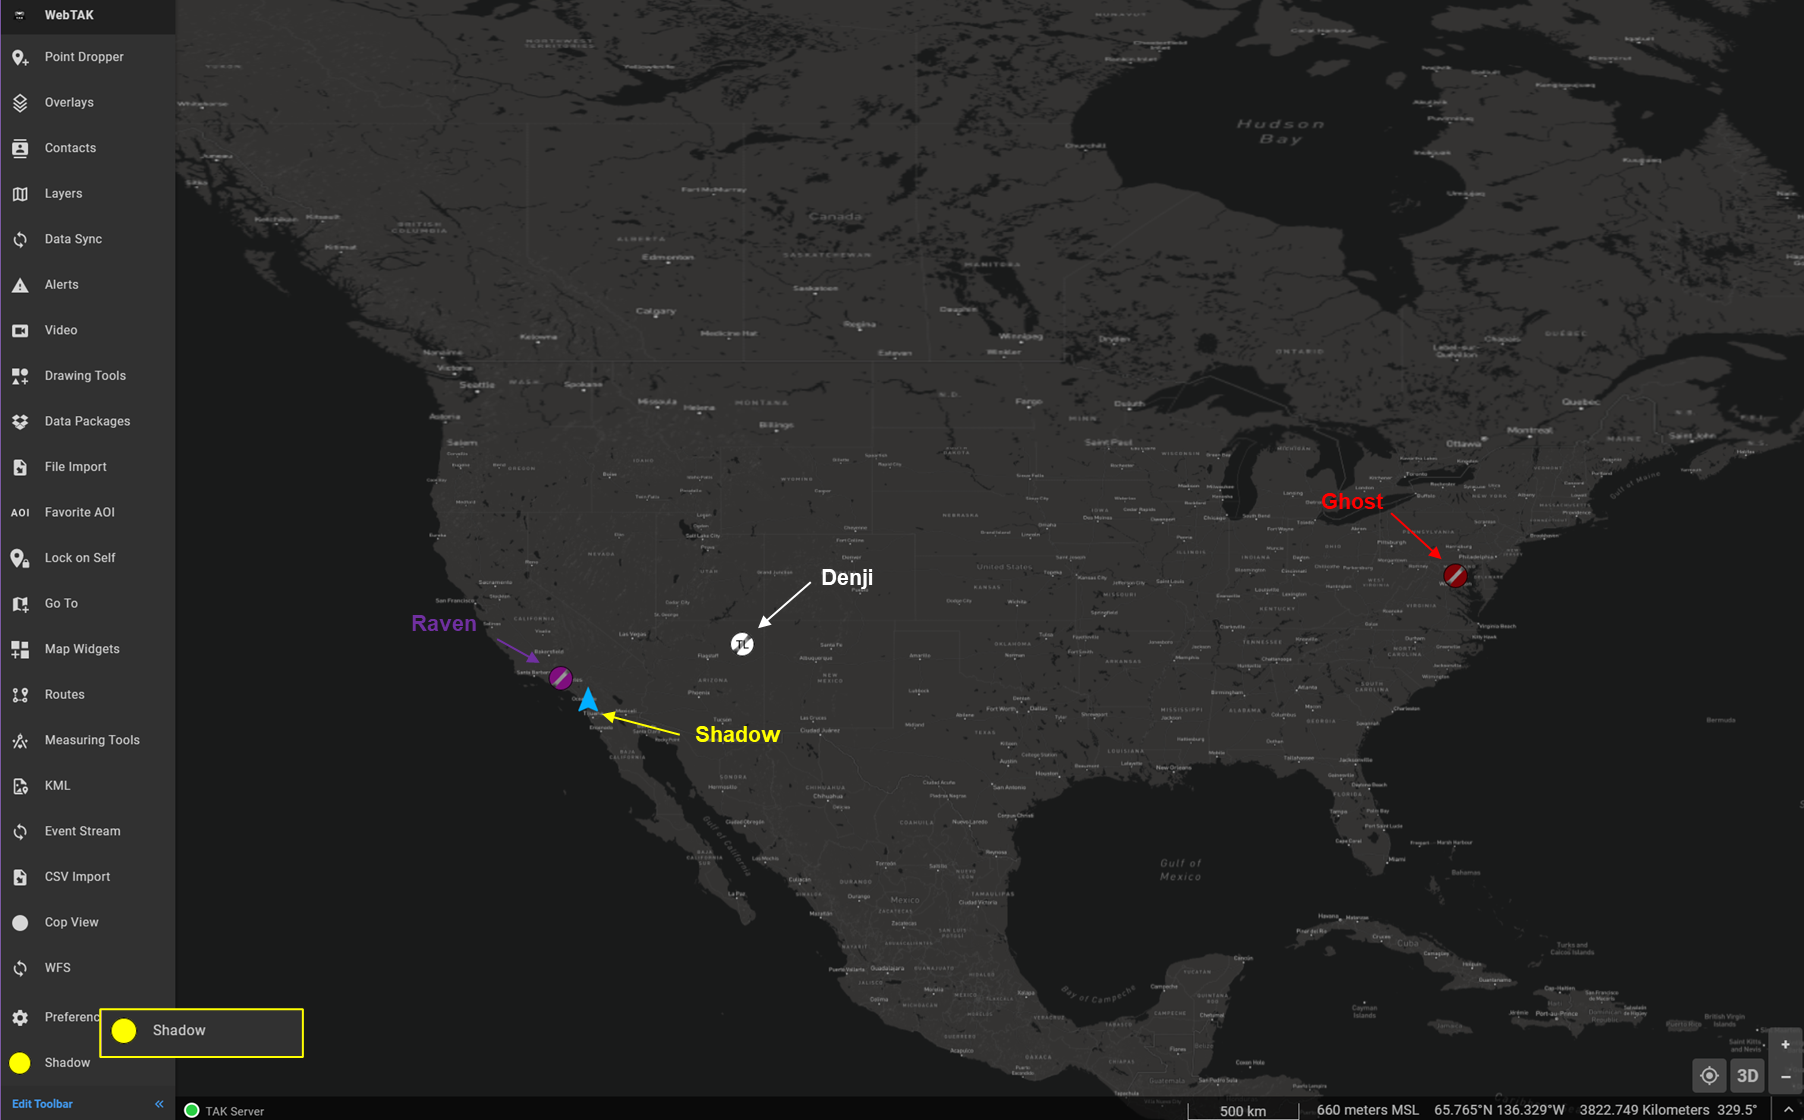
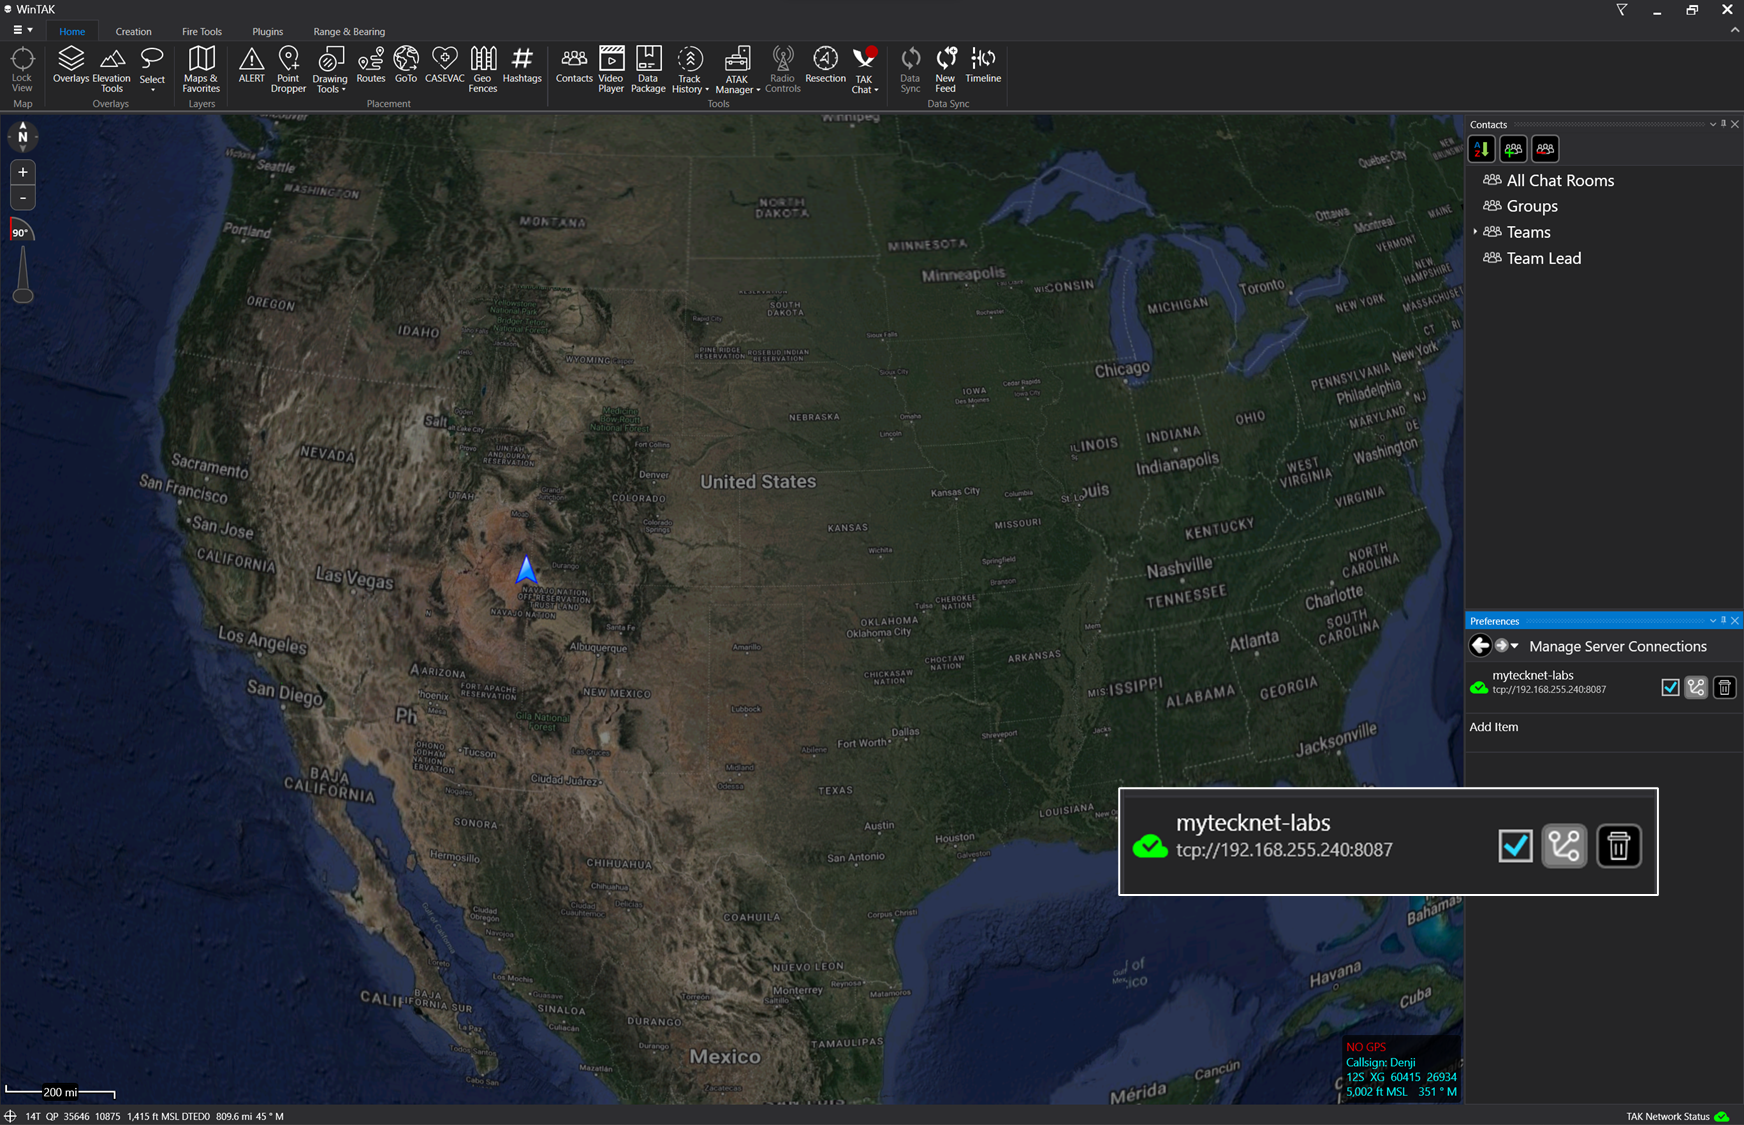
The screenshot below is a point of view from Shadow with Ghost and Raven as before but the group Anonymous which is applied to any clients that connect to TCP/8087. In this example, Denji is connected using WinTAK over TCP and port 8087 is able to participate in GroupA with Shadow and Raven.
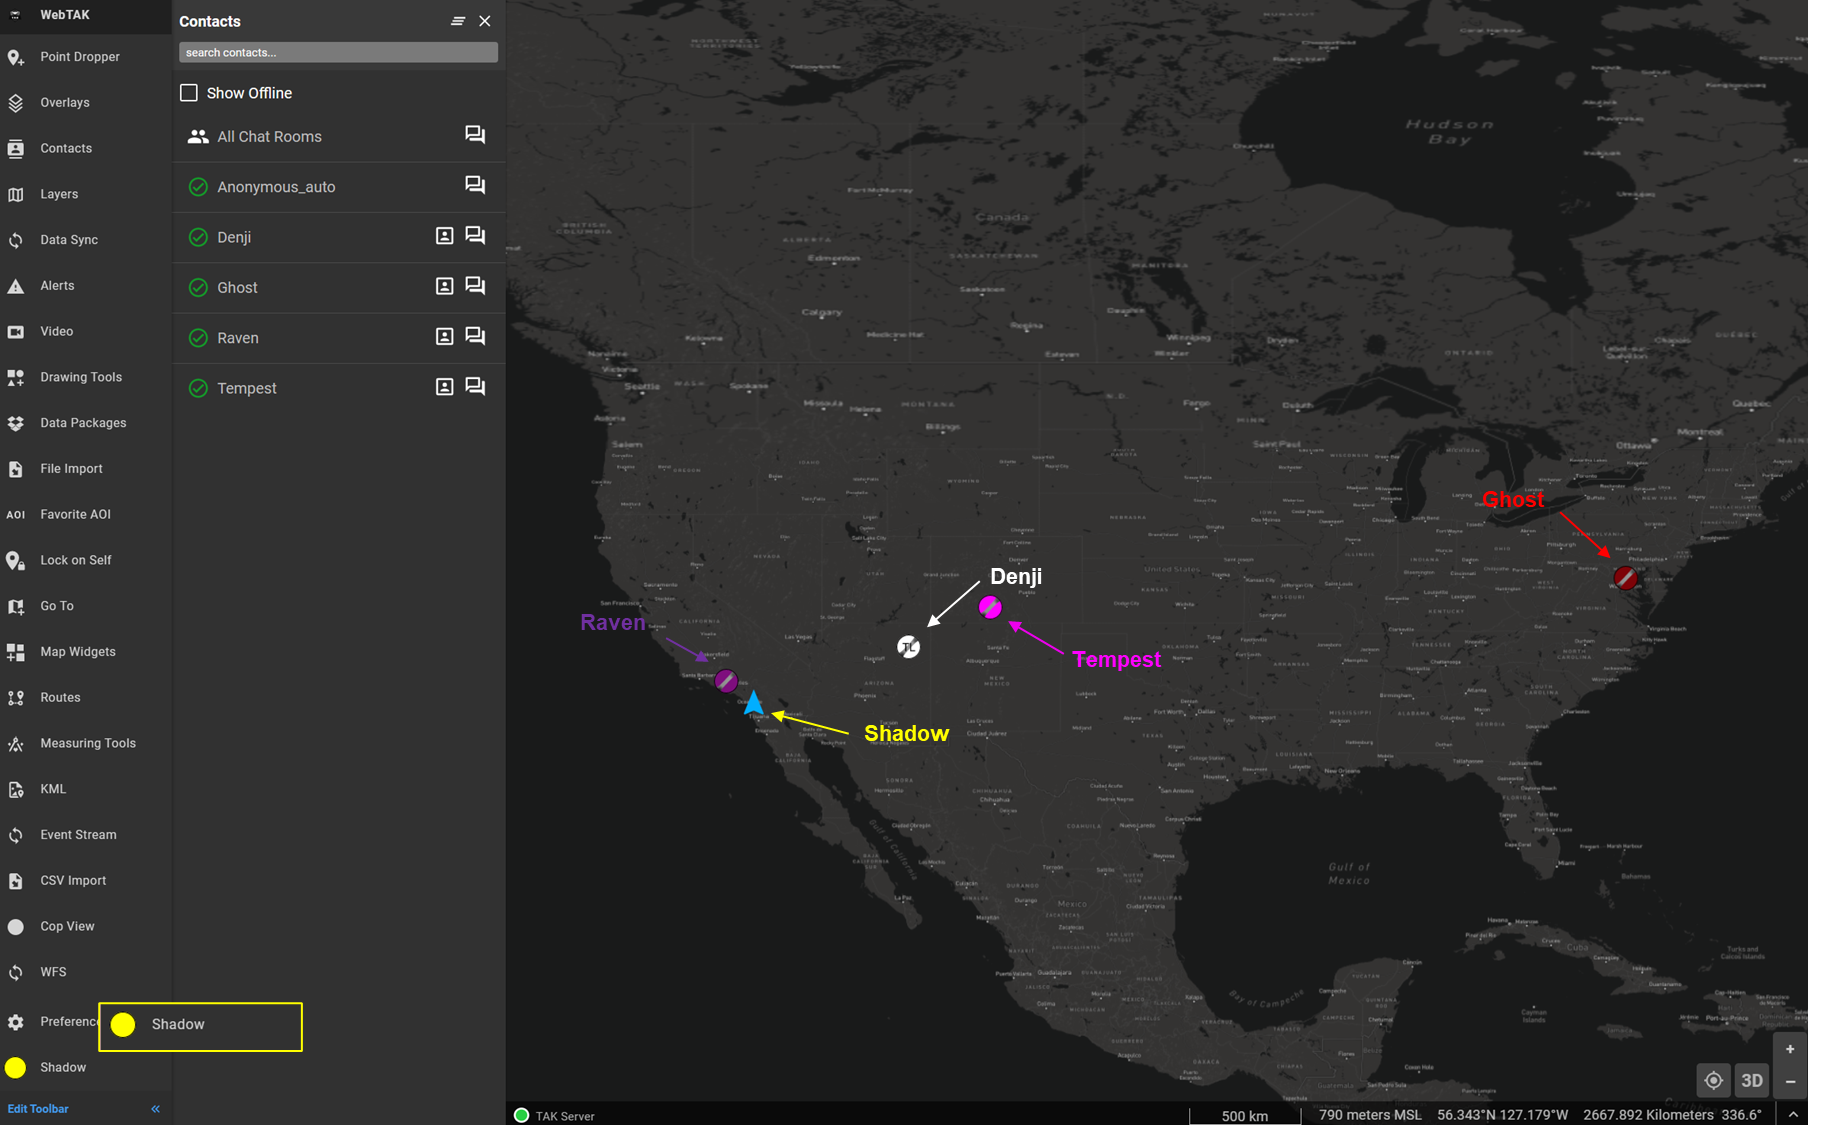
Here is another example of a WinTAK client (Denji) and an ATAK client (Tempest) who are connected on TCP/8087, again using Shadow's perspective.
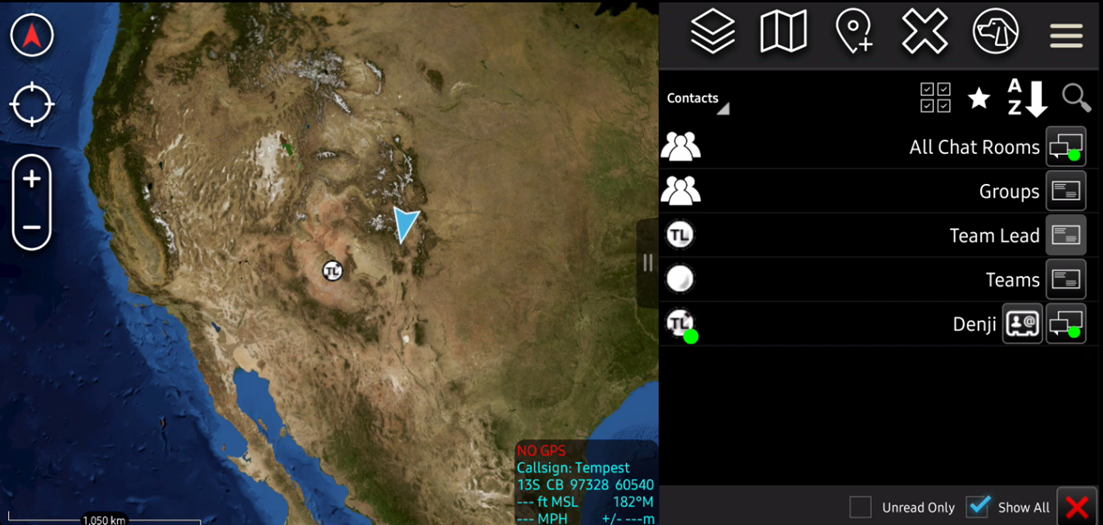
The screenshot below is from Tempest who is on ATAK and is able to only see Denji because they are connected to the same port.
The reasoning behind this is that we are using TCP Anonymous and not SSL to authenticate clients. TCP and Anonymous allow clients to connect without authentication which is very insecure. If we were to change TCP to SSL using this same setup we will be able to see Shadow and Raven from either Denji or Tempest.
TCP vs SSL/TLS Inputs
To demonstrate this, I have the following configuration setup:
• Port: 8087 // Protocol: Standard TCP // Authentication: Anonymous
• Port: 8088 // Protocol: Secure Streaming TCP (TLS) // Authentication: X509
• Port: 8089 // Protocol: Secure Streaming TCP (TLS) // Authentication: X509
Raven, Shadow, and Ghost are connected using TCP/SSL
Denji (WinTAK) is connected using TCP:8087
Tempest (ATAK) is connected using TCP/SSL:8088

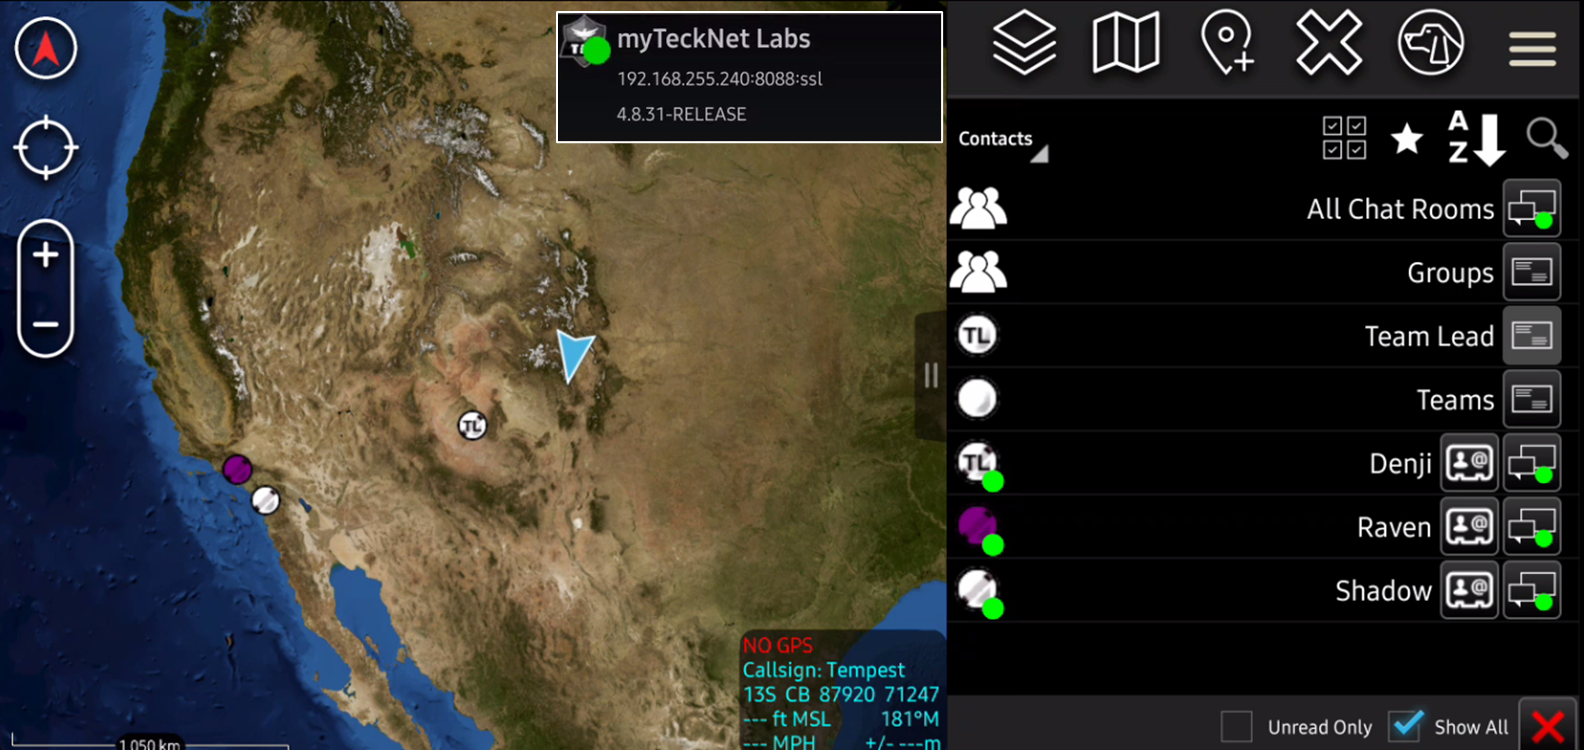
Regardless of the type of client, the connection is based on the authentication method. TCP with anonymous has no authentication method, as such authenticated clients are unable to pass events to these unauthenticated clients. However, unauthenticated clients are able to pass events to authenticated clients which is why Shadow, Raven, and Tempest are able to see Denji who is unauthenticated. Denji is able to send events to authenticated clients but is unable to receive them.
Adding Inputs editing the Core Configuration file
If we are to make the same change as above to the Core Configuration file directly we would add the following lines to either our CoreConfig.xml or CoreConfig.example.xml.
<input auth="anonymous" _name="StdTCPwGroups" protocol="tcp" port="8087" archive="true" anongroup="false" archieveOnly="false" coreVersion="2">
<filtergroup>GroupA</filtergroup>
<filtergroup>GroupD</filtergroup>
</input>
This will be placed in our network section between <network> and </network> within our configuration file.
<input auth="anonymous" _name="StdTCPwGroups" protocol="tcp" port="8087" archive="true" anongroup="false" archiveOnly="false" coreVersion="2" coreVersion2TlsVersions="TLSv1.2,TLSv1.3">
	<filtergroup>GroupA</filtergroup>
	<filtergroup>GroupD</filtergroup>
</input>
Example TCP input with no authentication
If you wish to implement SSL/TLS with authentication you will change the auth value to x509 and the protocol to tls. Below is the configuration used in the above example demonstrated earlier.
<input auth="x509" _name="StdSSLwGroups" protocol="tls" port="8088" archive="true" anongroup="false" archiveOnly="false" coreVersion="2" coreVersion2TlsVersions="TLSv1.2,TLSv1.3">
	<filtergroup>GroupA</filtergroup>
</input>
Example TLS input with authentication
Our network section would look like this:
<network multicastTTL="5" serverId="2983626fa9c54c0d8078ddd0534e59ca" version="4.8-RELEASE-31-HEAD">
	<input _name="stdssl" protocol="tls" port="8089"/>
	<input auth="anonymous" _name="StdTCPwGroups" protocol="tcp" port="8087" archive="true" anongroup="false" archiveOnly="false" coreVersion="2" coreVersion2TlsVersions="TLSv1.2,TLSv1.3">
		<filtergroup>GroupA</filtergroup>
		<filtergroup>GroupD</filtergroup>
	</input>
	<input auth="x509" _name="StdSSLwGroups" protocol="tls" port="8088" archive="true" anongroup="false" archiveOnly="false" coreVersion="2" coreVersion2TlsVersions="TLSv1.2,TLSv1.3">
		<filtergroup>GroupA</filtergroup>
	</input>
	<connector port="8443" _name="https"/>
	<connector port="8446" clientAuth="false" _name="cert_https"/>
	<announce/>
</network>
Certificate auto-enrollment
Generating client certificates automatically
For this method, we need to enable certificate auto-enrollment via the web administrative dashboard. The process allows us to use the Manage Users page to create and manage the initial user creation. After we have created the user and placed them in the appropriate group all we need to provide the end user is the trusted Certificate Authority file (caCert.p12) and the credentials we just created.
For those who hated the command line, this tool is for you. 😁
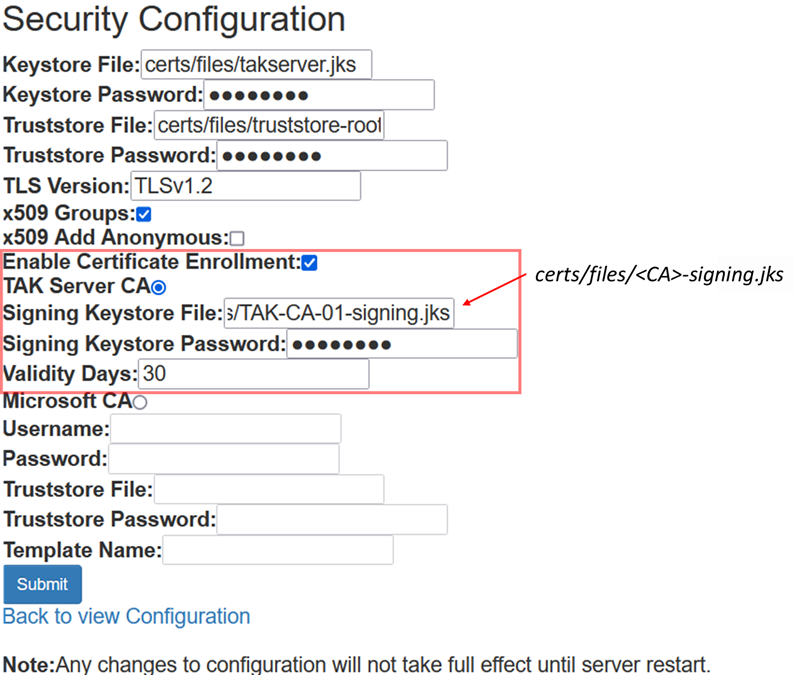
To enable certificate auto-enrollment we will select our menu using the hamburger menu (≡) and select Configuration >> Security and Authentication. Click on Edit Security >> and check the Enable Certificate Enrollment. This will present you with new options and values. For this particular setup since our TAK Server is already issuing our certificates, we will select TAK Server CA.
For Signing Keystore File this is going to be our issuing CA java Keystore file (jks). Following our let's build a TAK Server our Signing Keystore File is going to be TAK-CA-01-signing.jks. If you used something different the name format will be <nameofCA>-signing.jks.
Next, enter the Signing Keystore Password which by default is atakatak. If you changed the password, you would enter that new password here. For Validity Days enter the days you wish auto-enrolled certificates will be valid. After the validity days, the user will be presented to enter their username and password again to get re-issued a certificate. If you entered everything correctly it should look like this before you click submit.
After clicking submit we need to restart our takserver service.
# Restart the takserver service
# Enter the root or super password when prompted
sudo systemctl restart takserver
Enabling certificate auto-enrollment via CoreConfig
If you're still reading this that means you want to know how to enable certificate auto-enrollment by editing the CoreConfig. Just like we did before we will edit our CoreConfig.example.xml to maintain our configuration baseline. Otherwise, if you made edits using the web administrative dashboard already and did not migrate them over to the CoreConfig.example.xml then perform this step in the CoreConfig.xml.
In our CoreConfig.example.xml we are looking for the following section. This section is located near the bottom of the file. Again, we will use the vi editor to modify this file.
First, we are going to move the starting comment block <!-- and place it right before the <MicrosoftCAConfig line since we won't be using that configuration block. Next, we are going to edit the value of <certificateSigningCA= and set it to TAKServer. Optionally, but next, we want to edit the nameEntry for the Organization (O) and Organizational Unit (OU). This is unique to your organization and deployment. If you followed those steps your CoreConfig.example.xml file for the certificateSigning section should look like this:
<certificateSigning CA="TAKServer">
<certificateConfig>
<nameEntries>
<nameEntry name="O" value="TAK"/>
<nameEntry name="OU" value="TAK"/>
</nameEntries>
</certificateConfig>
<TAKServerCAConfig keystore="jks" keystoreFile="certs/files/TAK-CA-01-signing.jks" keystorePass="atakatak" validityDays="30" signatureAlg="SHA256WithRSA" />
<!--
<MicrosoftCAConfig username="{MS CA Username}" password="{MS CA Password}" truststore="/opt/tak/certs/files/keystore.jks" truststorePass="atakatak" svcUrl="https://{server}/{CA name}_CES_UsernamePassword/service.svc" templateName="Copy of User"/>
</certificateSigning>
-->
If you would like a copy-and-paste method above or below the comments your configuration snippet should look like this:
<certificateSigning CA="TAKServer">
	<certificateConfig>
		<nameEntries>
			<nameEntry name="O" value="TAK"/>
			<nameEntry name="OU" value="TAK"/>
		</nameEntries>
	</certificateConfig>
<TAKServerCAConfig keystore="JKS" keystoreFile="certs/files/TAK-CA-01-signing.jks" keystorePass="atakatak" validityDays="30" signatureAlg="SHA256WithRSA" CAkey="/opt/tak/certs/files/TAK-CA-01" CAcertificate="/opt/tak/certs/files/TAK-CA-01"/>
</certificateSigning>
TAK Server CA configuration XML
Again, use the validateConfig.sh when you have made edits to the CoreConfig.xml to verify there are no errors before restarting the takserver service.
When using certificate auto-enrollment the issued certificate subject will default to "O=TAK,OU=TAK". An example of a client certificate for Shadow will have the subject "CN=Shadow,O=TAK,OU=TAK". You can change this to meet or match the information configured in the cert-metadata.sh file modified during our TAK Server install and configuration. To change this default we must edit the core configuration file to something like this:
<certificateSigning CA="TAKServer">
	<certificateConfig>
		<nameEntries>
			<nameEntry name="O" value="myTeckNet"/>
			<nameEntry name="OU" value="Users"/>
            <nameEntry name="OU" value="TAK"/>
		</nameEntries>
	</certificateConfig>
<TAKServerCAConfig keystore="JKS" keystoreFile="certs/files/TAK-CA-01-signing.jks" keystorePass="atakatak" validityDays="30" signatureAlg="SHA256WithRSA" CAkey="/opt/tak/certs/files/TAK-CA-01" CAcertificate="/opt/tak/certs/files/TAK-CA-01"/>
</certificateSigning>
This will give the certificate subject "CN=Shadow,OU=Users,OU=TAK,O=myTeckNet" for the issued certificate. This will apply more when you integrate your TAK Server with an AD/LDAP authentication backend. Otherwise, with the TAK Server as the CA, this doesn't matter so much.
Issuing a Certificate using auto-enrollment
Once your takserver service has completed rebooting and you have created a user using the web administrative dashboard, the following information will need to be given to your end user:
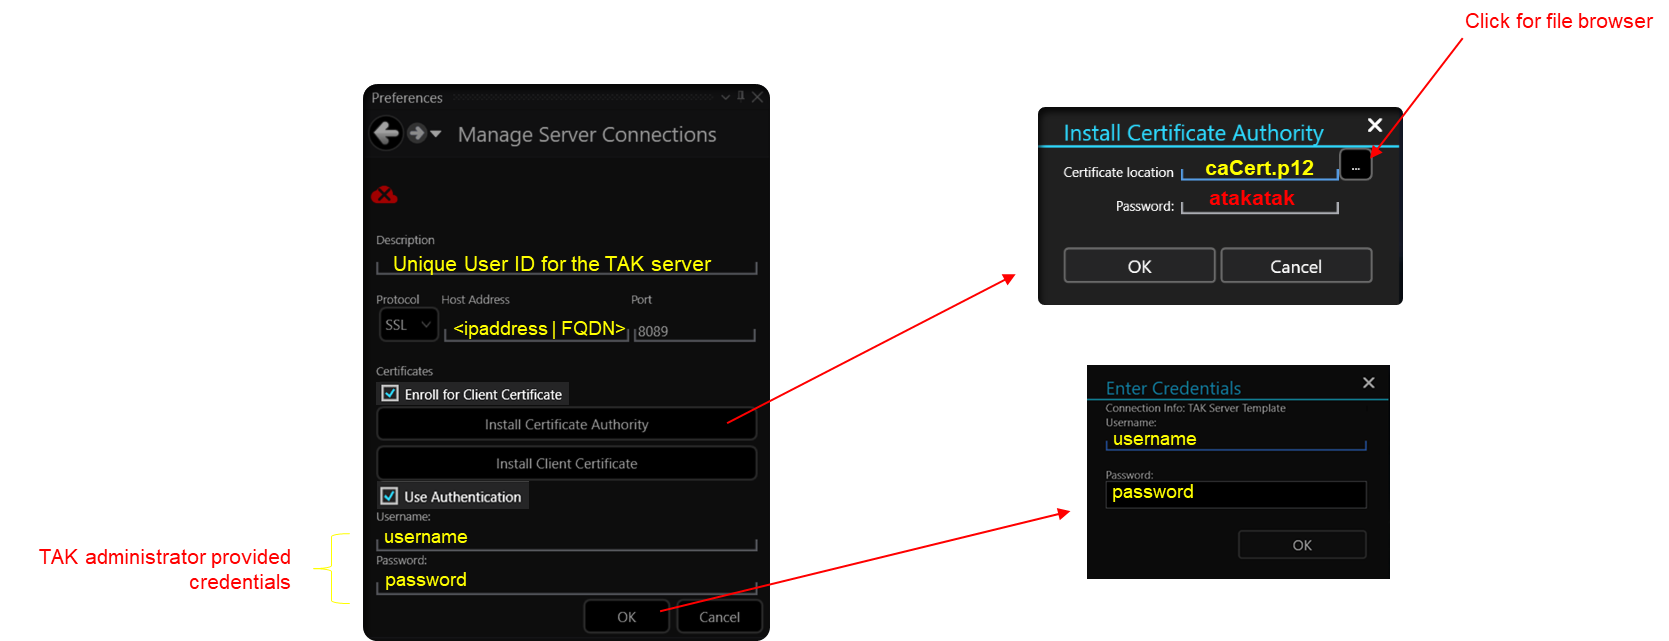
The trusted Certificate Authority certificate (.p12) // caCert.p12
The user credentials // username and password
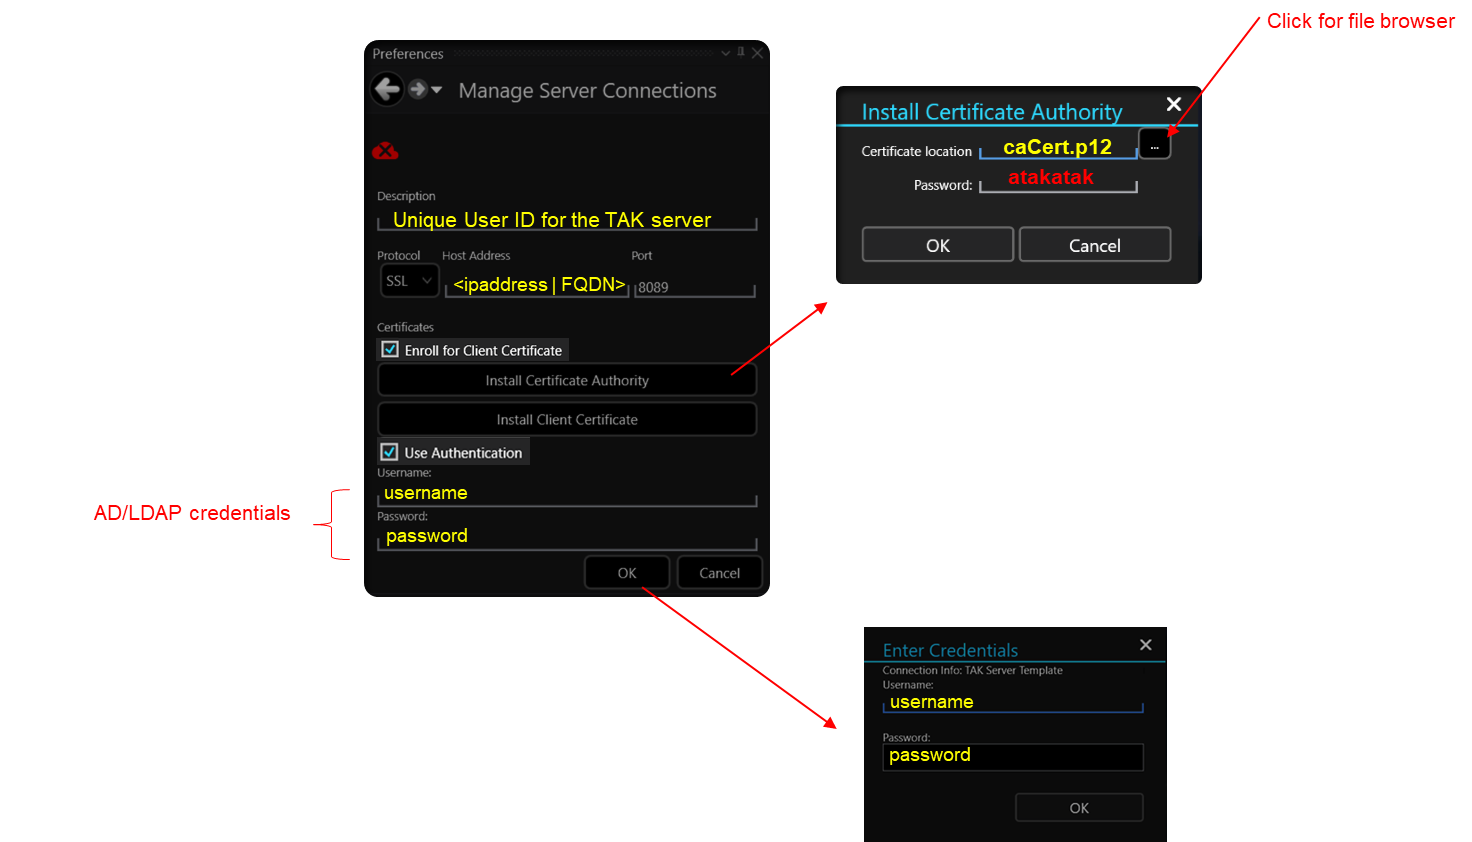
The below figure is using WinTAK but the steps are similar to ATAK. iTAK currently does not support this method of enrollment. The below setup is needed to get a client who is using auto-enrollment to request and get issued a certificate when using the certificate auto-enrollment process. The end user will need to check Enroll for Client Certificate, and User Authentication. Additionally, the user will need to install the CA certificate which in our case is named caCert.p12 if you followed the let's build a TAK Server - RPM Edition guide.
When the client successfully connects as the administrator you can navigate to Administrative >> Client Certificates using the web administrative console to see the newly issued client certificate. From this menu, you are able to manipulate this view to show Expired, Revoked, Active, or Replaced certificates. If you're managing clients using this method most of your time will be spent reviewing and revoking certificates including restarting the takserver service at the end of revoking certificates.
To revoke a certificate, you can select the user or users and select Revoke Selected which will begin the certificate revocation process on the backend. To complete this process, you will need to restart the takserver service as stated during the revocation prompts.

AD/LDAP Integration
Connecting to an AD/LDAP service
One of the advantages of leveraging either an AD or LDAP service is that you have centralized management of users and groups vice a decentralized structure and having to manage multiple user and group databases. This comes with a trade-off in difficulty to the setup. Generally in an AD/LDAP domain you have established certificate authorities and then depending on the authentication methods you use either a common access card (CAC)/token or username and passwords. This will require us to do some additional configurations on the TAK Server including:
- (Required) Creating a TAK service account to allow the TAK Server to query information from your AD/LDAP domain
- (Optional - but recommended) Creating a certificate signing request and recreating the java and pkcs12 trust stores to have our TAK Server signed by the domain issuing authority
- (Optional) Configure certificate autoenrollment using Active Directory Certificate Services
Configuring AD/LDAP Connection
To configure AD/LDAP, open the menu identified by the hamburger menu (≡) at the top right and select Configuration >> Security and Configuration. Click on Edit Configuration under Authentication Configuration. This will ask you to fill in a few values to authenticate to the AD/LDAP instance.
The information you will need to connect to the AD/LDAP instance will be:
- Domain URL: format = ldap://{DC.FQDN | FQDN}/DC=domain,DC=com
- User Authentication String: format = FQDN\{username} or {username}@FQDN
- (Optional) Group Prefix and relative distinguished name (RDN)
- Service Account Credentials
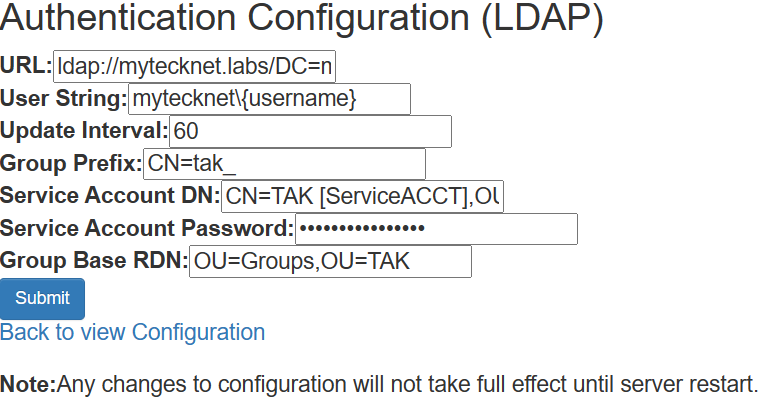
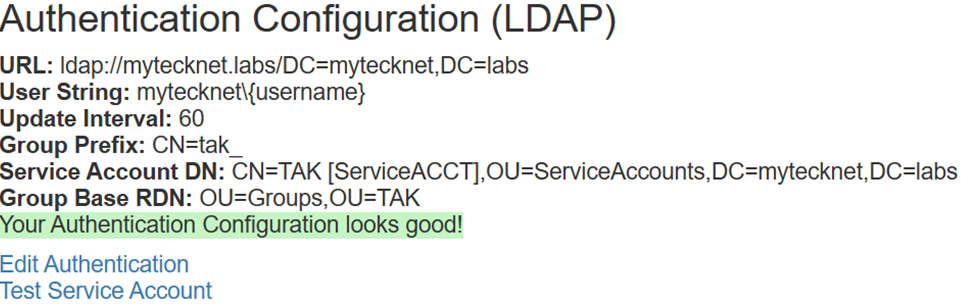
Once you have entered all the relevant data click on Submit to apply the settings. Click on Test Service Account to verify settings. If everything is good it should succeed. If you run into issues verify that the Service Account DN is correct and if you have any spaces within the name to use " " (double quotes) and double-check your service account password.

Configuring AD/LDAP in the CoreConfig
Alternatively, you can configure the AD/LDAP connection using the core configuration file. The AD/LDAP section will be placed within the auth section. You will need to know the following information for the configuration:
- the AD/LDAP distinguished name
- the AD/LDAP service account name and password
- an established group naming standard
Below is an example of the information required for the configuration file.
For LDAP environments:
<ldap url="ldap://hostname or FQDN/" userstring="uid={username},ou=XXX,dc=XXX,dc=com" updateinterval="60" style="DS" x509groups="true" x509addAnonymous="false"/>
or
For LDAPS environments
<ldap url="ldaps://hostname or FQDN/" userstring="uid={username},ou=XXX,dc=XXX,dc=com" updateinterval="60" style="DS" x509groups="true" x509addAnonymous="false" ldapsTruststore="JKS" ldapsTruststoreFile="certs/files/ldaps-keystore.jks" ldapsTruststorePass="Password"/>
or
For AD environments:
<ldap url="ldap://hostname or FQDN/dc=XXX,dc=com" userstring="FQDN\{username} or {username}@FQDN" updateinterval="60" serviceAccountDN="distinguishedName" serviceAccountCredential="Password" groupBasedRDN="OUdistinguishedName" groupprefix="" Style="AD"/>
Replace all items in BOLD to match your environment. An example of each configuration can be found below. For items requiring the distinguishedName the format for this type of value starts with cn="",ou="",dc="".
<auth default="ldap" x509groups="true" x509addAnonymous="false">
	<ldap url="ldap://mytecknet.labs/DC=mytecknet,DC=labs" style="AD" userstring="mytecknet\{username}" updateinterval="60" serviceAccountDN="CN=TAK [ServiceACCT],OU=ServiceACCTs,DC=mytecknet,DC=labs" serviceAccountCredential="M@d3Y0uL0ok!" groupBaseRDN="CN=Groups,OU=TAK"/>
</auth>
CoreConfig.xml with AD configured
<auth default="ldap" x509groups="true" x509addAnonymous="false">
	<ldap url="ldap://mytecknet.labs/" userstring="uid{username},ou=Users,ou=TAK,dc=mytecknet,dc=labs" updateinterval="60" style="DS"/>
</auth>
CoreConfig.xml with LDAP configured
# To edit the CoreConfig.xml directly from any directory location
sudo vi /opt/tak/CoreConfig.xml

# After editing restore all file permissions to default
sudo chown -R tak:tak /opt/tak

# Finally, restart the takserver service
sudo systemctl restart takserver
Steps to edit the CoreConfig.xml
In environments that enforce SmartCardLogon but require the ability to use the username and password credentials, we can have a parent OU named TAK and subOUs named Users and Groups. This now creates a mixed environment that enforces SmartCardLogon and we are allowing username and password authentication. To ensure that TAK users are unable to log in to workstations or servers using this username and password method the domain administrator would need to create or modify a group policy object that prevents interactive logon. To simplify this task a security group such as denyTAK_DomainAuth would be created and all the TAK users would be members of this group. As part of a standard operating procedure for the creation of new TAK users, they would be added to this denyTAK_DomainAuth group. This task could be automated using PowerShell to run as a scheduled task that queries all users within an OU and adds them as members to the targeted group denyTAK_DomainAuth.
Using ldapsearch to query AD/LDAP
After you have configured the TAK Server with your AD/LDAP instance you may want to test the configuration by querying a few users and groups within your database. To do this we will use the ldapsearach command. If this command is not installed by default and you will need to install it. To find out how to install ldapsearch we can use the yum whatprovides command and option.
# yum whatprovides command and option to search for the parent package
sudo yum whatprovides ldapsearch
In our case, we will need to install openldap-clients.
# Install openldap-clients
sudo yum install openldap-clients -y
After ldapsearch is installed we will need to know a bit about the syntax to get started. The basic syntax is: ldapsearch -LLL -H ldap://FQDN:389 -b 'dc=domain,dc=com' -x -D 'domain\username' -W '(sAMAccountName=ADUser)'Items marked in bold will need to match your environment. An example query would look like this:
ldapsearch -LLL -H ldap://mytecknet.labs:389 -b 'dc=mytecknet,dc=labs' -x -D 'mytecknet\tak.service' -W '(sAMAccountName=ghost)'Basic ldapsearch query
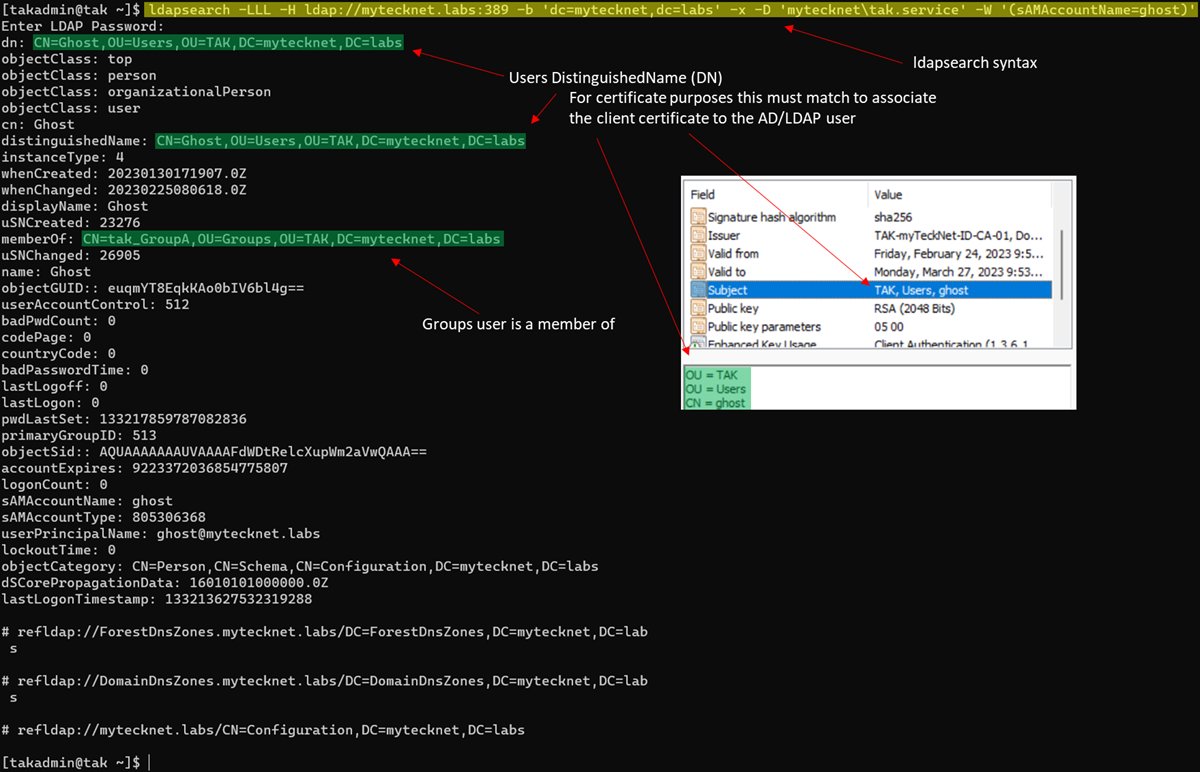
Group Prefix
The Group Prefix allows you to specify certain groups to apply if you're referencing an organizational unit (OU) that contains multiple groups for centralized management. If you wanted to target a group that starts with "tak_" then you would set the Group Prefix to: "CN=tak_". An example would be tak_GroupA, tak_GroupB, and GroupC. Since we only want to capture groups that start with "tak_" then tak_GroupA and tak_GroupB would be the only targeted groups and GroupC would be ignored.
If you were to make the configuration change using the core configuration file you would add the groupprefix value in our LDAP section. Additionally, we are going to add the attribute and value: groupNameExtractorRegex="CN=(.*?)(?:,|$)" to assist us with using IN and Out Groups in AD/LDAP.
<auth default="ldap" x509groups="true" x509addAnonymous="false">
        <ldap url="ldap://mytecknet.labs/DC=mytecknet,DC=labs" userstring="mytecknet\{username}" updateinterval="60" groupprefix="CN=tak_" groupNameExtractorRegex="CN=(.*?)(?:,|$)" style="AD" serviceAccountDN="CN=TAK [ServiceACCT],OU=ServiceAccounts,DC=mytecknet,DC=labs" serviceAccountCredential="M@d3Y0uL0ok!" groupBaseRDN="CN=Groups,OU=TAK"/>
    </auth>
CoreConfig.xml with AD/LDAP configured with Group Prefix
IN and Out Groups with AD/LDAP

To use IN/OUT Groups we require additional groups within our AD/LDAP environment to identify the placement of the user objects. In our example, we have groups tak_GroupA and tak_GroupB. To apply the IN/OUT filtering we need to create new groups with the same name except we will append _WRITE and _READ to them. An example is tak_GroupA_WRITE and tak_GroupA_READ. In total, we will have six new groups now.
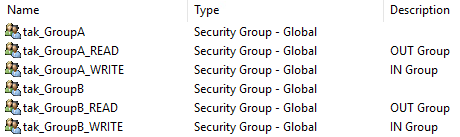
I've given it away above, but as you can see _READ applies to the OUT Group and _WRITE applies to the IN Group. If you somehow forget to apply a user to a group they will default to the __ANON__ group when they authenticate to the TAK Server.
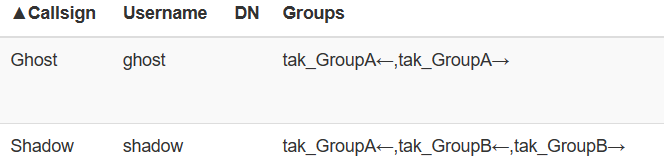
In the above example, we have Shadow who is part of the tak_GroupB but is also a member of the tak_GroupA_WRITE group, as identified by the tak_GroupA← denoting that Shadow is In Group for GroupA. If you recall this allows Shadow to write events to GroupA but not read. Thus Ghost is receiving Shadow's information but Shadow cannot read anything from Ghost or GroupA.
Signing our TAK Server
One of the things you may want to do to integrate your TAK Server into your domain is to get it signed by your certificate authority using a secure socks layer (SSL) / transport layer security (TLS) for secure communications. The process for obtaining a signed certificate can be found here in my article on using an external certificate authority to sign your TAK Server.
Although this step is not required for the normal operation of a TAK Server this ensures a trusted connection using an authoritative trusted CA within your own AD/LDAP. If you forego this step no worries you can still operate your TAK clients using your TAK Server as a CA. You would need to import the TAK Servers public CA certificate into your computer's trust store if you plan to use WebTAK or log in to the admin dashboard to fix those pesky invalid certificates and trusted website warnings.
AD/LDAP Certificate Autoenrollment
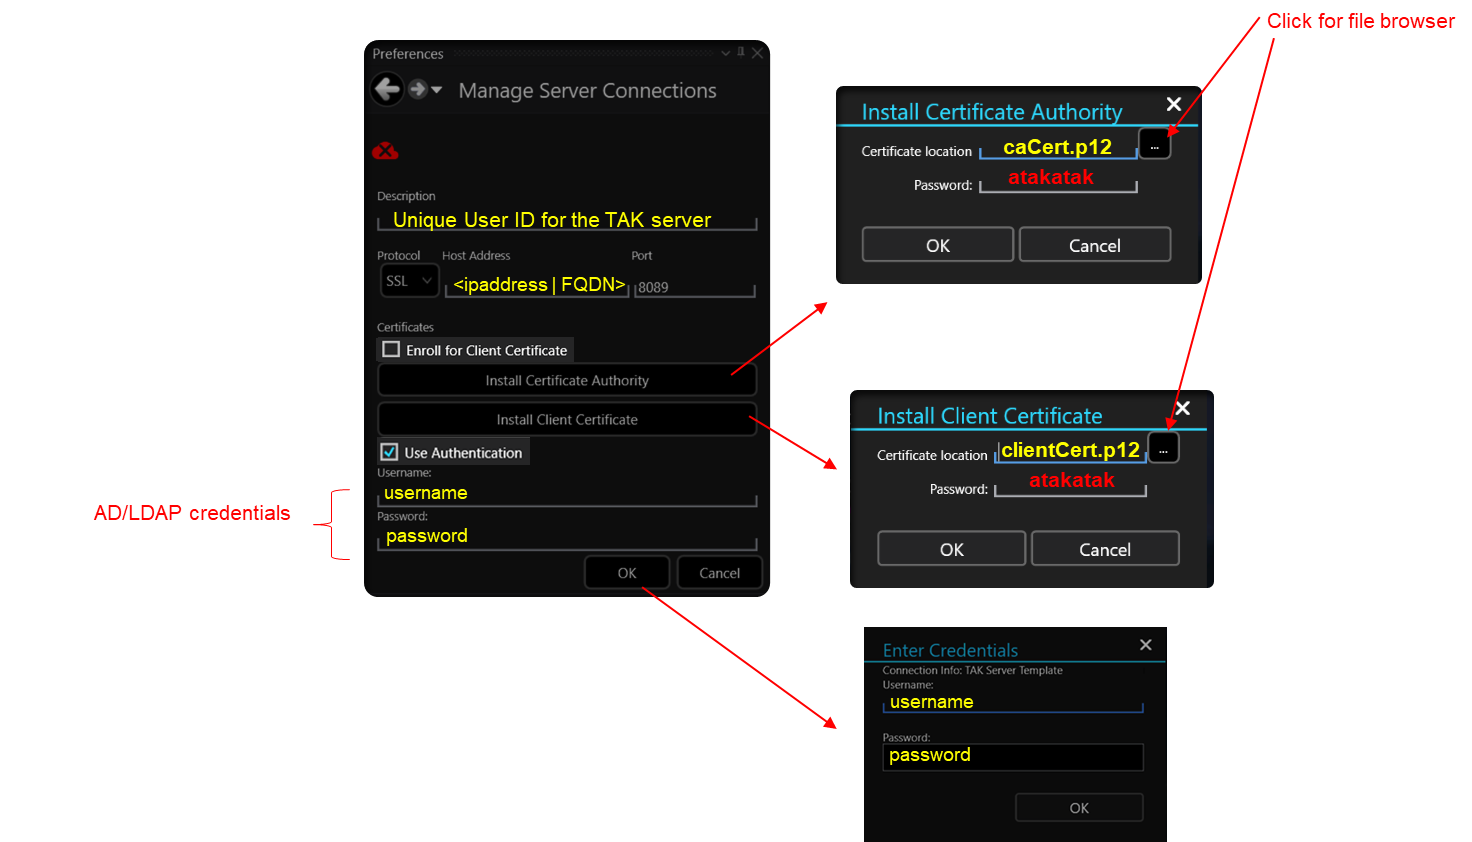
These steps assume that your AD/LDAP domain has a public key infrastructure (PKI) environment established. If your environment does NOT have PKI enabled you can still integrate with an AD/LDAP instance while maintaining your TAK Server as an issuing authority for client certificates. The process for this would remain the same when connecting to a TAK Server. The client will still require the TAK Servers public CA certificate (caCert.p12) and then a client certificate (clientCert.p12). Additionally, the end user will select Use Authentication to authenticate using their AD/LDAP credentials. This will be covered more in Connecting our TAK Clients using AD/LDAP
AD/LDAP Authentication - TAK Server Certificate Autoenrollment Configuration
For this configuration, we will configure our TAK Server as the CA if it's not already. Instructions can be referenced here. Once our TAK Server is configured as our CA for certificate autoenrollment we will configure our AD/LDAP authentication configuration here.
To test our AD/LDAP authentication we will use the certificate enrollment and authentication portal. This is generally by default https://TAKServerIP:8446/ By default port 8446 is not enabled in our firewall so we will need to add it. To do so we will use the following commands:
sudo firewall-cmd --zone=public --add-port 8446/tcp --permanent
sudo firewall-cmd --reload
Next, try to access the authentication portal. Enter your username and password without the domain designator. An example would be ghost and NOT mytecknet\ghost when entering the username.
If you are able to successfully authenticate using the authentication portal to connect clients using AD/LDAP and then the TAK Server as the CA follow the client instructions here.
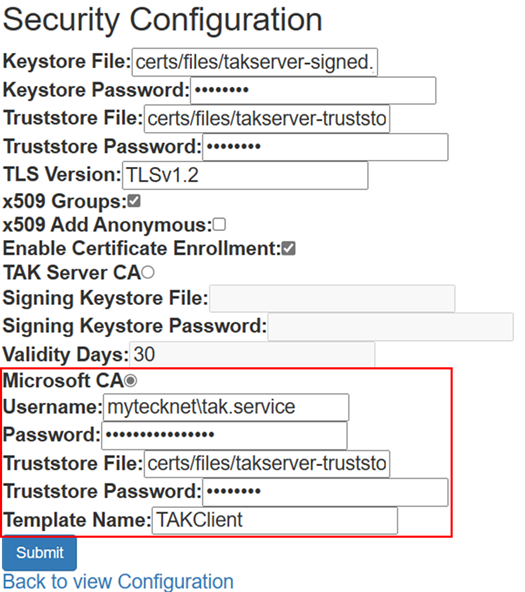
If you would like to use AD/LDAP for certificate autoenrollment you will need to change the TAK Server CA to Microsoft CA. Otherwise, the TAK Server can still serve as a valid CA for your clients. To start configuration, navigate to the web administrative dashboard or by editing the core configuration file directly. Start by opening the menu identified by the hamburger menu (≡) at the top right and select Configuration >> Security and Configuration. Next, choose Edit Security, if Enable Certificate Enrollment is unchecked, check it. Otherwise, if it is checked from our previous setup with the TAK Server as the CA, select Microsoft CA.
Required information for the Microsoft CA will be a username and password that will be required for the CES authentication to request a certificate. The trust store will be our TAK Server trust store that contains our TAK Servers' public CA certificates. This should be the newly bundled trust store if you signed your TAK Server by an external source. Otherwise, if your TAK Server is still the CA you will need to import your AD/LDAP public CA certificate into the trust store. The command to do so is keytool -noprompt -import -trustcacerts -alias <alias> -keystore <TAKTruststoreJKS> -storepass <JKSPAssword>. Replace <alias> with a unique name, <TAKTruststoreJKS> with the TAK Servers trust store, and then <JKSPassword> with the trust store password. The Template Name will reference the available Certificate Templates provided by our CA. Contact your CA Administrator for a list of valid certificate template names.
Enabling certificate autoenrollment via CoreConfig
If you wish to edit this using the core configuration file the section syntax will look like this:
<certificateSigning CA="MicrosoftCA">
<MicrosoftCAConfig username="{MS CA Username}" password="{MS CA Password}" truststore="certs/files/keystore.jks" truststorePass="atakatak" svcUrl="https://{server}/{CA name}_CES_UsernamePassword/service.svc" templateName="Copy of User"/>
</certificateSigning>
Replace all items identified in BOLD to match your environment. The username and password are going to come from the CA Administrator and should match the username and password for the service account created during the configuration of the CES role. The Server will be the name of the DNS record for the server hosting the IIS CES role and the CA name will be the CA that the CES CA is using for certificate enrollment. The CA Administrator should provide this information to you.
<certificateSigning CA="MicrosoftCA">
    <MicrosoftCAConfig username="takcertreq" password="atakatak" truststore="certs/files/keystore.jks" truststorePass="atakatak" svcUrl="https://pki.mytecknet.labs/entca_CES_UsernamePassword/service.svc" templateName="TAKClient"/>
</certificateSigning>
Example Core Configuration File Contents
Once you have completed editing the core configuration file you must restart the takserver service to apply these settings. sudo systemctl restart takserver.
Connecting our TAK Clients using AD/LDAP
Windows TAK (WinTAK)
In this example, we are going to first connect to a TAK Server by using a client certificate with AD/LDAP authentication. For this our user will need to be given the following:
The trusted Certificate Authority certificate (.p12) // caCert.p12
The issued client certificate (.p12) // clientCert.p12
The AD/LDAP user credentials // username and password
Once the end-user has installed both the TAK Server public and client certificates, they will enable Use Authentication by checking the appropriate boxes and filling in the username and password input. When the user clicks on Ok they will enter their credentials again to begin the authentication process to the TAK Server. The below example is using WinTAK but applies to ATAK as well.
With certificate autoenrollment
To connect to the TAK Server using certificate enrollment from our domain CA we will use the same steps covered earlier here. The following information will need to be given to your end user:
The trusted Certificate Authority certificate (.p12) // caCert.p12
The user credentials // username and password
The below figure is using WinTAK but the steps are similar to ATAK.
WebTAK
Users are able to log in using WebTAK via their username and password without a certificate by entering their username and password without the domain identifier. To log in to WebTAK navigate your browser to https:\\<takserver>:8446. From here you will be prompted to enter your credentials. Enter your username directly as shown below. If you attempt to log in using domain\username you will receive an authentication error. This is because the authentication method used to set up defaults to the domain\{username} we specified during the AD/LDAP authentication setup.

Once successfully logged in, a TAK Server administrator can verify this by using the client monitoring dashboard and reference the username and assigned groups that are pulled from AD/LDAP.

Conclusion
In this guide we covered the types of groups used within the TAK environment, how to manage users and groups using the TAK Server for authentication, and then integrating your TAK Server into an AD/LDAP environment for authentication to include certificate enrollment using a Microsoft CA. Remember throughout this configuration the TAK Server will only accept one method for authentication which is using the flat file authentication (users and groups managed by the TAK Server) or AD/LDAP authentication through integration. The TAK clients can use a Microsoft CA or the TAK Server as a CA in either setup as well.
