Using External Certificate Authorities to sign your TAK Server

The purpose of this guide will be to walk you through how to get your TAK Server a public certificate for trusted connections. This will require us to obtain a public certificate from a trusted certificate authority (CA). We will cover generating a certificate signing request to send to our CA for signing. Additionally, we will cover requesting a certificate from Let's Encrypt a popular public CA service. It's important to note that using public CA's such as Let's Encrypt may not offer the best client-to-server security in a TAK ecosystem since any actor could authenticate to your TAK Server if signed by Let's Encrypt.
Why use SSL/TLS?
Secure connections are part of the norm when conducting business transactions on the open internet. When you as a user see that HTTPS and a secure lock on your browser you're trusting that your data is secure between you and the distant end. There is a lot that goes on the backend to establish this connection but here is a brief overview.
The SSL/TLS Handshake
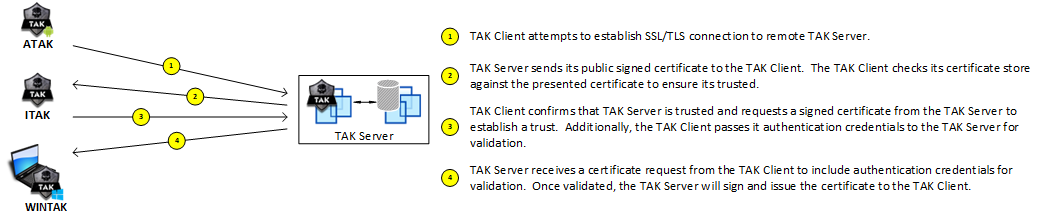
To establish a two-way SSL/TLS authentication the client and server need to authenticate and validate each other identities. This is just the prelude to establishing a secure connection. This process is called the SSL Handshake. During this process, two asymmetric keys are used which are one public and one private key. The public key is used for encryption and the private key is for decryption during this process only. This allows the client and server to confidentially set up and exchange a “shared key” once the connection is established. To begin, you (the client) send a HELLO to the server requesting the SSL/TLS version, a random number, supported ciphers and compression, and a session identification number. The server then responds back with a HELLO message and the answers to the requested values. Additionally, the server will send its identity (certificate) to the client to validate. In return, it asks for the client to do the same. When the client validates the server certificate being presented it then sends its certificate to the server for it to validate as well. In both processes, the client and server are checking the certificate chain, validation and expiration date, and certificate revocation status.
If both the client and server validate each other identities this establishes a secure connection and mutual authentication between the two. This creates a symmetric key "shared key" that both the client and server will use to encrypt and decrypt data being transferred. To establish this two-way mutual authentication you must have a private key, client certificate, and intermediate and root CA certificates to create this connection. To do this we must first create a certificate signing request to a CA to receive our client certificate.
Below is quick data flow of the certificate request from a TAK Client to TAK Server.
Certificate Signing Request (CSR)
To begin, we will need to generate a CSR which we will use the OpenSSL application to create our request. Throughout the rest of this guide, we will be using OpenSSL which is installed on the TAK Server to generate and process our commands to make things easier. The steps and process may vary if you use an external workstation to run the OpenSSL commands; however, the result should be the same.
In creating our CSR we will cover two methods to do so. Method one is a one-line command to create our CSR with minimal customization. The second will involve creating a configuration file and adding the option in our OpenSSL command to reference this configuration file for the additional values.
Method One:
Start by establishing a secure shell (SSH) connection to your TAK Server by using your preferred application of choice. Once successfully authenticated execute the OpenSSL command below. After generating your CSR, skip to Verify the CSR.
# Generate our CSR using minimal values and options
# Replace <FQDN> w/ your public DNS record
openssl req -new -newkey rsa:2048 -sha256 -keyout takserver.key -out takserver.csr -subj /CN=<FQDN>

# Example
#openssl req -new -newkey rsa:2048 -sha256 -keyout takserver.key -out takserver.csr -subj /CN=tak.mytecknet.labs
OpenSSL certificate request command
Method Two:
For this method, we are going to create a configuration file creating a [req], [dn], and [ext] section. Within the [req] section we will establish the prompt, distinguished_name, and req_extensions classes. In this class, we will set them to the following values: Prompt will be set to no, distinguished_name will reference the [dn] section, and then req_extensions will reference the [ext] section.
Within the [dn] section we will create our distinguished name classes. CN will be our common name while OU is Organizational Unit, O is Organization, and C will be Country. Optionally, you can add Locality (L) and State (ST). For our example configuration, we will only establish CN, OU, O, and C.
Lastly, our [ext] section will establish our subjectAltName which we will use to reference our configured DNS records. This can be either the A-Record or CName that is registered within your DNS environment.
To begin we are going to use the vi editor to create our configuration file. Copy and replace the example configuration to fit your environment.
# Create the configuration file
vi config.cnf
vi terminal-based text editor
[req]
prompt=no
distinguished_name=dn
req_extensions=ext

[dn]
CN=tak.mytecknet.labs
OU=PKI
O=myTeckNet
C=US

[ext]
subjectAltName = @alt_names

[alt_names]
DNS.1 = tak.mytecknet.labs
DNS.2 = taksvr01.mytecknet.labs
IP.1 = 192.168.255.240
Example configuration file
Once you have edited your configuration file we are going to now reference it in our OpenSSL certificate request.
# Issue the CSR referencing the config.cnf
openssl req -new -newkey rsa:2048 -sha256 -config config.cnf -keyout takserver.key -out takserver.csr
OpenSSL certificate request command

Verify the CSR
After we have created our CSR we want to verify its contents for accuracy. Although this step is not required I would recommend it to ensure that all items are correct before proceeding.
# Verify the contents of our CSR
openssl req -text -in takserver.csr -noout -verify
OpenSSL verify request

To submit our CSR to our issuing CA we need to copy its contents to submit. Two methods will be covered on how to submit our CSR to our issuing CA. If your CA administrator allows you to submit your certificate requests, you can use a certificate web autoenrollment website. Generally, this site is https://yourdomainca/certsrv; however, consult your certificate administrator. Alternatively, you can send your CSR directly to the certificate publisher or administrator for processing. To output, the CSR contents use the cat command followed by the .csr generated to display the base-64 contents.
# Display the contents of our CSR
cat takserver.csr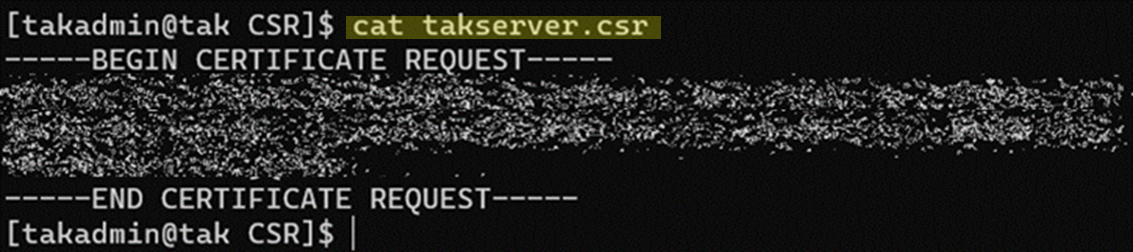
Signing the CSR
The following will cover the steps required to sign the CSR if you have sufficient privileges. Not all organizations will allow you to do this on your own but the following steps are here to assist and provide the steps generally executed by a certificate publisher or administrator.
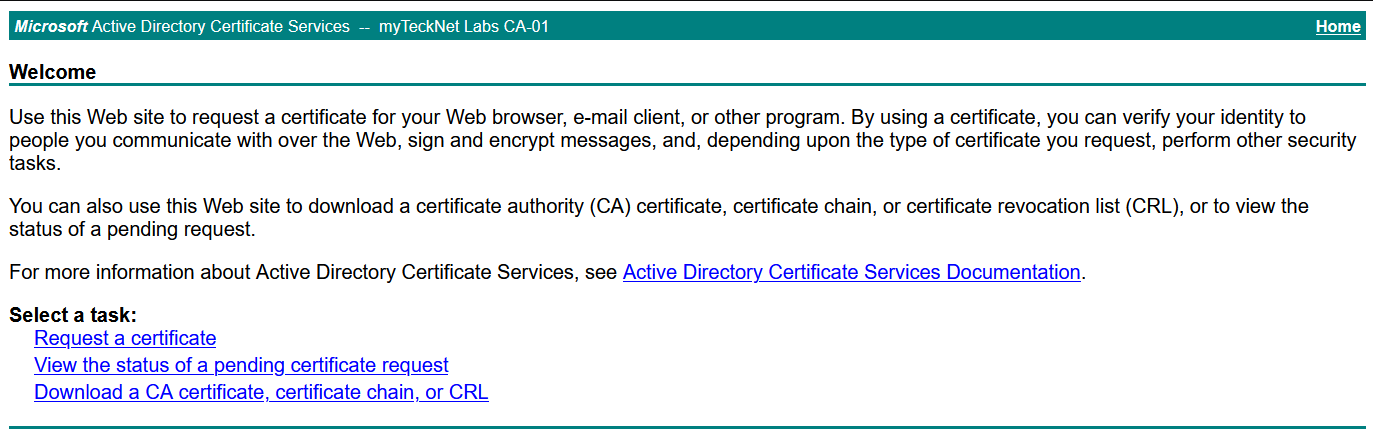
via the Web Certificate Enrollment page
Navigate to your organization's certificate web autoenrollment page. If prompted enter the credentials required for access. Once the page loads select Request a Certificate to begin the signing process.
Next, select Submit a certificate request by using a base-64-encoded CMC or PKCS #10 file, or submit a renewal request by using a base-64-encoded PKCS #7 file. This will take us to the base-64 request page.

Copy the contents of the .csr to include the BEGIN CERTIFICATE REQUEST header to the END CERTIFICATE REQUEST headers. Under the certificate template select the appropriate certificate template to apply and click Submit to complete the request.
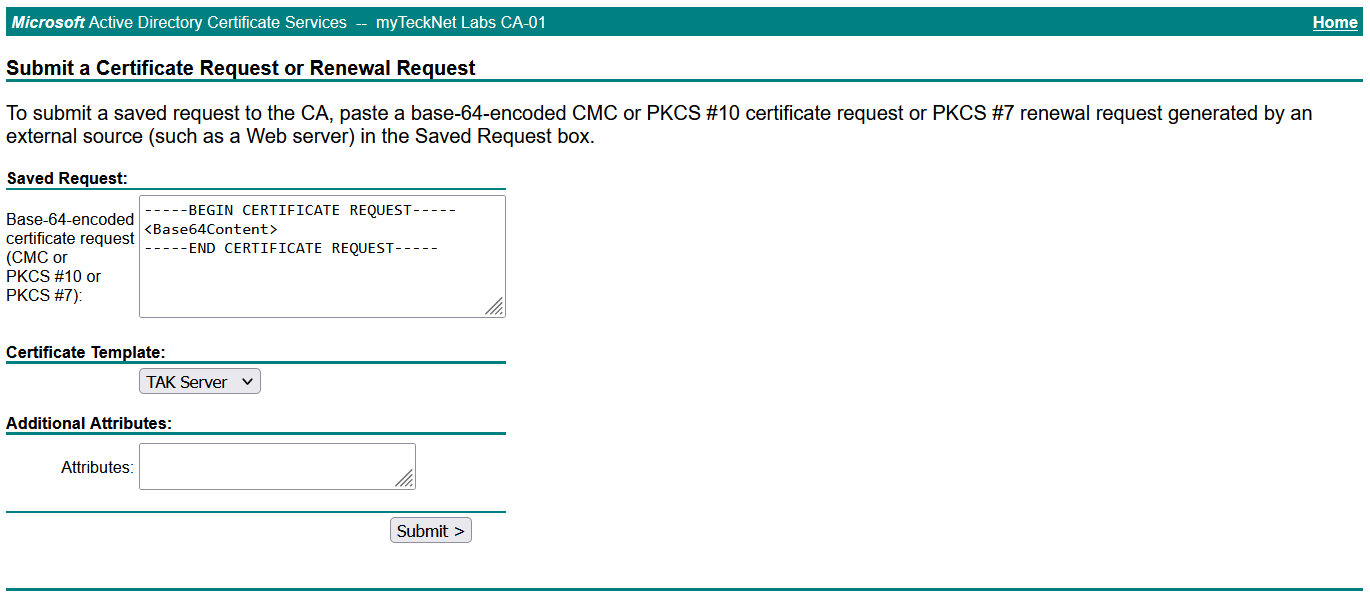
When the certification process has been completed you will be presented with the option to download a DER or Base-64 encoded certificate. Click on the Base-64 encoded option and select Download certificate chain. This will contain our PKCS7 (P7B) certificate bundle file.

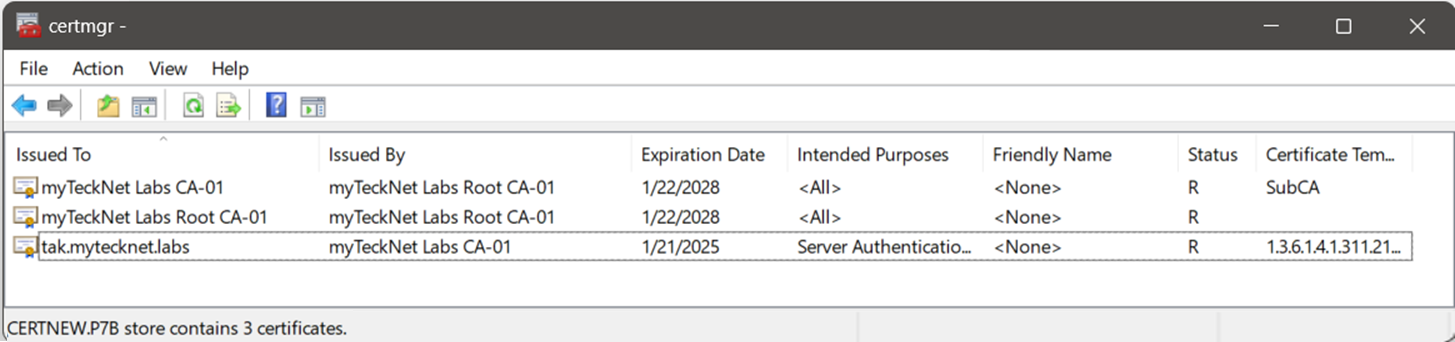
To verify the certificate contents double click and expand the certificate location to expose the completed certificate chain.
via the command line
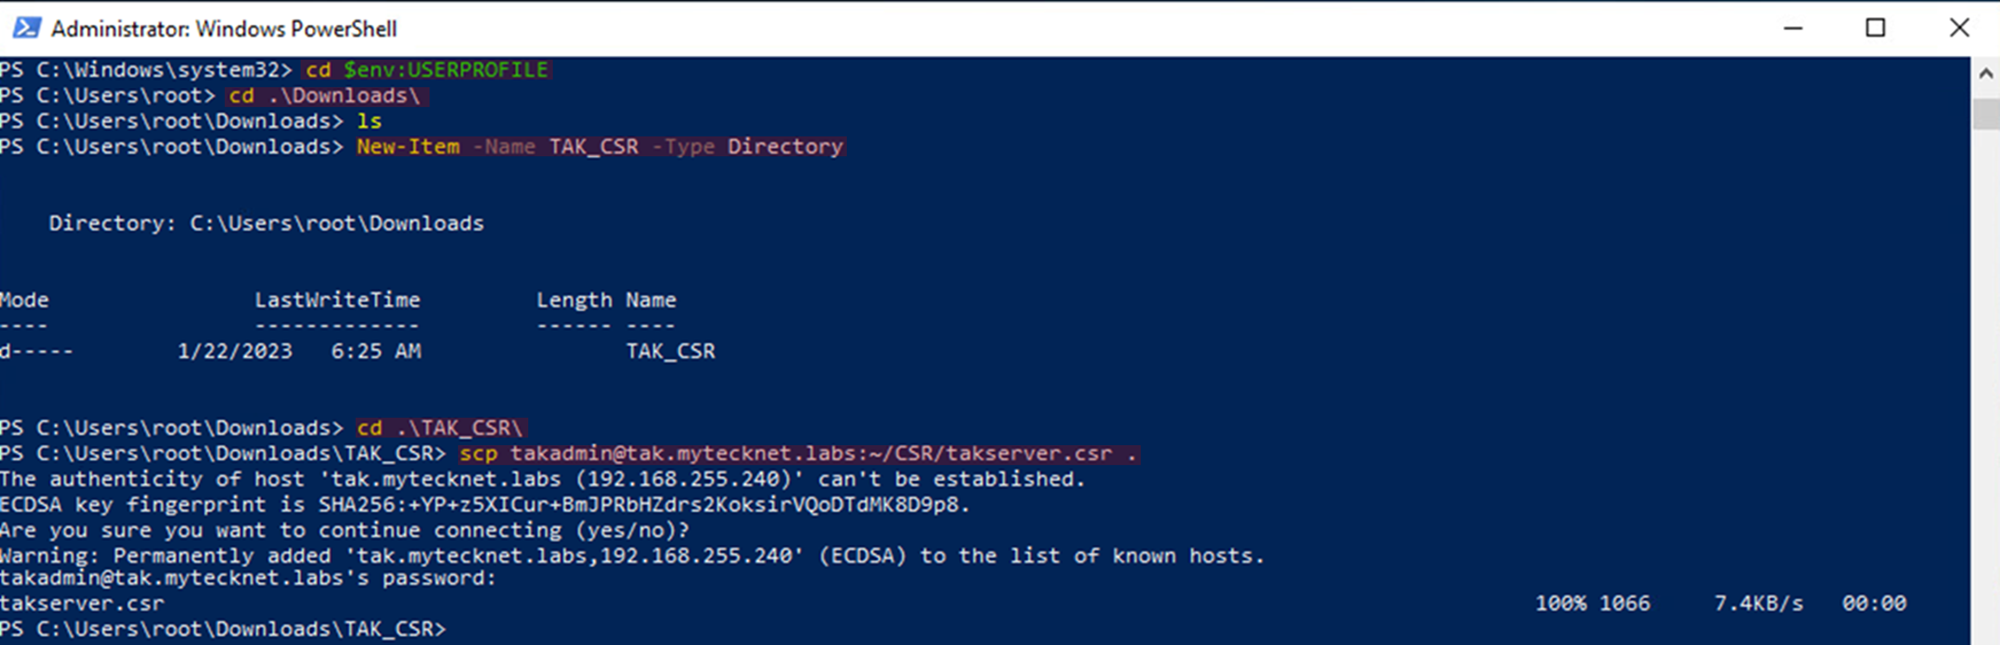
This method assumes that you created the certificate signing request from the TAK Server. To begin let us move to a directory we can easily reference. For this task, I will use PowerShell to easily move between environment variables.
# Change from the current directory to the user home directory
cd $env:USERPROFILE

# Change to the downloads directory
cd .\Downloads

# Create a new directory to store our signed certificate
New-Item -Name TAK_CSR -Type Directory

# Change to this new directory
cd .\TAK_CSR

# Start the transfer process for the CSR to the local host
# Note the period at the end means current directory
scp <username>@<TAKServerIP>:~/takserver.csr .

# Example
#scp [email protected]:~/takserver.csr
Secure Copy Command (scp)
As part of this task, secure copy (scp) is builtin into most modern operating systems. Open a command prompt or terminal and type the following commands to copy them from the TAK Server to our host system. Navigate to the directory in which the certificate files are located. In our example, we will copy the takserver.csr to our Downloads directory.
For Windows Users
cd %userprofile%\Downloads
scp <user>@<ipaddress>:~/takserver.csr .
For Linux // your distribution may vary
cd ~/Downloads
scp <user>@<ipaddress>:~/takserver.csr .
macOS
cd ~/Downloads
scp <user>@<ipaddress>:~/takserver.csr .
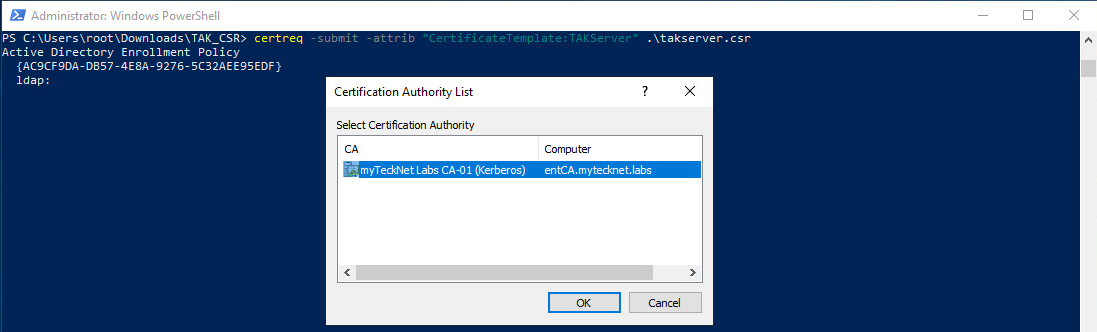
Now that our CSR has been transferred we need to submit our request to our issuing CA. To do this we will use the certreq command followed by the attrib option to identify which certificate template we need.
# Submit the certificate request for the following certificate template
certreq -submit -attrib "CertificateTemplate:<TemplateName>" takserver.csr

# Example
certreq -submit -attrib "CertificateTemplate:TAKServer" takserver.csr
If you have multiple issuing certificate authorities select the one that your administrator has identified or any available option.
If your CA has auto-enrollment configured for that certificate template you will receive the certificate within a few seconds. If you receive the notification that the request has been submitted and awaiting approval contact your CA administrators to approve the request. Once the request has been approved you will use the following command to retrieve the certificate.
# Retrieve the certificate from the certificate authority once approved
certutil -retrieve <ID>

# Select the certificate authority the request was submitted to and save the csr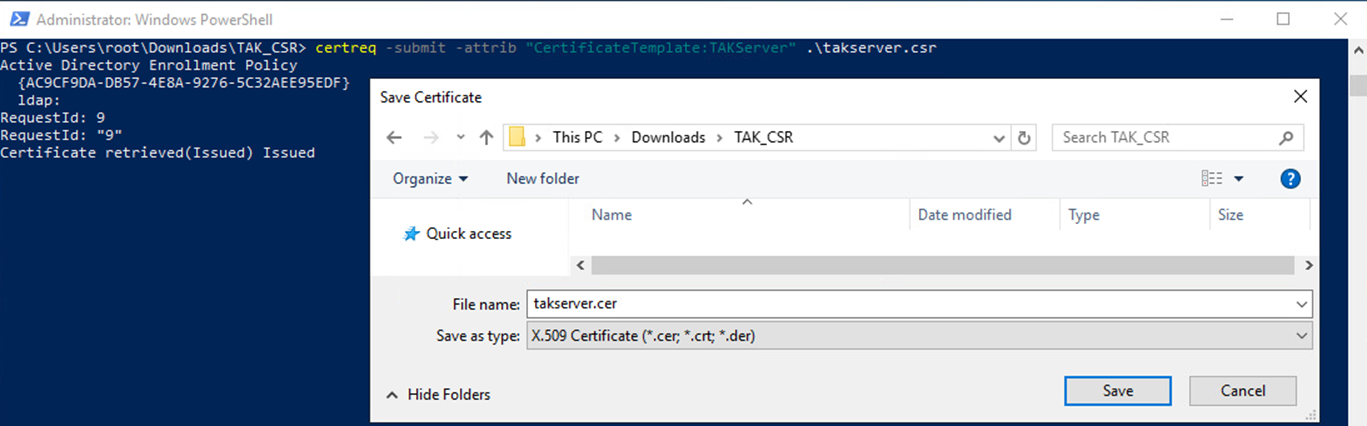
After you receive your signed certificate we need to create the CA trust store file. This file is going to contain our intermediate CAs and our root CA certificate. To do this we are going to create a privacy-enhanced mail (PEM) file that will contain our trusted CA chains.
The PEM certificate chain
In general, the privacy-enhanced mail (PEM) format is a text base-64 document that contains the private key and signed certificate along with the certificate trust chain which includes any intermediate CAs and then the root CA certificate. The format of the PEM is structured as such:
-----BEGIN RSA PRIVATE KEY-----
	(Your Private Key)
-----END RSA PRIVATE KEY-----
-----BEGIN CERTIFICATE-----
	(Your Issued SSL certificate)
-----END CERTIFICATE-----
-----BEGIN CERTIFICATE-----
	(Your Intermediate certificate)
-----END CERTIFICATE-----
-----BEGIN CERTIFICATE-----
	(Your Root certificate)
-----END CERTIFICATE-----
Privacy Enhanced Mail (PEM) Format
Extracting your Intermediate Certificate Authority certificates
To create our PEM we will need our public intermediate and root CA certificates. Normally, this will be easily available via a published website such as a certificate revocation list (CRL) distribution point or authority information access (CDP/AIA) or other internal certificate authority source. However, in some cases when sending this off for an administrator to sign you may not receive the full trust chain in return. The easiest method to get these files is to view our returned signed certificate details to view the full trust chain.
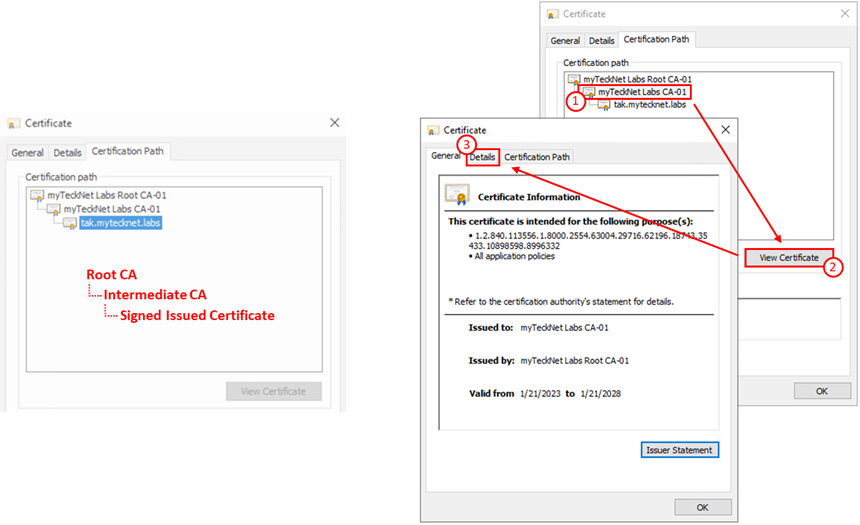
To view the certificate path open the signed certificate and select the Certificate Path tab. This tab is formatted as such:
● Root Certificate: This is your top most trusted CA. This is the certificate that signs all subsequent certificates under it.
● Intermediate/Enterprise/Issuing Certificate: This CA goes by many names but this is the intermediate CA and depending on the hierarchy and tier of the public key infrastructure could be the issuing certificate authority.
● Public/Signed Certificate: This is your public signed certificate by an issuing CA.
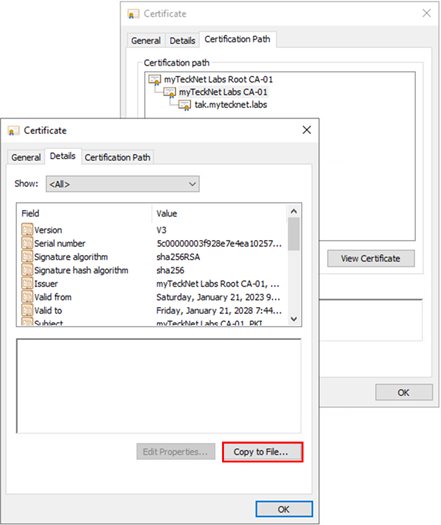
The process to extract each intermediate certificate will require you to select the issuing CA and click on View Certificate. This will open a new dialog for that certificate. Select the Details tab to display the certificate details.
Here we will be given the option to Copy to File which allows us to extract the certificate from our signed certificate. When you click on this you will be presented with the Certificate Export Wizard.
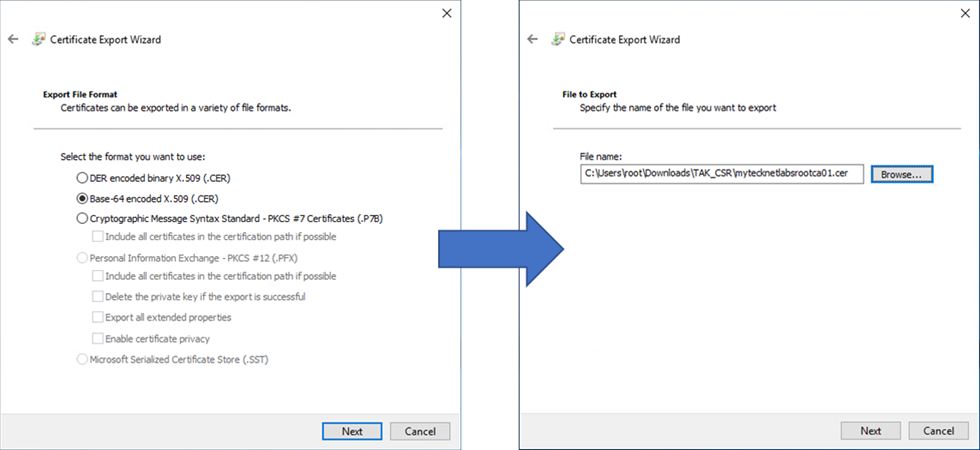
Certificate Export Wizard
When the Certificate Export Wizard loads click on Next and select Base-64 encoded X.509 from the Export File Format screen, click Next to continue. Click on Browse and navigate to the desired folder. Set the name to something easily identifiable such as the name of the certificate, e.g., mytecknetlabsca01.cer. Review the overview window and click on Finish to export the certificate. Repeat this step for each additional certificate within the certificate path. In our example we have only the root CA left so we will select the root CA certificate, and click View Certificate to begin the process.
Building the CA trust store bundle
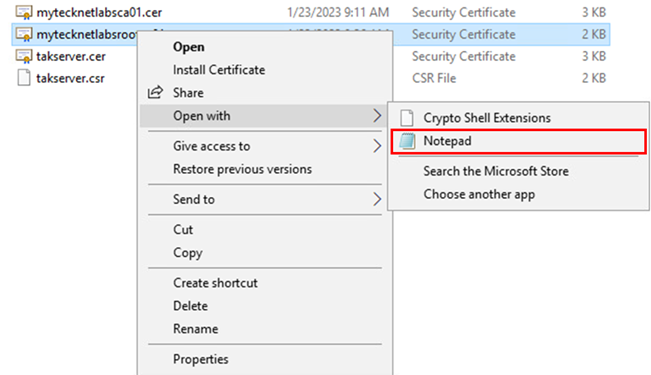
Now that you have extracted the intermediate and root certificates it's time to build the CA trust store bundle. This will be a PEM file that contains both our intermediate and root CA in base-64 format. Start by opening a blank notepad document. Then, Right-click the root CA we just exported select Open with, and click on Notepad. This will allow us to view the root CA certificate in the base-64 encoded format.
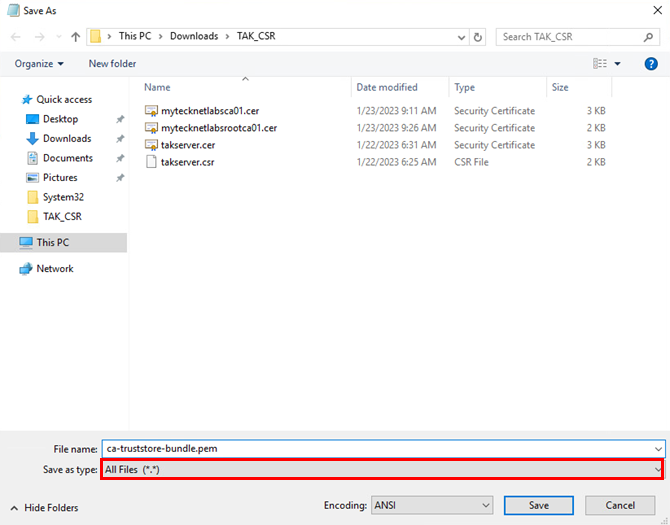
Copy the entire contents of the root CA certificate into the new blank notepad. This will be the bottom content of our CA trust store bundle file. Next, open the intermediate CA certificate and repeat the same steps. However, this time paste this at the top of our document. Repeat this for each additional intermediate CA certificate within your environment. When completed we should have our intermediate CA contents at the start of our file and the root CA at the end of our file. If your file is formatted like this go to File and select Save. We are going to name this file ca-truststore-bundle.pem, ensure that when saving in the Save as type, you select All Files (*.*) to accept the .pem extension.
Now that we have our CA trust store bundle created we need to transfer these files back to the TAK Server so that we can repack them and convert them into a Java Keystore file.
Migrating the certificate files
For this task, we will use secure copy which is built-in into most modern operating systems. To do so we will open a command prompt or terminal and type the following commands to copy them from our host system to our destination TAK Server. Navigate to the directory in which the certificate files are located. In our example, our files will be located in our Downloads directory which we will copy from our host system to our TAK Server.
For Windows Users
cd %userprofile%\Downloads
scp takserver.p7b <user>@<ipaddress>:~/
For Linux // your distribution may vary
cd ~/Downloads
scp takserver.p7b <user>@<ipaddress>:~/
macOS
cd ~/Downloads
scp takserver.p7b <user>@<ipaddress>:~/
Moving the P7B (PKCS7)
This is the file we received from the web certificate autoenrollment webpage in base-64 encoded format. The steps can be back referenced here.
# Copy our takserver.p7b to the TAK Server
scp takserver.p7b [email protected]:~/
Moving the PEMs
This step involves both moving our received signed certificate from our issuing CA and the CA trust store bundle we created with our intermediate and root certificates. This step can be back referenced here.
# Copy our CA trust store bundle we created
scp ca-truststore-bundle.pem [email protected]:~/CSR/

# Copy over our signed certificate
scp takserver.cer [email protected]:~/CSR/
Converting X.509 to PKCS12
This section is going to cover converting your signed public certificate into a PKCS12 (P12) file. This format will contain both the signed certificate and the private key.
Converting the TAK Server Certificate (Key store)
Converting the P7B (PKCS7)
Establish a secure shell connection to your TAK Server by using your preferred application of choice. Once successfully authenticated execute the OpenSSL commands below to extract and convert our signed public certificate. To cover procedures in this step we are going to extract the signed public certificate from our certificate chain. This is going to give us our public certificate without the associated private key. Next, we are going to combine our signed public certificate with our private key into a new certificate file format. Once that is complete we will verify the contents of our new file. This file should contain at the top the signed certificate identified by the subject followed by the intermediate certs and finally our root certificate at the bottom. A breakdown of these steps is below:
# Extract our signed public certificate from our PKCS7 bundle
openssl pkcs7 -print_certs -in takserver.p7b -out takserver.cer

# Add our private key and convert PKCS7 to PKCS12
openssl pkcs12 -export -out takserver.p12 -inkey takserver.key -in takserver.cer -name <FriendlyName> -passin pass:<password> -passout pass:<password>

# Example
#openssl pkcs12 -export -out takserver.p12 -inkey takserver.key -in takserver.cer -name tak.mytecknet.labs -passin pass:atakatak -passout pass:atakatak

# Verify the contents of our PKCS12 certificate
openssl pkcs12 -info -in takserver.p12
Once you have completed this task continue to Converting the TAK Server Certificate (Key store).
Converting the PEM
This step assumes that you generated your certificate request from the TAK Server and received the signed public certificate using the command line. Upon receiving the signed certificate you extracted the intermediate and root certificates and created a certificate trust store bundle file with your CAs. Finally, you copied both the signed public certificate and the certificate trust store bundle to the TAK Server.
To complete this step we are going to combine our CA trust store bundle with our signed public certificate and private key to create our PKCS12 file. Once that is complete we will verify the contents of our new file. This file should contain at the top the signed certificate identified by the subject followed by the intermediate certs and finally our root certificate at the bottom.
# Combine our certificate truststore bundle with our private key and signed certificate
openssl pkcs12 -export -certfile ca-truststore-bundle.pem -out takserver.p12 -inkey takserver.key -in takserver.cer -name <FriendlyName> -passin pass:<password> -passout pass:<password>

# Example
#openssl pkcs12 -export -certfile ca-truststore-bundle.pem -out takserver.p12 -inkey takserver.key -in takserver.cer -name tak.mytecknet.labs -passin pass:atakatak -passout pass:atakatak

# Verify the contents of our PKCS12 certificate
openssl pkcs12 -info -in takserver.p12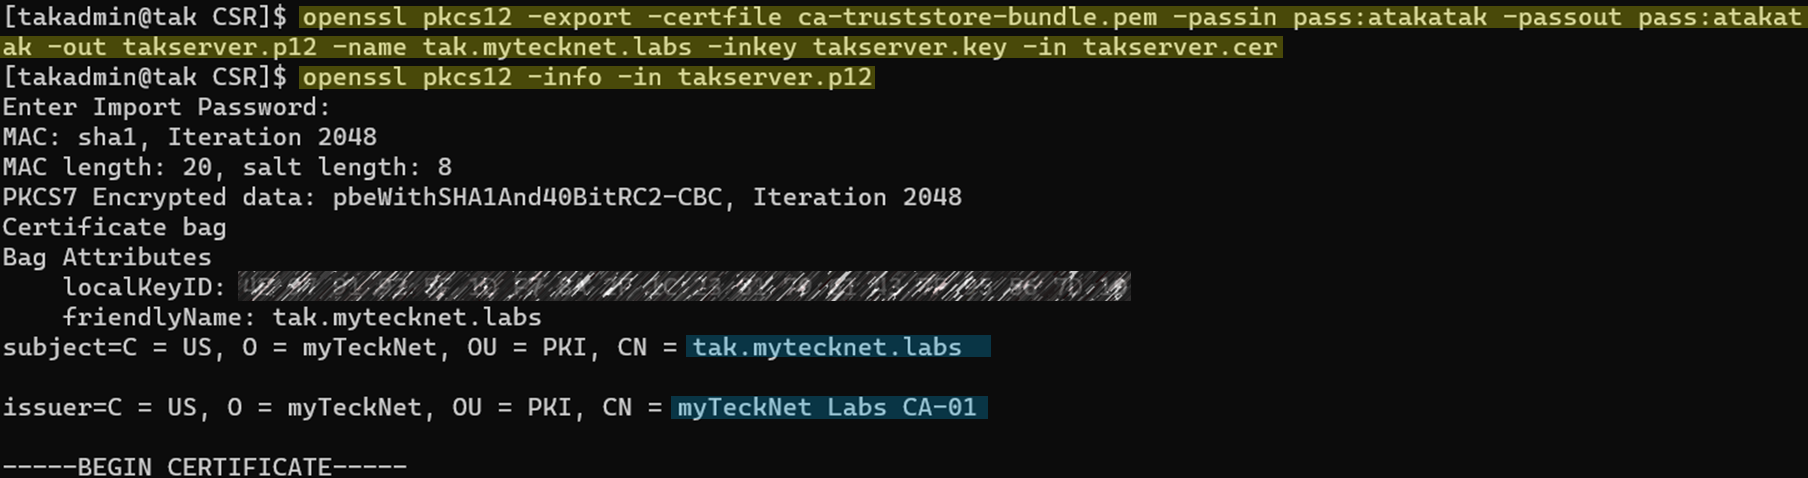
Converting PKCS12 to Java Keystore (JKS)
This will be our final step in the whole certificate conversion process. In this process, we are going to convert our PKCS12 (P12) into the Java Keystore format which is required by the TAK Server. The TAK Server will require two sets of key stores. The client key store which is contains our signed public certificate and certificate chain. The other key store is our trust store which contains all the public intermediate or root certificates that signed our certificate.
What is the difference between the stores and why are they important?
I will try to keep this as simple as possible without going deep into detail. The key store is the certificate that is presented when you attempt to access the TAK Server from either the TAK clients (ATAK, WinTAK, iTAK, etc.) or a web browser. The trust store is a library of trusted certificates that when presented to the TAK Server will trust. To explain the client-to-server process, when we as a TAK client initiate a connection to the TAK Server we will present our client certificate to the TAK Server and cross reference this certificate against its trust store library. If the presented client certificates intermediate or root certificates are present in the trust store the connection is established since it's considered a trusted source. If the intermediate or root certificates that signed the presented client certificate are not present in the TAK Server trust store the TAK Server will reject the connection because it considers the client certificate untrusted.
Converting the TAK Server Certificate (Key store)
Now that we have created our PKCS12 file we need to convert this to its final format, the Java Keystore (JKS). For this, we are going to use a new command proved by the Java toolset called the keytool. This command will allow us to create and modify certificates for use in the Java environment. Using this command we are going to create a new Java Keystore and add our trusted certificate bundle to this.
# Create the Java keystore and import our PKCS12 for our TAK Server
keytool -importkeystore -srcstoretype PKCS12 -destkeystore takserver.jks -srckeystore takserver.p12 -alias <FriendlyName> -srcstorepass <p12password> -deststorepass <JKSpassword> -destkeypass <JKSpassword>

# Example
#keytool -importkeystore -srcstoretype PKCS12 -destkeystore takserver.jks -srckeystore takserver.p12 -alias tak.mytecknet.labs -srcstorepass atakatak -deststorepass atakatak -destkeypass atakatak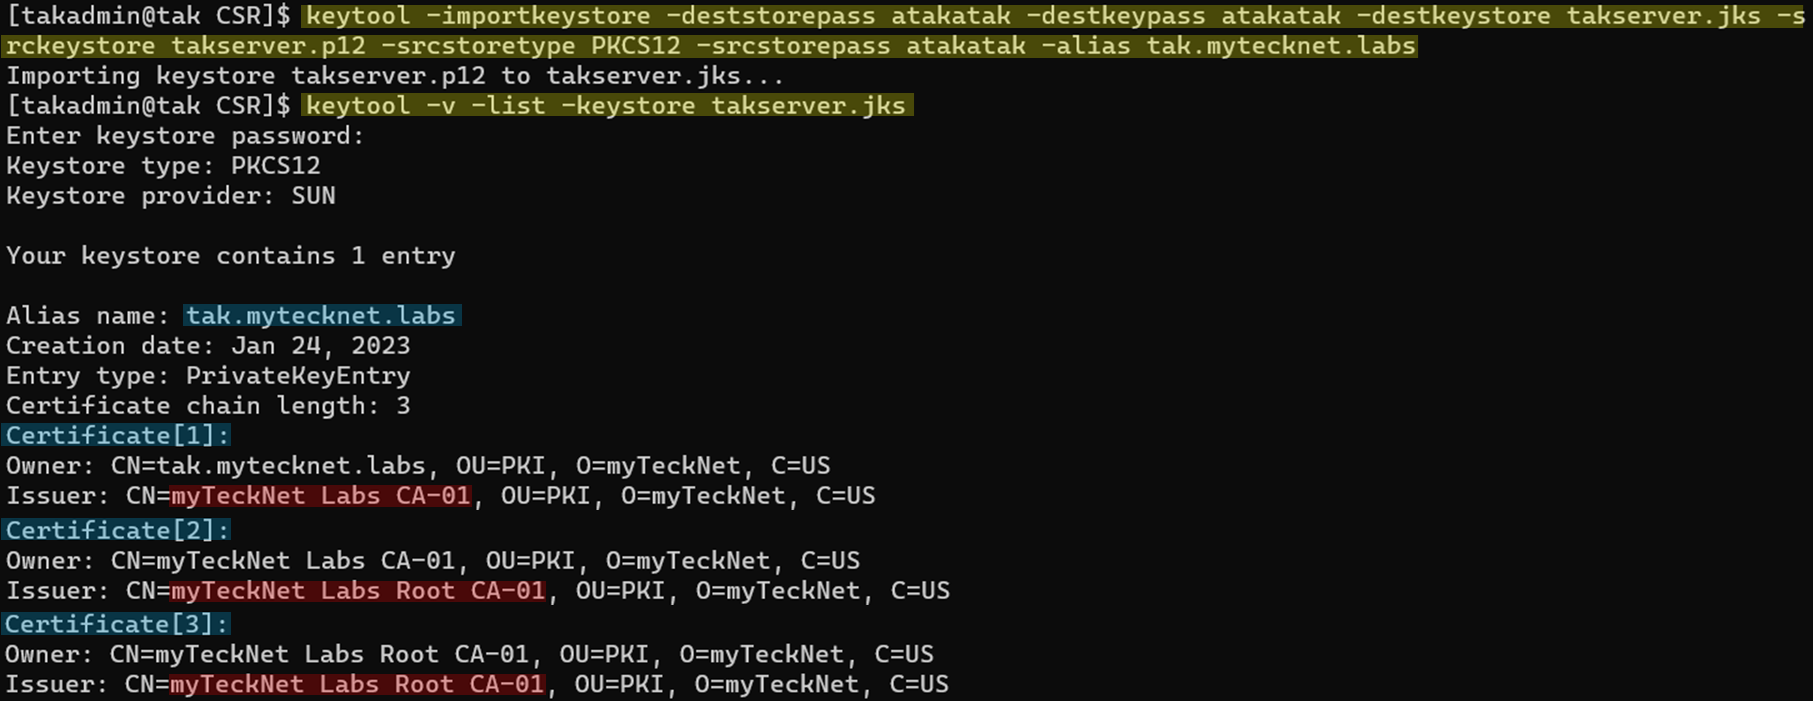
TAK Server Trust store (Trust store)
Next, we are going to create our trust store for our TAK Server. If you recall this is a library of trusted certificate authorities that the server will cross reference during the client-to-server connection. Depending on the method you used to sign your certificate signing request the process will be slightly different.
Extracting the P7B (PKCS7)
If you received your signed certificate using the web certificate autoenrollment webpage you should have requested the base-64 encoded certificate chain. The process will have us extract the certificates from this bundle into base-64 encoding for each certificate present. Then we are going to edit this newly created certificate by removing the first certificate present which is our signed public certificate. This is not required as our trust store only needs to contain the certificate chains for client certificates we want to trust. In this case, we want to only trust the certificate authorities that signed our TAK Server. If you wish to add additional external certificate authorities you would do so now by appending them to this file.
# Extract the certificates in the bundle into base-64 individually
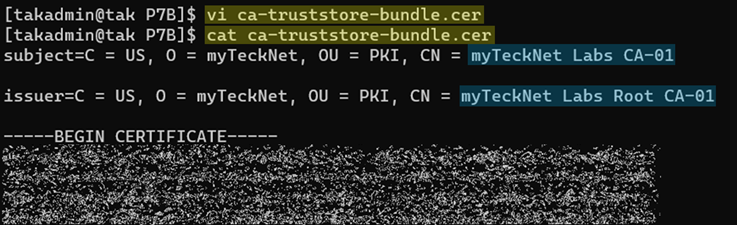
openssl pkcs7 -inform PEM -outform PEM -in takserver.p7b -print_certs > ca-truststore-bundle.cer
# View the contents of our output certificate file
cat ca-truststore-bundle.cerView the contents of the .cer and verify at a minimum it contains the complete certificate chain. In our example, we have at least three certificates: our issued certificate, intermediate, and root certificate.

Next, edit the .cer and remove our issued certificate from the file so that it only contains two certificates: our intermediate and root certificates. In the below example, referencing our previous screenshot we can see that the subject: tak.mytecknet.labs is no longer present because we removed it from the file.
Converting the PEM to JKS
Next, we are going to use a script to take all the certificates, create the trust store, and append each certificate into this newly created trust store.
First, we need to create a new file (i.e., vi installPEM.sh) with the .sh file extension and copy the contents below into this file.
#!/bin/bash
# Credit @Josh Blomberg for finding this
# Usage ./installPEM.sh {file.pem} {PEMPassword} {KeyStoreName}

PEM_FILE=$1
PASSWORD=$2
KEYSTORE=$3
# number of certs in the PEM file
CERTS=$(grep 'END CERTIFICATE' $PEM_FILE| wc -l)

# For every cert in the PEM file, extract it and import into the JKS keystore
# awk command: step 1, if line is in the desired cert, print the line
# step 2, increment counter when last line of cert is found
for N in $(seq 0 $((CERTS - 1))); do
ALIAS="${PEM_FILE%.*}-$N"
cat $PEM_FILE |
awk "n==$N {print}; /END CERTIFICATE/ {n++}" |
keytool -noprompt -import -trustcacerts -alias $ALIAS -keystore $KEYSTORE -storepass $PASSWORD
done
After we have created our script file (installPEM.sh) we need to make it executable. To do so we will use the chmod command with the execute option to make this file executable. Finally, we are going to run the script to create our new TAK Server trust store library. All the commands executed should look like this:
# Create the installPEM.sh
vi installPEM.sh

# Copy and paste the script contents to our new file
# Save this file
# Add the execute attribute to this script file
chmod +x installPEM.sh

# Use the installPEM.sh to create our new Java Keystore trust store library
./installPEM.sh <sourcePEM> <destJKSpassword> <destJKSTruststore>.jks

# Example
#./installPEM.sh ca-truststore-bundle.cer atakatak takserver-truststore.jks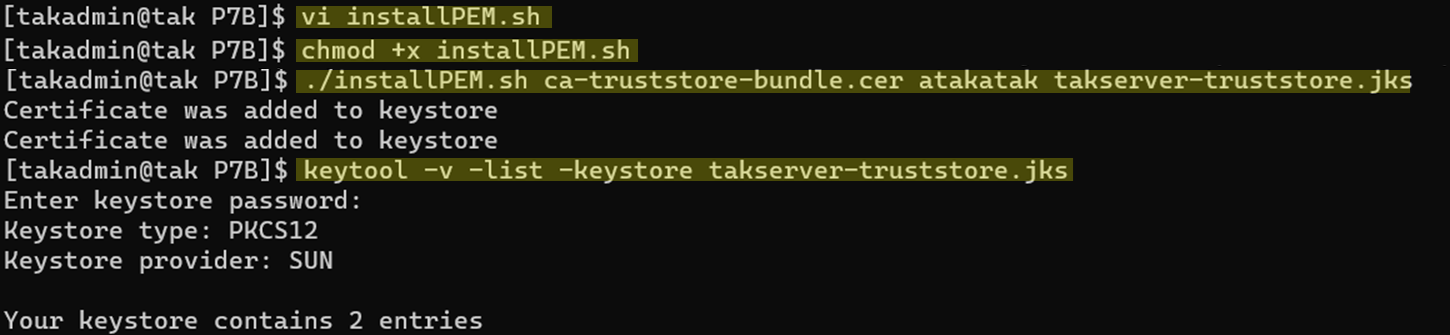
Applying the custom certificate
Almost there! Our last steps require us to move our new key store and trust store to the TAK certificate directory /opt/tak/certs/files and then change the permissions back to default. After that, we need to edit our TAK configuration file (CoreConfig.xml and CoreConfig.example.xml) with our new Java Keystores.
# Move/Copy the Java Keystores to the TAK certificate directory
cp -v takserver.jks /opt/tak/certs/files/takserver-signed.jks

# Move/Copy the trust store library to the TAK certificate directory
cp -v takserver-truststore.jks /opt/tak/certs/files/takserver-truststore.jks

# Set directory permissions back to default
sudo chown -R tak:tak /opt/tak
To make the change to our CoreConfig.xml and CoreConfig.example.xml we want to make a backup for safe measures. After we create our backup we stop the takserver service and edit both the configuration files starting with the example configuration and ending on the main configuration file.
# Change our working directory to /opt/tak
cd /opt/tak

# Stop the takserver service
sudo systemctl stop takserver

# Move our configuration files to our home directory
cp CoreConfig.xml ~
cp CoreConfig.example.xml ~
Before we edit out configuration files we need to know what sections to edit. If you followed the Let's build a TAK Server - RPM Edition we needed to edit the security and federation section of our configuration files to apply our new TAK Server certificate authority trust store. Now that our TAK Server is signed by an external certificate authority we need to edit this file again to point to our new key store and trust store. We need to modify the keystoreFile value under both the security and federation section and then only modify the truststore under the security section. Below is an example of the sections we are going to edit. The items in BOLD are the values that we will replace with our newly created certificate files.
<security>
<tls context="TLSv1.2" keymanager="SunX509" keystore="JKS" keystoreFile="certs/files/takserver.jks" keystorePass="atakatak" truststore="JKS" truststoreFile="certs/files/truststore-TAK-CA-01.jks" truststorePass="atakatak">
</tls>
<federation>
<federation-server port="9001">
<tls context="TLSv1.2" keymanager="SunX509" keystore="JKS" keystoreFile="certs/files/takserver.jks" keystorePass="atakatak" truststore="JKS" truststoreFile="certs/files/fed-truststore.jks" truststorePass="atakatak">
</federation-server>
</federation>
This is an example of our completed security and federations in both configuration files. Notice our keystoreFile references our newly TAK Server key store takserver-signed.jks and the truststore references our new CA bundle takserver-truststore.jks.
<security>
	<tls context="TLSv1.2" keymanager="SunX509" keystore="JKS" keystoreFile="certs/files/takserver-signed.jks" keystorePass="atakatak" truststore="JKS" truststoreFile="certs/files/takserver-truststore.jks" truststorePass="atakatak">
	</tls>
</security>
 <federation>
	<federation-server port="9001">
    	<tls context="TLSv1.2" keymanager="SunX509" keystore="JKS" keystoreFile="certs/files/takserver-signed.jks" keystorePass="atakatak" truststore="JKS" truststoreFile="certs/files/fed-truststore.jks" truststorePass="atakatak"/>
	</federation-server>
</federation>
Changing the default certificate password and Certificate Authority
After we have modified both configuration files we need to verify our configuration to ensure we have no errors. We will use the validateConfig.sh script which is located in /opt/tak/ directory. This file cannot be executed or referenced from outside this folder so ensure that you change the directory into the /opt/tak/ directory if you are not in that directory currently.
# change our working directory if not already in /opt/tak
cd /opt/tak

# Edit our configuration files
vi CoreConfig.example.xml
vi CoreConfig.xml

# Validate our configuration file
sh validateConfig.sh

# Change the directory permissions to default (just incase)
sudo chown -R tak:tak /opt/tak

# Restart the takserver service
sudo systemctl restart takserver
While the takserver service is restarting view the logs for any errors. If the certificates are loaded successfully you should see this within the takserver-api.log file. This log is located in the /opt/tak/logs/ directory. Below is a response to a good configuration and startup of the TAK Server web server.
[main] INFO o.s.b.w.e.tomcat.TomcatWebServer - Tomcat initialized with port(s): 8443 (https) 8446 (https)
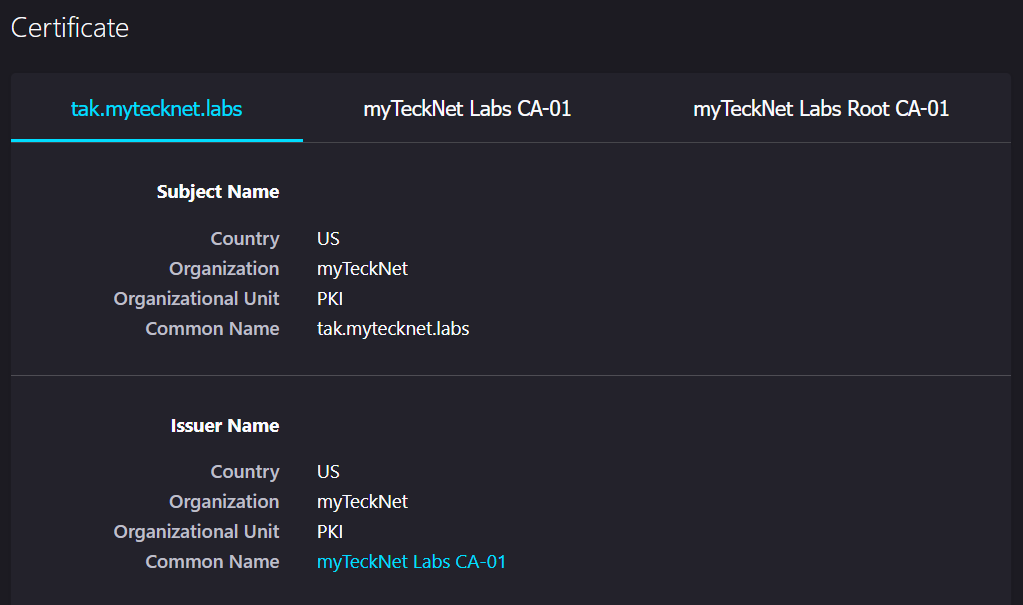
Give the TAK Server a few additional moments and attempt to access the TAK Server again. If you successfully accessed the TAK Server you can view the certificate chain in Firefox to see that our certificate has been successfully applied.
If you are the certificate authority administrator, I recommend creating a Certificate Template for the TAK Server that contains both the client and server authentication policies and a TAK Client template that contains just the client authentication policy.
Using Let's Encrypt
Let's Encrypt is a public certificate authority (CA) that provides for a large majority of today's public certificates to both public and private organizations. For this part of the guide, we will cover how to generate a public certificate from Let's Encrypt and apply this to our TAK Server using the cert_https connector on port 8446.
In this example, we are going to apply this certificate to our public-facing authentication page. This is the cert_https connector on port 8446 by default.
Before we can request a Let's Encrypt certificate we need to install some application dependencies. Extra Package for Enterprise Linux (EPEL) should be installed already if you installed the TAK Server. Next, we are going to install snapd which is a package installer by Canonical which is the same producer for Ubuntu OS lines.
 # Install EPEL
 sudo yum install epel-release

 # Install snapd
 sudo yum install snapd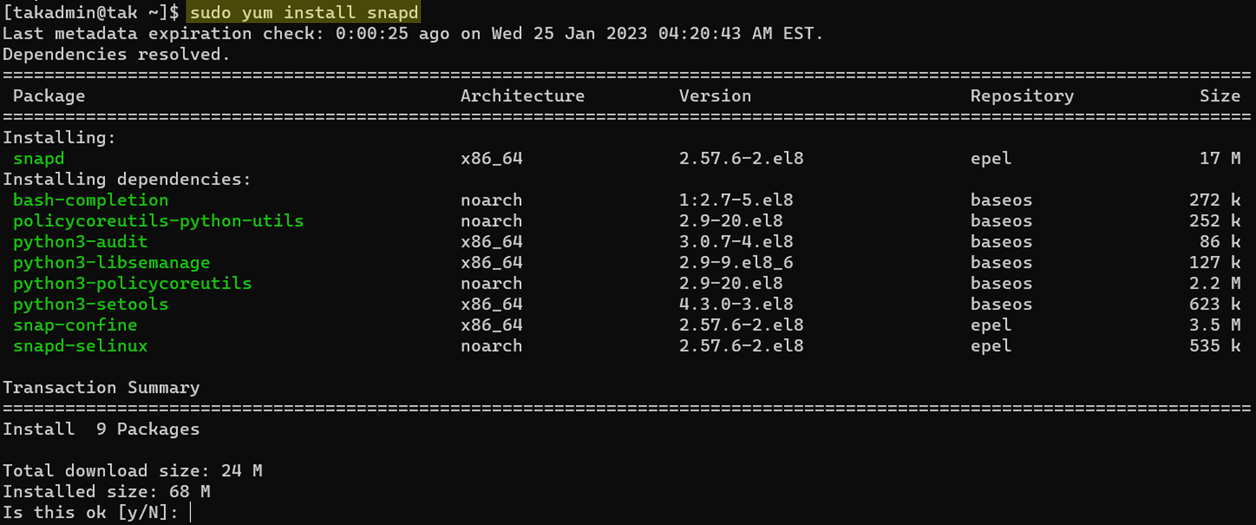
After snapd is installed we need to enable its process and link its binary.
# Enable snapd
sudo systemctl enable --now snapd.socket

# Create the symbolic link for snap
sudo ln -s /var/lib/snapd/snap /snap
Before we can request our certificate from Let's Encrypt we need to open port 80 on our TAK Server to allow Let's Encrypt to read and copy files to our server. This port is required and is part of the certificate request process. If you're running behind a firewall you will need to modify your firewall to port forward the request for port 80 to your TAK Server. This process will vary by firewall or router manufacture so consult your device manual or support page on that process.
To modify our TAK Server host firewall we need to issue the firewall-cmd to add an 80/TCP port and reload the firewall to apply the new configuration.
# Add 80/TCP to our public zone and make it permanent
sudo firewall-cmd --zone=public --add-port 80/tcp --permanent

# Reload the firewall to accept our changes
sudo firewall-cmd --reload

# View our firewall to verify the change
sudo firewall-cmd --list-all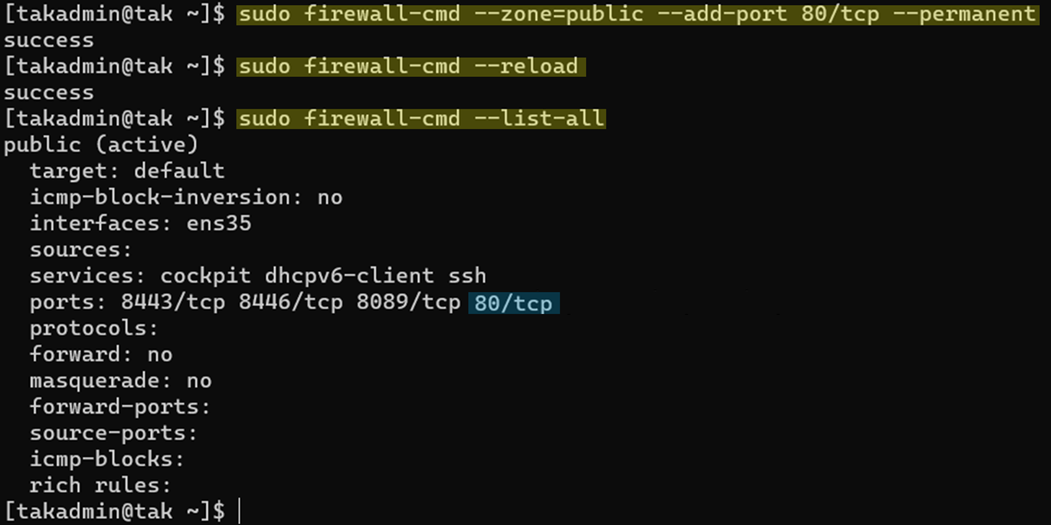
Now that our firewall is configured we need to can install certbot to initiate our request to Let's Encrypt to obtain our certificate. Certbot is an automatic certificate script that will submit our request and retrieve the signed certificate. Additionally, it can install the certificate for well-known web server applications. Since TAK does not rely on the default web server application directories we are going to request a standalone certificate to apply manually.
# Using snapd install certbox
sudo snap install --classic certbot

# Create the symbolic links to certbot
sudo ln -s /snap/bin/certbot /usr/bin/certbot
Using certbot we are going to begin the certificate signing request. Issue the option standalone to request a certificate but do not install it. During the process, it will ask you a series of questions before proceeding to the next step.
# Begin our certificate signing process for a standalone webserver
sudo certbot certonly --standalone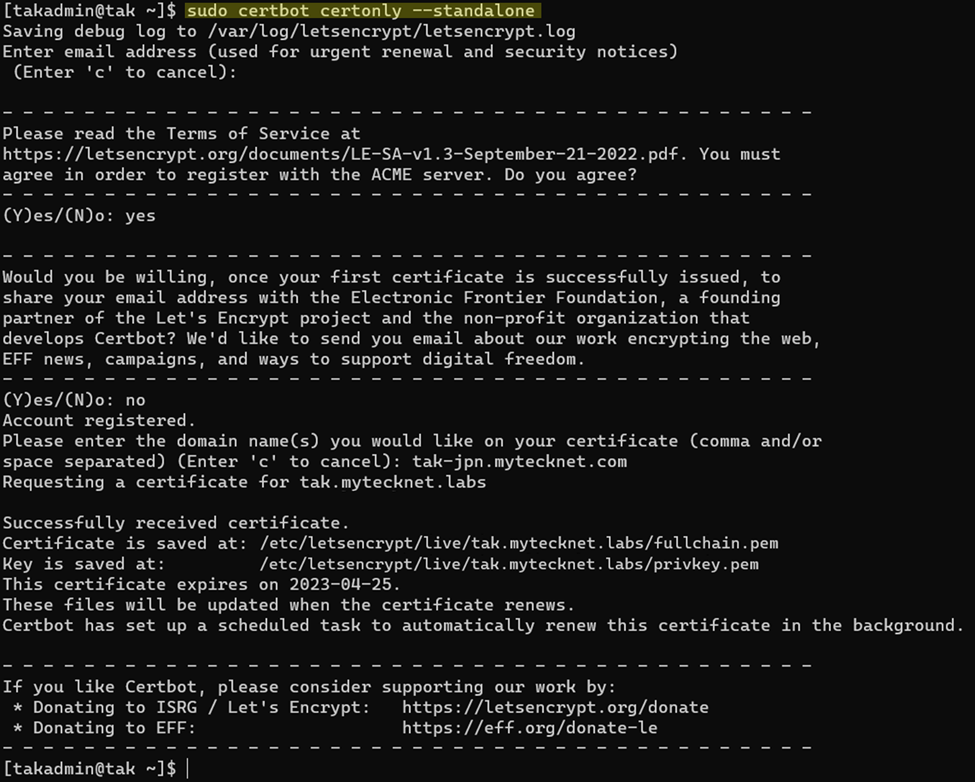
If you answered every question and your server was accessible because all the required ports and paths were open you will receive a signed certificate chain and private key in the /etc/letsencrypt/live/ directory. To view our certificate we can use the OpenSSL command to output our signed certificate contents.
# Verify our newly signed certificate by viewing the contents
openssl x509 -text -in /etc/letsencrypt/live/tak.mytecknet.labs/fullchain.pem -noout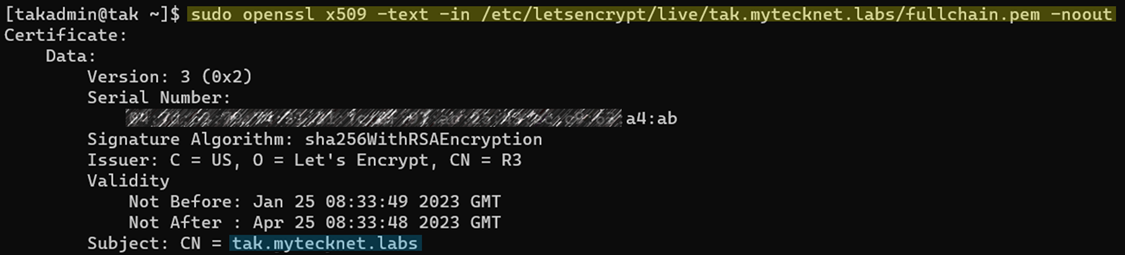
Before we continue, let's execute a dry run to verify our certificate renewal. By default certificates issued by Let's Encrypt are valid for 30 days, cetbot can be configured to renew a certificate automatically based on this timeline.
# Conduct a certificate renewal dry run to verify permissions and path
sudo certbot renew --dry-run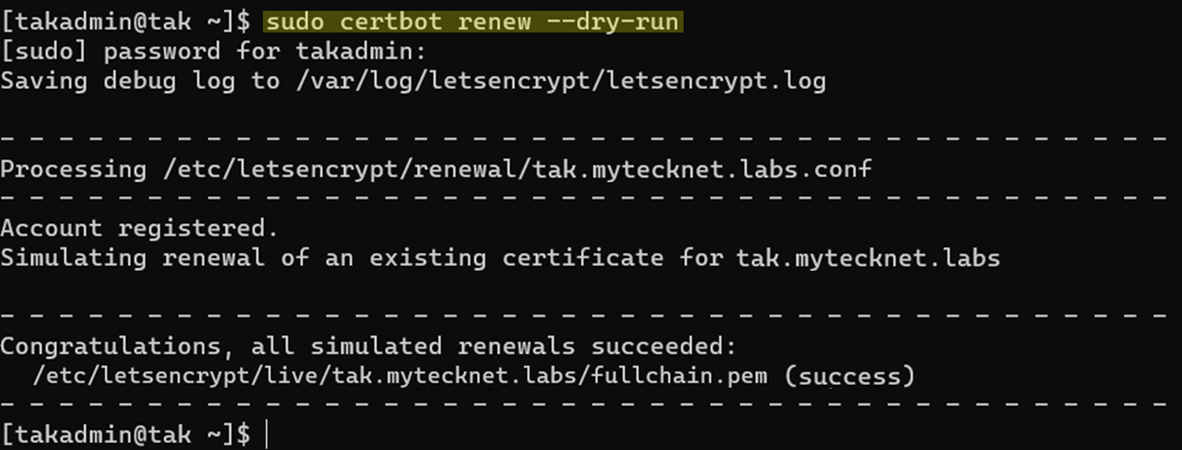
The process is the same as what we did when we received our own signed certificate from our own CA. This process involves us taking our certificate and combining it with our private key to generate the PKCS12 certificate. After that, we will convert that into the Java Keystore format. This will need to be done for both our key stores and trust stores.
# Create our PKCS12 certificate from our signed certificate and private key
sudo openssl pkcs12 -export -in /etc/letsencrypt/live/tak.mytecknet.labs/fullchain.pem -inkey /etc/letsencrypt/live/tak.mytecknet.labs/privkey.pem -out takserver-le.p12 -name tak.mytecknet.labs

# View our PKCS12 content
sudo openssl pkcs12 -info -in takserver-le.p12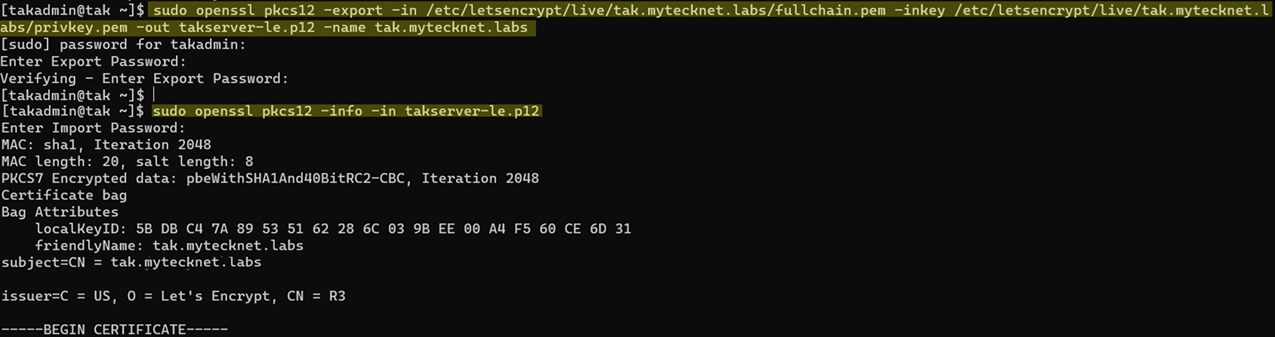
# Create our Java Keystore from our PKCS12 certificate
sudo keytool -importkeystore -destkeystore takserver-le.jks -srckeystore takserver-le.p12 -srcstoretype pkcs12
This completes the certificate conversion process. Now we need to move it to the certificates directory and reset the permissions to default.
# Move the certificate to the TAK certificate directory
sudo mv takserver-le.jks /opt/tak/certs/files

# Restore our permissions to default
sudo chown -R tak:tak /opt/tak
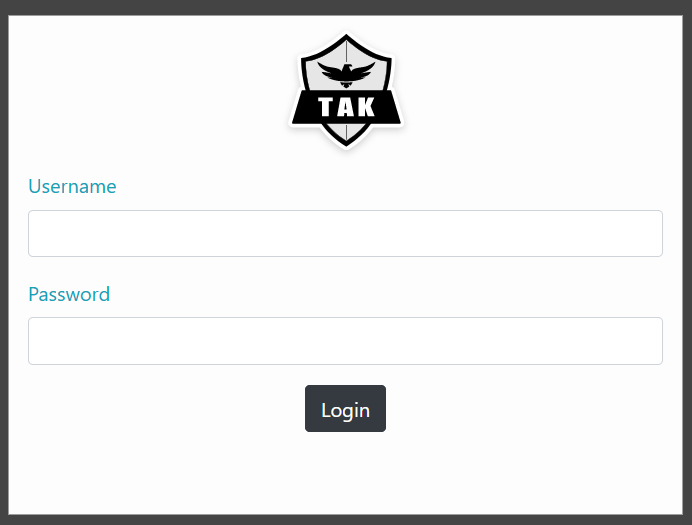
We are going to apply this certificate to the certificate autoenrollment port of our TAK Server which is hosted on port 8446. This port additionally allows us to enter our credentials to log into WebTAK as seen below. To make this change we are going to modify the connector for port 8664 by adding the key store information similar to the format in the security section of the configuration files.
To make this change permanent we will want to make this change in both our CoreConfig.example.xml and CoreConfig.xml. Before we do so we need to stop the takserver service and backup our configuration files.
# Change our working directory to /opt/tak
cd /opt/tak

# Stop the takserver service
sudo systemctl stop takserver

# Move our configuration files to our home directory
cp CoreConfig.xml ~
cp CoreConfig.example.xml ~
After we have moved our configuration files, we will edit our confirmation files to add the line below above the existing connector port 8446.
<connector port="8446" clientAuth="false" _name="LetsEncrypt" keystore="JKS" keystoreFile="certs/files/takserver-le.jks" keystorePass="atakatak"/>
Additionally, we will comment the old connector using <!-- <connector port="8446" .... > -->
An example is below:
<connector port="8446" clientAuth="false" _name="LetsEncrypt" keystore="JKS" keystoreFile="certs/files/takserver-le.jks" keystorePass="atakatak"/>

<!-- <connector port="8446" clientAuth="true" _name="cert_https"/> -->
After editing our configuration files we will restart our takserver service to apply our new settings. While the takserver service is restarting view the logs for any errors. If the certificates are loaded successfully you should see this within the takserver-api.log file. This log is located in the /opt/tak/logs/ directory. Below is a response to a good configuration and startup of the TAK Server web server
[main] INFO o.s.b.w.e.tomcat.TomcatWebServer - Tomcat initialized with port(s): 8443 (https) 8446 (https)
Give the TAK Server a few additional moments and attempt to access the TAK Server again. If you successfully accessed the TAK Server you can view the certificate chain in Firefox to see that our certificate has been successfully applied.
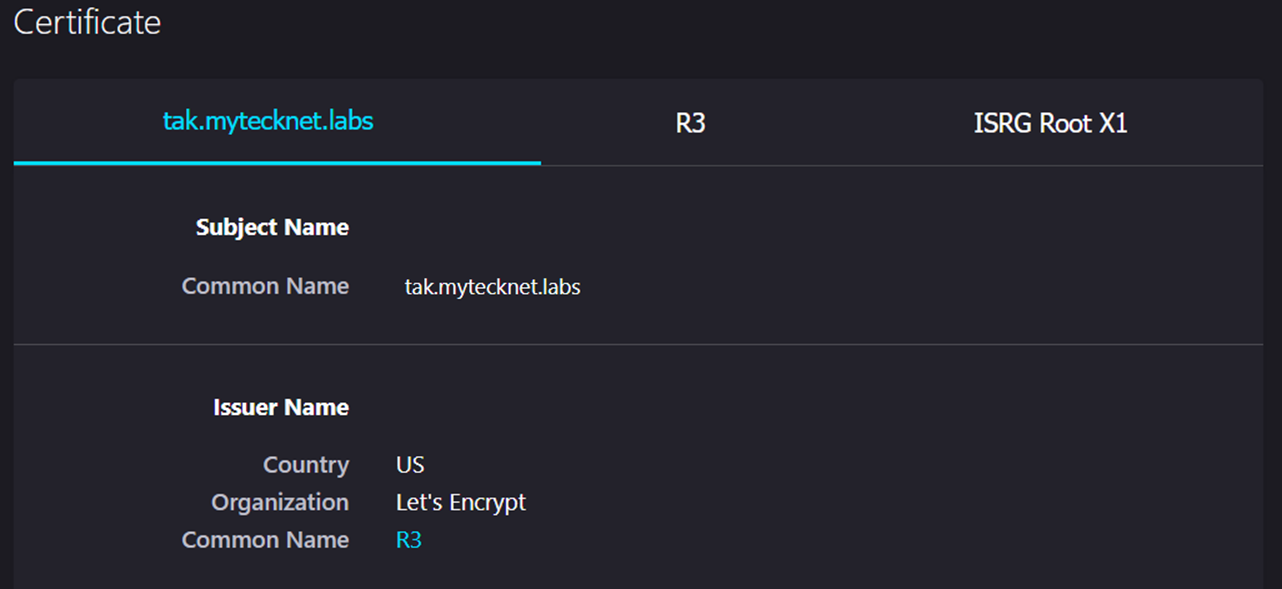
With Let's Encrypt applied to the cert_https port we can use Quick Connect on unprovisioned TAK clients to connect without having to pass our self-signed TAK Server public CA.
Summary
To summarize to use an external certificate authority (CA) we need to generate a certificate signing request (CSR) and submit this to our issuing CA. Once we receive our signed certificate we need to bundle our signed certificate with our private key to create a PKCS12 certificate file. Next, we need to create two additional certificate files by converting our PKCS12 files to make a client keystore and truststore file for our TAK Server. What we didn't cover was recreating our web administrator certificate since with the new CA our previous certificate is now invalid. This process is the same but requires a different Certificate Template by the issuing CA.
Here is a challenge I frequently use in my TAK Server production deployments. I have my TAK Server publically signed; however, I maintain my TAK Server as the issuing CA for all my clients. Knowing what you know now do you think you can figure it out now?
Spoiler
If you recall in my TAK Server build guide, your TAK clients will have a client certificate which is signed by the TAK Server. Along with that client certificate you have your TAK Server trust store certificate (truststore-TAK-CA-01.p12 we renamed to caCert.p12). When you attempt to connect to the TAK Server it will get rejected because the TAK Server no longer trusts the TAK Server CA certificates being presented by the client. This means you need to add the TAK Server certificate to the TAK Server trust store (takserver-truststore.jks).
We have another problem. The TAK client which is trying to connect to the TAK Server also doesn't trust the TAK Server because its own trust store (caCert.p12) doesn't trust the TAK Server. For this, we need to create a whole new certificate chain for our clients (caCert.p12) that contains both our external and internal certificates. The commands covered in this guide will help you solve this problem.
Happy Hunting! 😱
