Let's Build a TAK Server


Change Log
12Jan2024
- Updated the Updating the TAK Server section with descriptions.15Jan2024
- Added Java instructions for Ubuntu/Raspberry Pi OS for both single and two-server deployments.
- Added instructions for optionally changing the takserver commonName to use the IP address instead.17Jan2024
- Updated Certificate Autoenrollment and Revoking Certificate sections.23Sept2024
- Corrected command errors under Revoking Certificates and CRLs
This guide aims to build and familiarize ourselves with the installation and configuration process of a TAK Server. This will cover the binaries and containers provided by the TAK Product Center (TPC) at TAK.gov. Depending on the requirements, you can install the TAK Server using the RPM package manager (rpm), Debian software package (deb), or a Docker container. The overall difficulty of this task should be simple if you are familiar with the Linux environment; however, it may be challenging for those without. If this is your first time using Linux, take the time to read through the steps beforehand. This will assist with understanding the process; as navigating the command line can be challenging if you are not mindful of what directory and session you are in. This can lead to some command line confusion if you are not careful.
Do not worry, we will get there together!
In general, the TAK client does not require a server if your clients are all within the same subnet. The reason for this is that TAK clients use multicast to discover clients within the subnet. Think of your home network behind your router from your internet service provider. All clients within that network can see and share information on the network. To communicate outside of that network, they go through the router to connect them to external networks. It is a bit more detailed than that; nevertheless, it paints the picture. The TAK Server acts as the router to connect, unlike networks.
Let's get started!
System Overview
Requirements
The TAK Server requires very few resources to begin with. It is compact enough to fit on a 32 GiB, Raspberry Pi 4 with 8GB RAM.
- Min. 4 Cores, 8GB RAM, 40GB Storage
- Java OpenJDK
- 11 (TAK Server 4.9 and below)
- 17 (TAK Server 4.10 and up)
- PostgreSQL
- 10 (TAK Server 4.7 and below)
- 15 (TAK Server 4.8 and up)
Supported Operating Systems
The TAK Server can be installed on rpm-based or deb-based operating systems. The most common OS used:
- CentOS Linux 7 (not CentOS 8 Stream) [EOL: June 2024]
- Rocky Linux 8 (Replacement for CentOS 7) [Preferred for hassle-free installation]
- Red Hat Enterprise Linux (RHEL) 8 [RHEL 7 EOL: June 2024]
- Ubuntu 22
- Raspberry Pi OS (64bit)
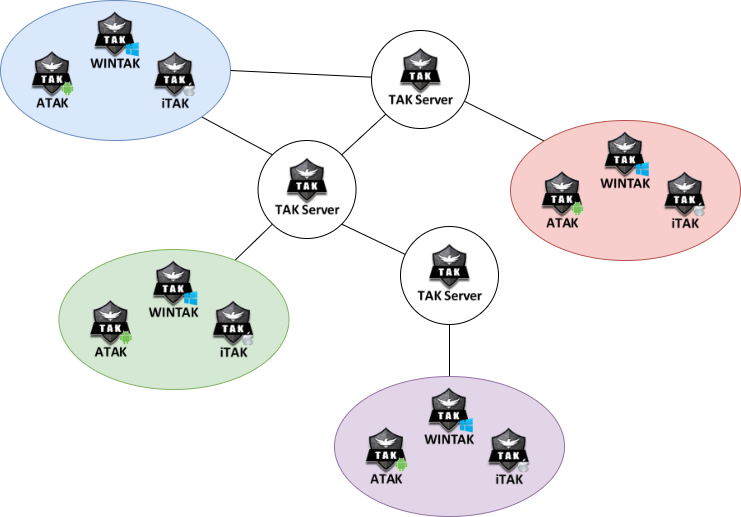
Communications Architecture
A typical TAK Server architecture includes clients connected to a locally hosted TAK Server that is connected to other TAK Servers. Optionally, TAK clients can connect to multiple TAK Servers as well. Not depicted is the ability for the TAK Server to inject external data as Cursor-on-Target (CoT) to feed connected clients. When a TAK Server is not in use, TAK Clients can directly ingest data as well in the CoT format.
Security
A TAK Server's security is dependent on the security of the underlying OS and the TAK Server configuration. To ensure a secure environment the topics covered within this guide will cover how to properly install, configure, and secure the TAK Server using best practices. Additional security and best practices can be found here.
 JR
JR
Installing the TAK Server
Examples include the Center for Internet Security (CIS) - Benchmarks or Defense Information Systems Agency (DISA) - Security Technical Implementation Guide (STIG)
takserver-rocky8; however, takserver-el8 and takserver_deb12 where used to capture the additional steps required for building on the supported OS. Reference the screenshots provided to determine which OS was used for the commands.This section will cover the installation of a single and two-server deployment. The single server deployment is the most common and involves both the core and database servers to be installed on a single host. In a two-server deployment, the core and database are on dedicated servers for resources.
If you are deploying a two-server environment, click here.
Single Server Setup
Prerequisites
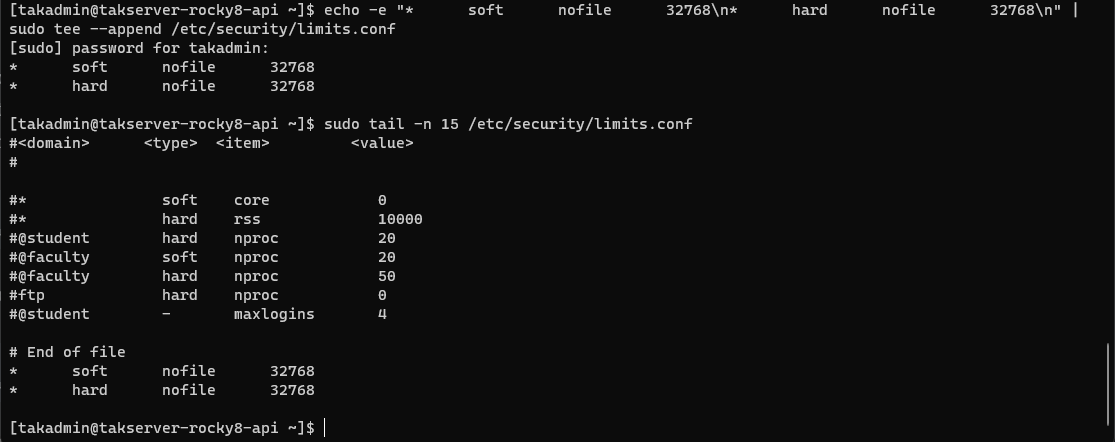
Starting with a fresh installation of a supported OS, we will need to modify the Linux pluggable authentication module limits set within the /etc/security/limits.conf. Within this file, we need to increase the number of file handles allowed within the per-user limit for open files to support Java threads. We will configure the soft (user override) and hard (root override) limits within this file. We can edit the file using a command line text editor (vi/vim, or nano) or a one-line command string.
# Increase JVM threads
# Each 'tab' is six spaces when typing manually
echo -e "*      soft      nofile      32768\n*      hard      nofile      32768\n" | sudo tee --append /etc/security/limits.conf
To edit using vi or vim type: sudo vi /etc/security/limits.conf or to use nano type: sudo nano /etc/security/limits.conf. Some Linux distributions do not come with Nano preinstalled and may need to be installed before executing the command.
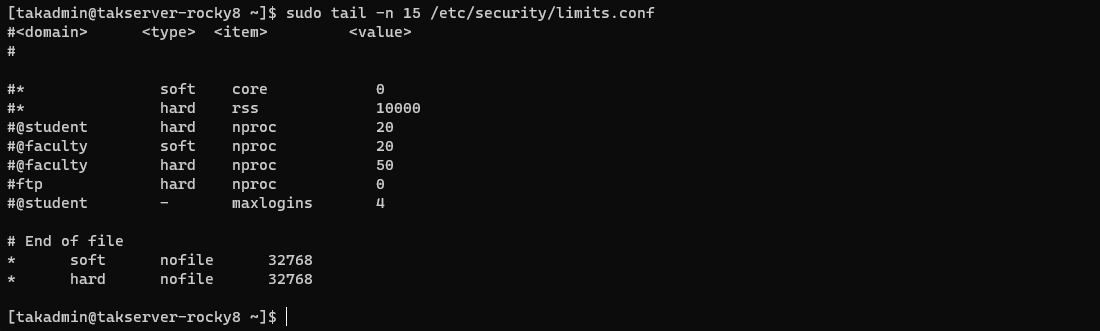
# Tail to view the end contents of a file
sudo tail -n 15 /etc/security/limits.conf
Rocky Linux/RHEL 8
# Install nano in Rocky and RHEL 8
sudo dnf install nano -y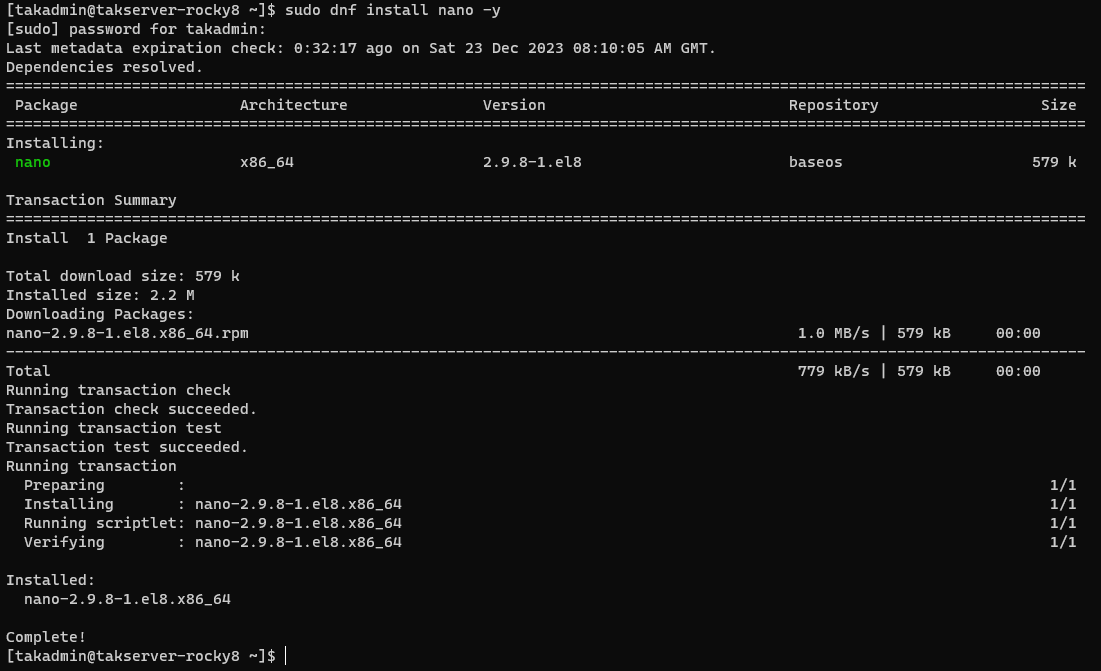
Ubuntu/Raspberry Pi OS
# Install nano in Ubuntu or Raspberry Pi OS
sudo apt install nano -y
When using the sudo command you will be prompted to enter your password to elevate privileges. Once the editor has opened, scroll down to the end of the /etc/security/limits.conf file and insert the following lines; insert a tab between each value:
* soft nofile 32768
* hard nofile 32768
Once complete, exit the editor ensuring you save your changes.

To validate the change, tail the limits.conf file.
Installing Extra Packages for Enterprise Linux
Next, we must install Extra Packages for Enterprise Linux (EPEL) to provide the extra repositories for dependencies required for PostgreSQL and PostGIS.
Rocky Linux 8
# Enable Powertools
sudo dnf config-manager --set-enabled powertools

# Install EPEL Rocky Linux 8
sudo dnf install epel-release -y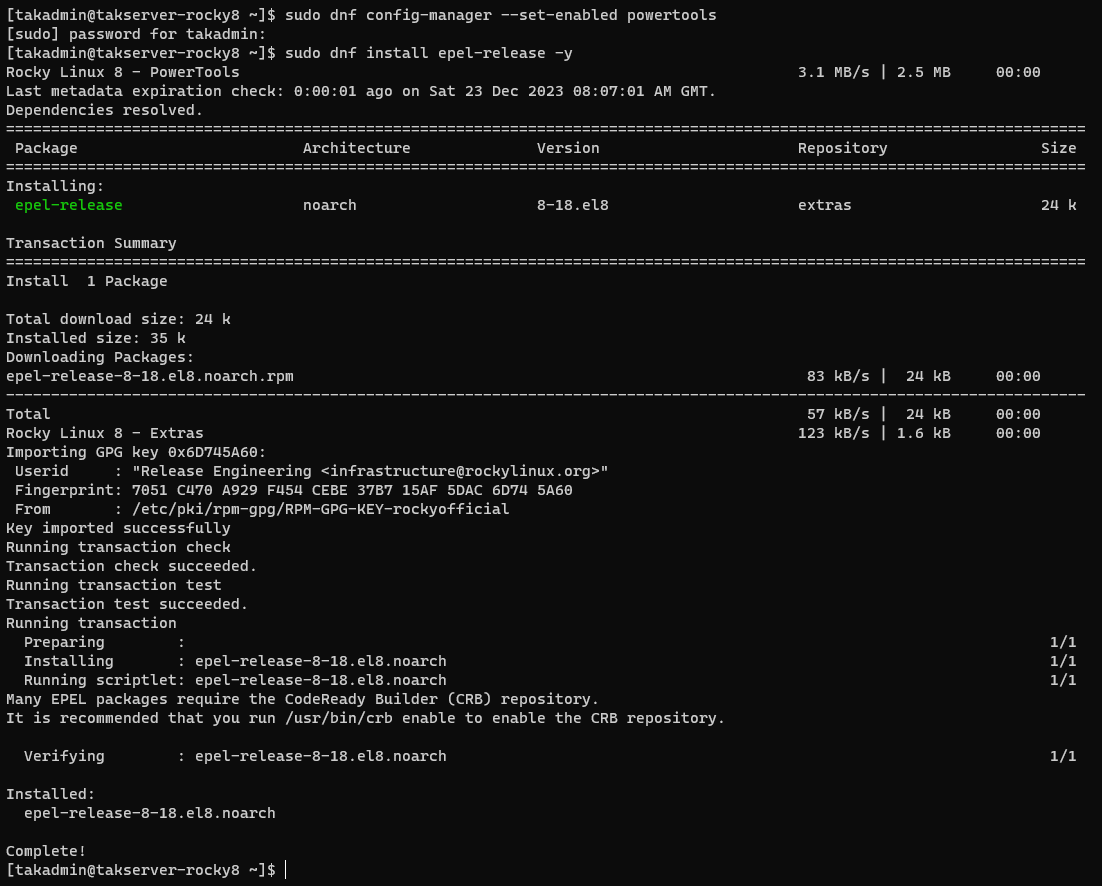
RHEL 8
# Enable Codeready Builder
sudo subscription-manager repos --enable codeready-builder-for-rhel-8-$(arch)-rpms

# Install EPEL RHEL 8
sudo rpm --import https://dl.fedoraproject.org/pub/epel/RPM-GPG-KEY-EPEL-8
sudo dnf install https://dl.fedoraproject.org/pub/epel/epel-release-latest-8.noarch.rpm -y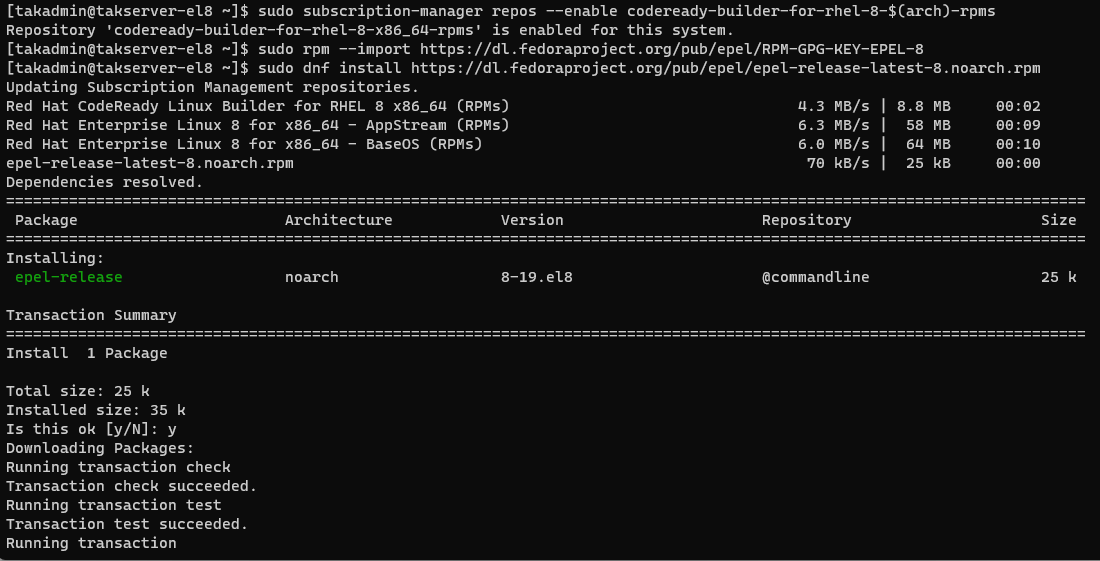
Installing PostgreSQL and PostGIS
After completing the installation of EPEL, we need to add the PostgreSQL and PostGIS repositories as well. This will install the appropriate version outlined in the requirements.
Rocky Linux/RHEL 8
# Install PostgreSQL/PostGIS 15 for Rocky Linux/RHEL 8
sudo rpm --import https://download.postgresql.org/pub/repos/yum/keys/PGDG-RPM-GPG-KEY-RHEL
sudo dnf install https://download.postgresql.org/pub/repos/yum/reporpms/EL-8-x86_64/pgdg-redhat-repo-latest.noarch.rpm -y
sudo dnf -qy module disable postgresql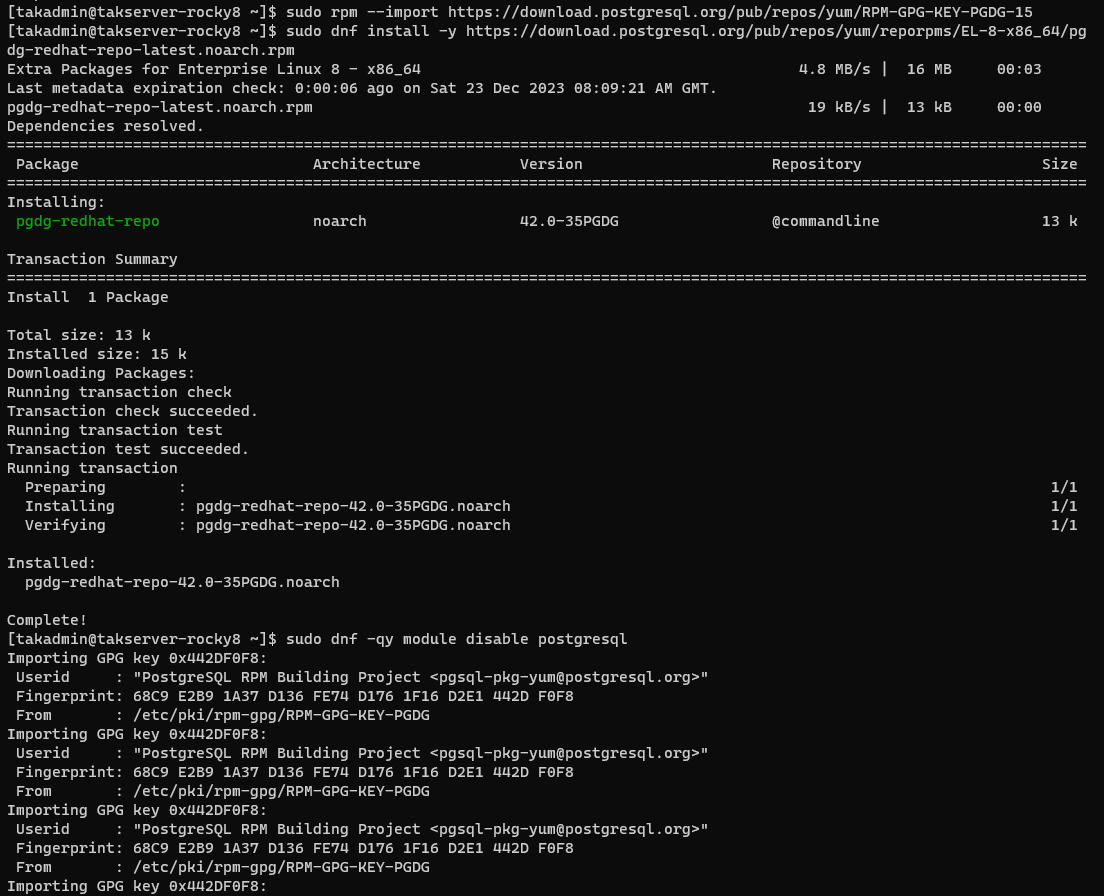
Ubuntu/Raspberry Pi OS
apt-key is being depreciated and will last be available in Debian 11 and Ubuntu 22.04. Both methods of adding the keyring will be shown to support those with legacy versions.# Install PostgreSQL/PostGIS 15 for Ubuntu/Raspberry Pi OS
sudo sh -c 'echo "deb https://apt.postgresql.org/pub/repos/apt $(lsb_release -cs)-pgdg main" > /etc/apt/sources.list.d/pgdg.list'
wget -O- https://www.postgresql.org/media/keys/ACCC4CF8.asc | gpg --dearmor | sudo tee /etc/apt/trusted.gpg.d/postgresql.org.gpg > /dev/null
# LEGACY Ubuntu/Raspberry Pi OS
wget --quiet -O - https://www.postgresql.org/media/keys/ACCC4CF8.asc | sudo apt-key add -
👀 Oops, seems we got an error. Since I had installed using minimum requirements many dependencies were not installed. To resolve this we simply need to install GnuPG, GnuPG2, or GnuPG1.
# Install the missing binary
sudo apt install gnupg -y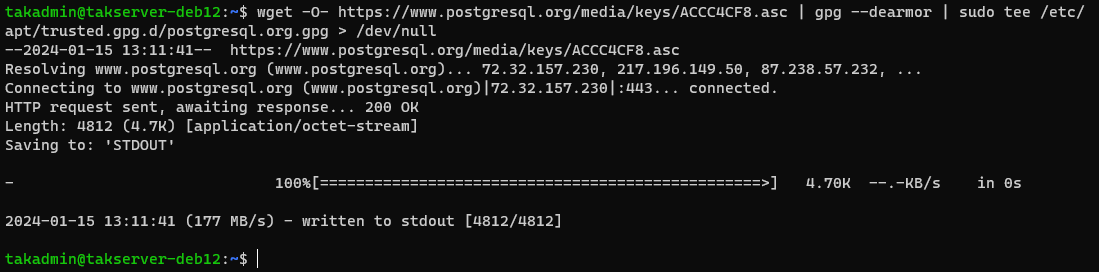

Finally, once we have completed all these steps, we need to update our repository database with the recent changes.
Rocky Linux/RHEL 8
# Update Rocky Linux/RHEL 8
sudo dnf update -y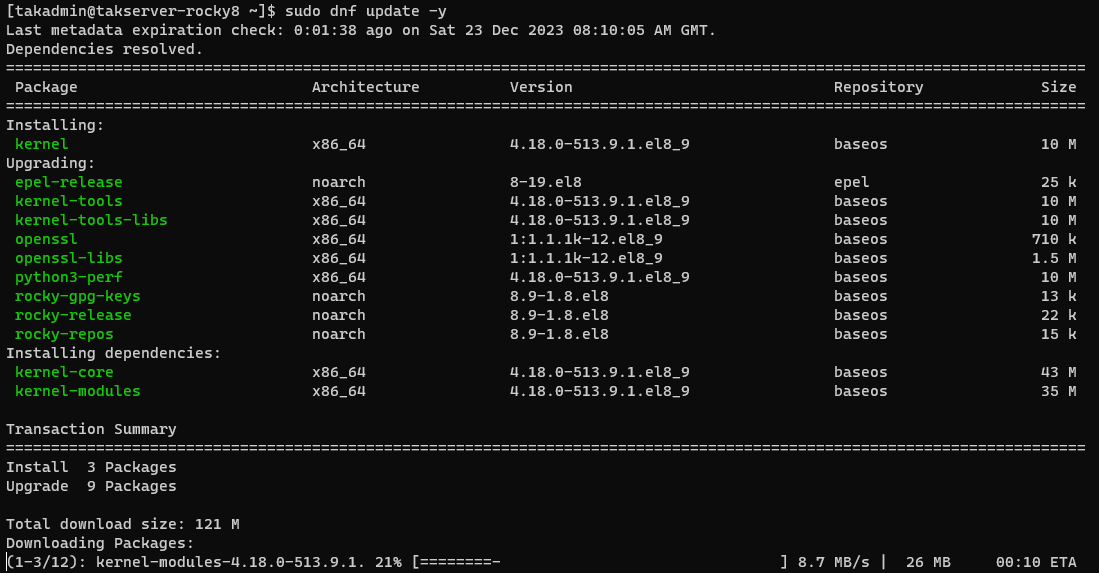
Ubuntu/Raspberry Pi OS
# Update Ubuntu/Raspberry Pi OS
sudo apt update -y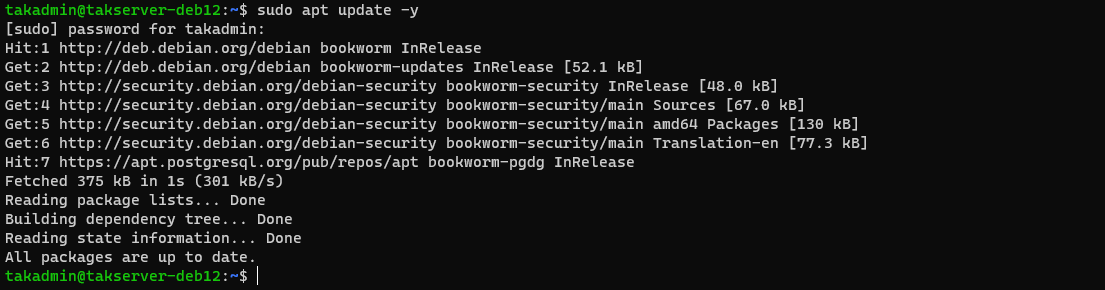
Installing Java OpenJDK
Finally, install the appropriate Java OpenJDK version for the appropriate version outlined in the requirements.
Rocky Linux/RHEL 8
# Install Java 17 OpenJDK Devel
sudo dnf install java-17-openjdk-devel -y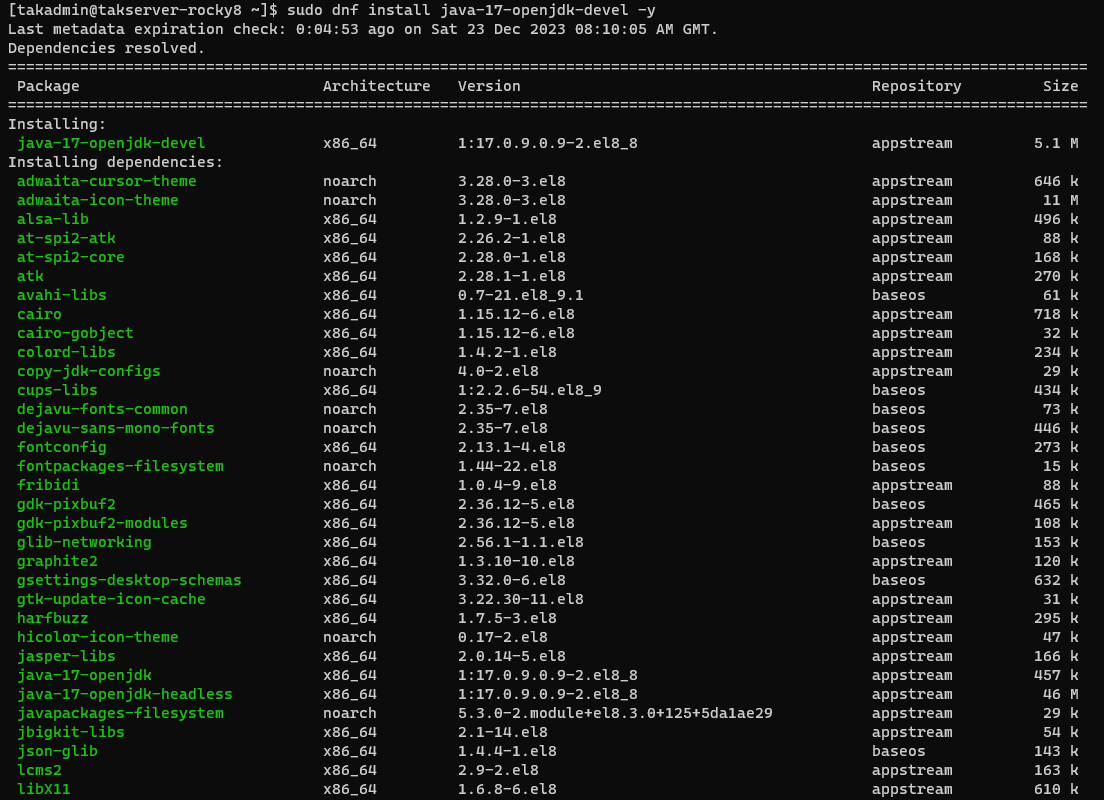
Ubuntu/Raspberry Pi OS
In some distributions, Java comes preinstalled. You can check if your distribution applies by executing the java --version command. If you get command not found this means you will need to install OpenJDK-17-jre.

# Install Java 17 for Ubuntu/Raspberry Pi OS
sudo apt install openjdk-17-jre
Installation Instructions
This section will cover installing the TAK Server using the installation files (.rpm or .deb) provided by the TAK.gov website. Due to the continuous deployment of the TAK Server and its releases, this guide assumes you will install the latest release.
Copying files from Windows/Mac to Linux
For this task, we will use secure copy (SCP) which is built into the secure shell ecosystem in most modern OS. To use this command, open a terminal, command prompt, or PowerShell window. Navigate to the directory where the TAK Server installation binaries are located.
Open in Terminal, Open PowerShell window here, or if you have Windows Subsystem for Linux (SWL), select Open Linux shell here. This will open a terminal window in the desired directory.The basic syntax for scp is scp options <sourceFile> <username>@<dstServer>. Since we are copying to Linux we need to specify a target directory within the Linux file structure. Typically this is ~/ which is the Linux user's home directory.
zsh: no matches found: when using * in the scp command we need to escape \ the wildcard.EXAMPLE:
scp takserver-5.\*.rpm [email protected]:~/# Copy files to Linux
scp takserver-5.*.rpm <username>@<takserver>:~/
# EXAMPLE
# scp takserver-5.*.rpm [email protected]:~/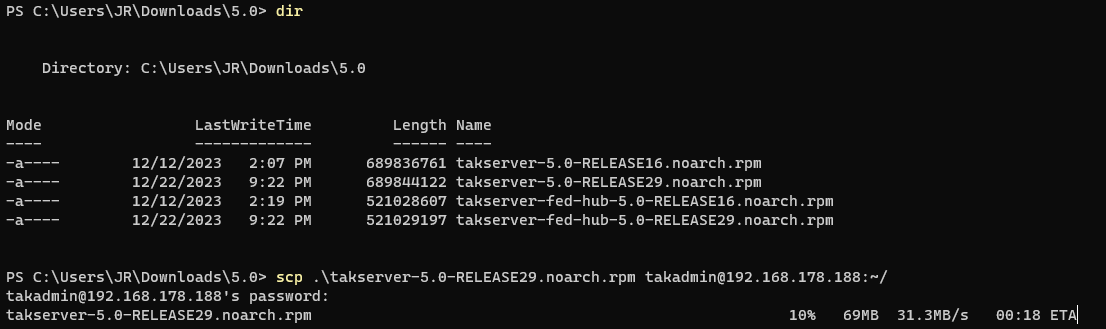
If preferred a graphical user interface to copy from Windows to Linux, WinSCP is a popular application for this task. For additional information on copying from MacOS to Linux can be found here.
After the installation files have been copied to the target host we can begin the installation procedures.
Rocky Linux/RHEL 8
# Install TAK Server 5.x in Rocky Linux/RHEL 8
sudo dnf install takserver-5.*.rpm -y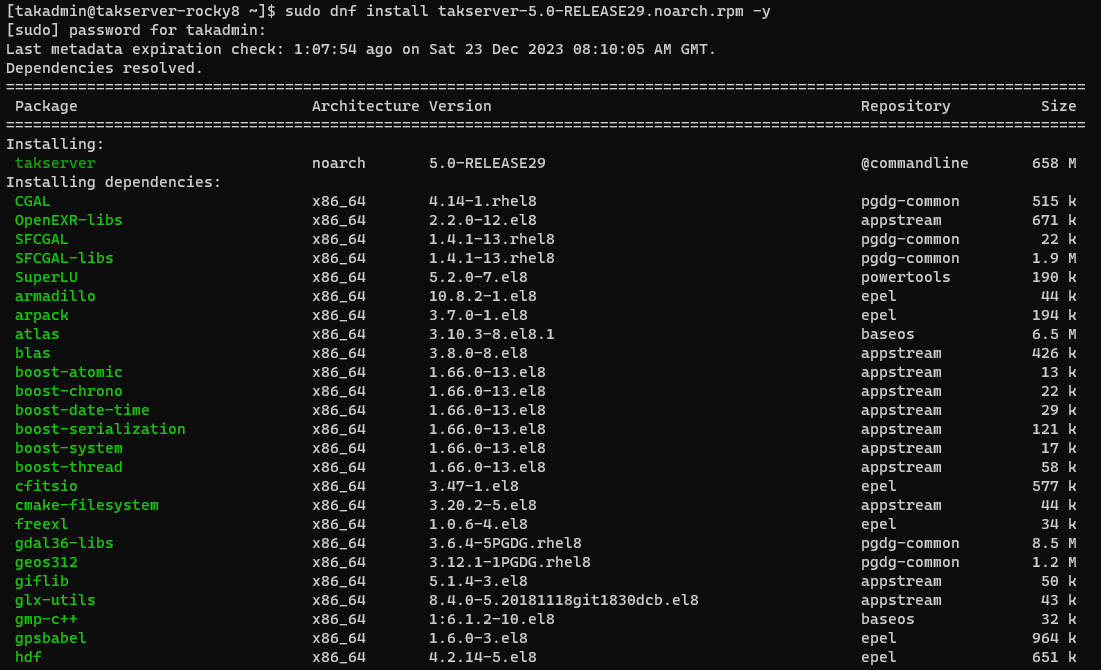
Security-Enhanced Linux (SELinux)
SELinux stands for Security-Enhanced Linux and is a security feature developed initially by the National Security Agency (NSA) that provides a technical control for supporting access security and mandatory access controls. In some installations of Linux SELinux is enabled to enforce security configurations. To determine if SELinux is enforcing we will use the getenforce command to get the SELinux status.
# Check SELinux status
getenforce
What to do if SELinux is Enforcing? If SELinux is enforced we need to apply the SELinux profile for the TAK Server by installing an extra package before applying the SELinux profile.
Rocky Linux 8
# Install checkpolicy
sudo dnf install checkpolicy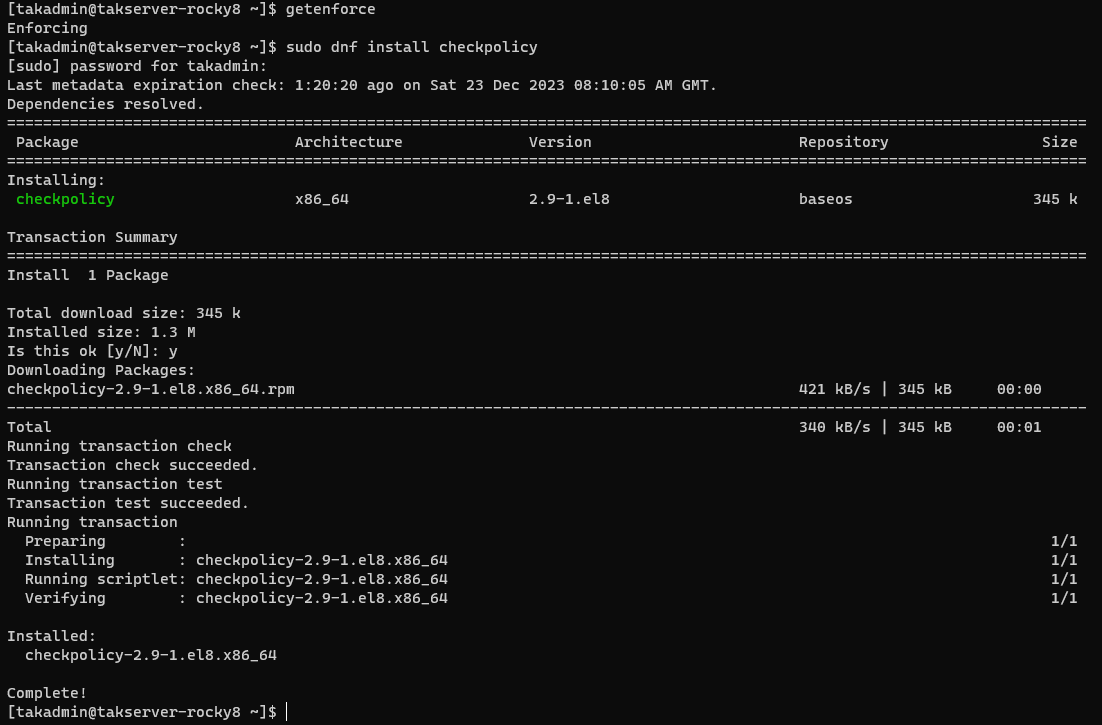
Rocky Linux/RHEL 8
# Apply the TAK Server SELinux Profile
 cd /opt/tak && sudo ./apply-selinux.sh
Ubuntu/Raspberry Pi OS
# Install TAK Server 5.x in Ubuntu/Raspberry Pi OS
sudo apt install ./takserver_5.0-RELEASE29_all.deb -y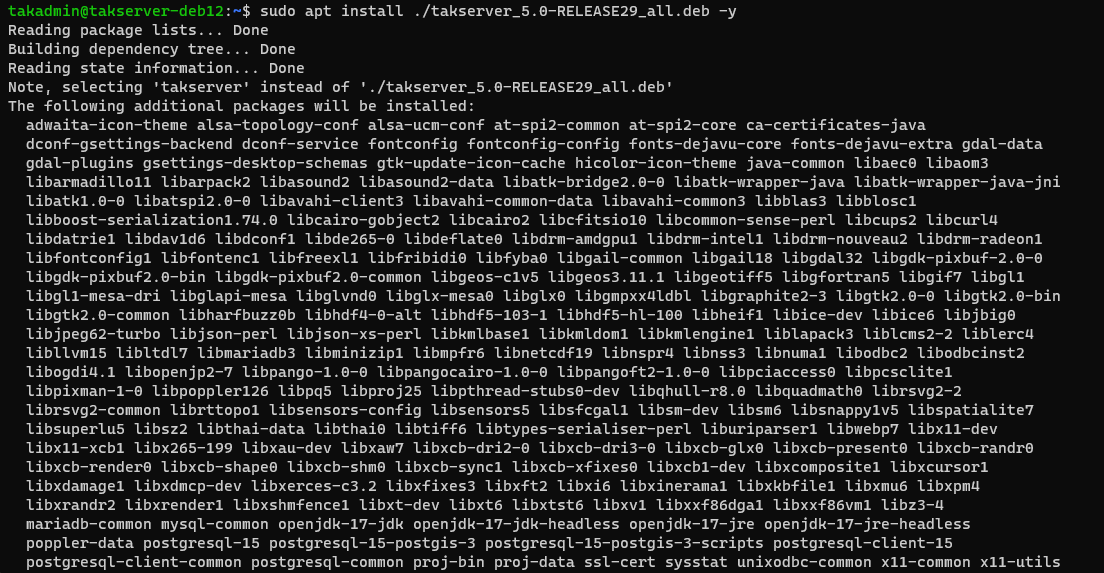
Once we complete the installation of our single server, can move on to the post-configuration tasks.
Two-Server Setup
The two-server setup involves creating two servers; one that will act as the core server to provide the API and functions to our clients, the other is the database server that will store our contents.
Database Server
Starting with a fresh installation of a supported OS, we will cover how to install EPEL, PostgreSQL, PostGIS, and Java for our database TAK Server requirements. Additionally, we will need to configure our firewall to allow inbound communications from our core server to the database.
Installing Extra Packages for Enterprise Linux
First, we must install Extra Packages for Enterprise Linux (EPEL) to provide the extra repositories for dependencies required for PostgreSQL and PostGIS.
Rocky Linux 8
# Enable Powertools
sudo dnf config-manager --set-enabled powertools

# Install EPEL Rocky Linux 8
sudo dnf install epel-release -y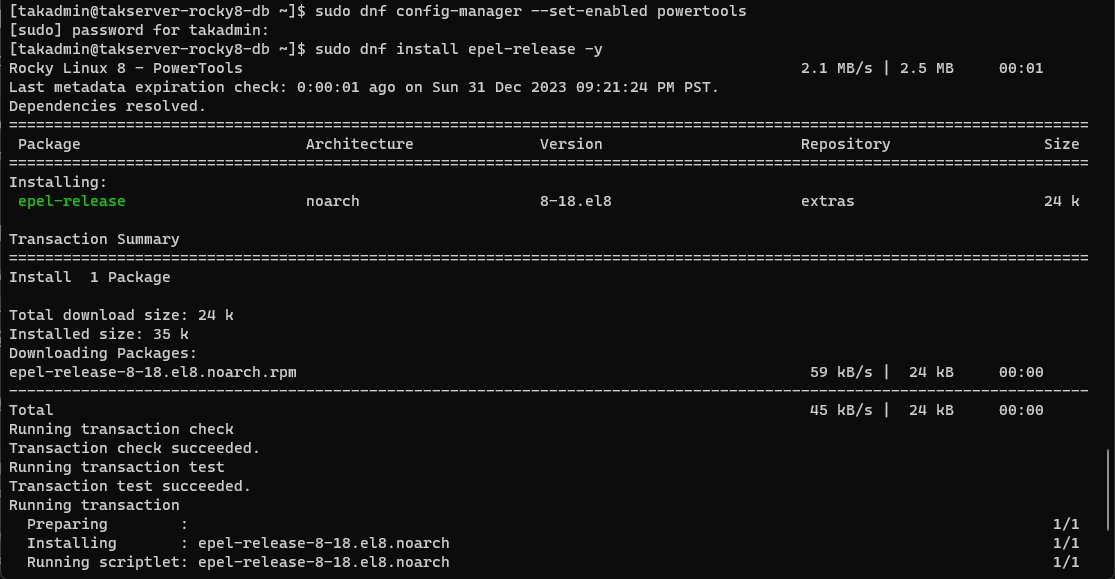
RHEL 8
# Enable Codeready Builder
sudo subscription-manager repos --enable codeready-builder-for-rhel-8-$(arch)-rpms

# Install EPEL RHEL 8
sudo rpm --import https://dl.fedoraproject.org/pub/epel/RPM-GPG-KEY-EPEL-8
sudo dnf install https://dl.fedoraproject.org/pub/epel/epel-release-latest-8.noarch.rpm -y
Installing PostgreSQL and PostGIS
After completing the installation of EPEL, we need to add the PostgreSQL and PostGIS repositories as well. This will install the appropriate version outlined in the requirements.
Rocky Linux/RHEL 8
# Install PostgreSQL/PostGIS 15 for Rocky Linux/RHEL 8
sudo rpm --import https://download.postgresql.org/pub/repos/yum/RPM-GPG-KEY-PGDG-15
sudo dnf install https://download.postgresql.org/pub/repos/yum/reporpms/EL-8-x86_64/pgdg-redhat-repo-latest.noarch.rpm -y
sudo dnf -qy module disable postgresql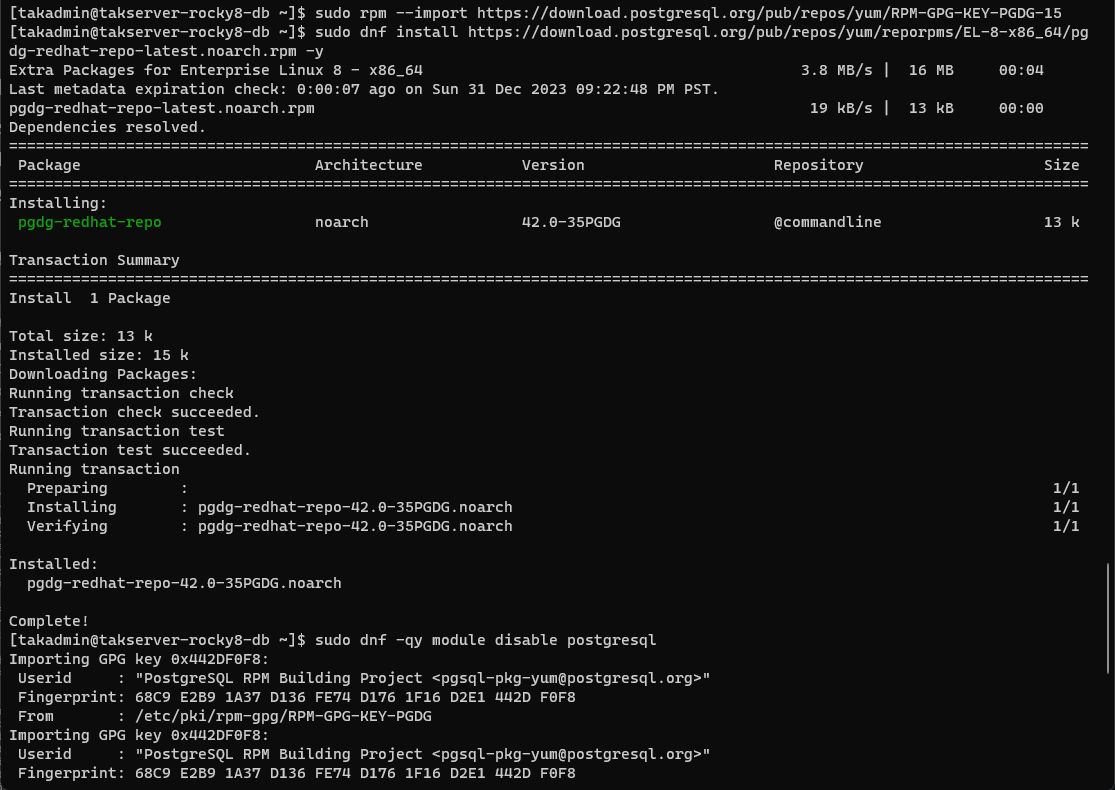
Ubuntu/Raspberry Pi OS
apt-key is being depreciated and will last be available in Debian 11 and Ubuntu 22.04. Both methods of adding the keyring will be shown to support those with legacy versions.# Install PostgreSQL/PostGIS 15 for Ubuntu/Raspberry Pi OS
sudo sh -c 'echo "deb https://apt.postgresql.org/pub/repos/apt $(lsb_release -cs)-pgdg main" > /etc/apt/sources.list.d/pgdg.list'
wget -O- https://www.postgresql.org/media/keys/ACCC4CF8.asc | gpg --dearmor | sudo tee /etc/apt/trusted.gpg.d/postgresql.org.gpg > /dev/null
# LEGACY Ubuntu/Raspberry Pi OS
wget --quiet -O - https://www.postgresql.org/media/keys/ACCC4CF8.asc | sudo apt-key add -👀 Oops, seems we got an error. Since I had installed using minimum requirements many dependencies were not installed. To resolve this we simply need to install GnuPG, GnuPG2, or GnuPG1.
# Install the missing binary
sudo apt install gnupg -yFinally, once we have completed all these steps, we need to update our repository database with the recent changes.
Rocky Linux/RHEL 8
# Update Rocky Linux/RHEL 8
sudo dnf update -y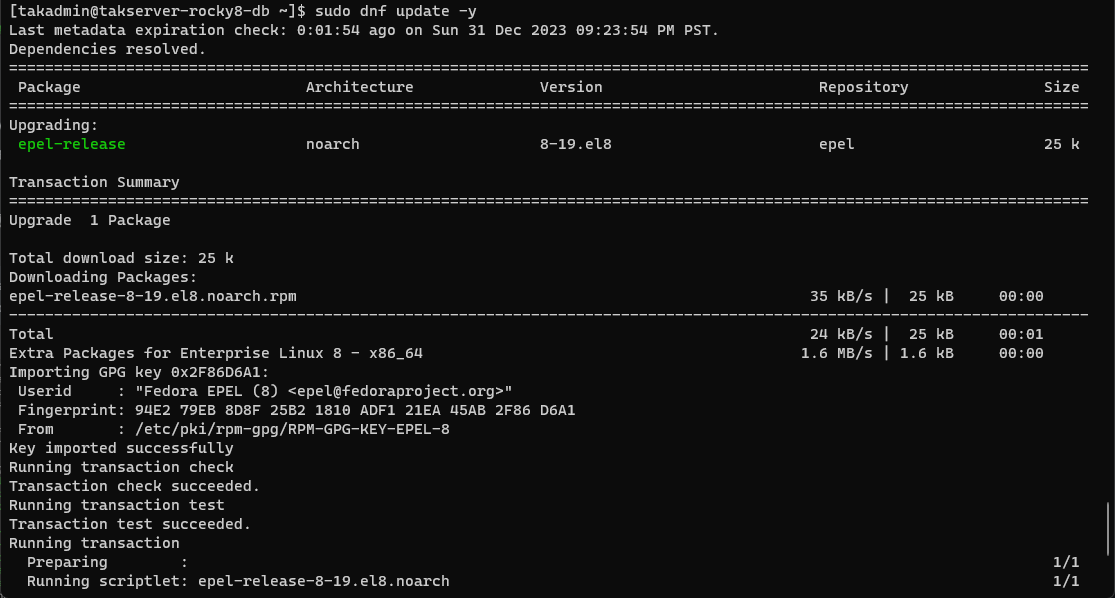
Ubuntu/Raspberry Pi OS
# Update Ubuntu/Raspberry Pi OS
sudo apt update -yInstalling Java OpenJDK
Finally, install the appropriate Java OpenJDK version for the appropriate version outlined in the requirements.
Rocky Linux/RHEL 8
# Install Java 17 OpenJDK Devel
sudo dnf install java-17-openjdk-devel -y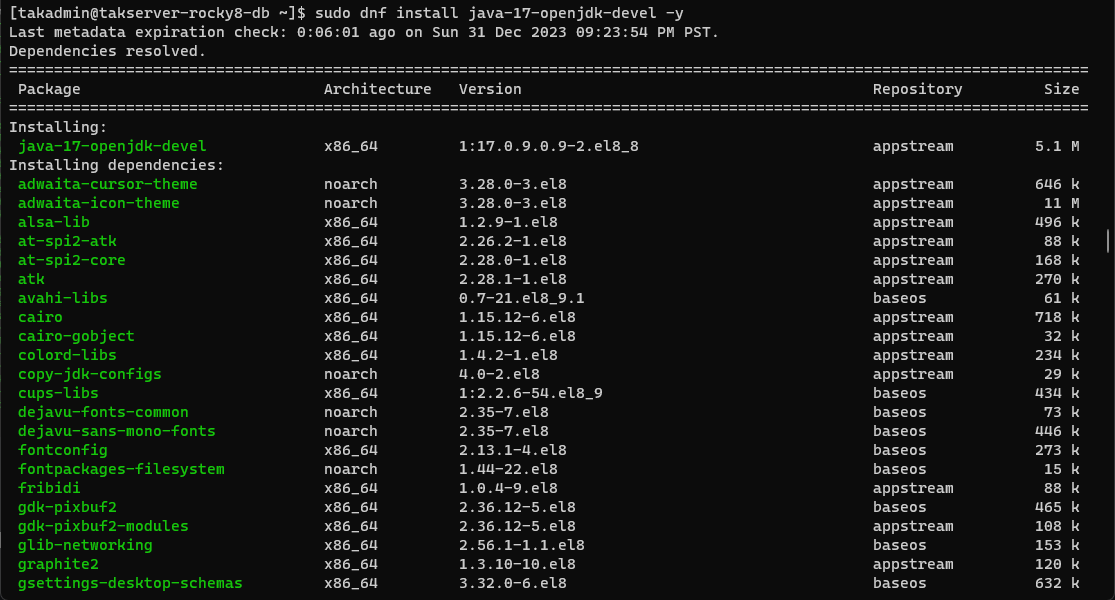
Ubuntu/Raspberry Pi OS
In some distributions, Java comes preinstalled. You can check if your distribution applies by executing the java --version command. If you get command not found this means you will need to install OpenJDK-17-jre.
# Install Java 17 for Ubuntu/Raspberry Pi OS
sudo apt install openjdk-17-jreInstallation Instructions
This section will cover installing the TAK Server using the installation files (.rpm or .deb) provided by the TAK.gov website. Due to the continuous deployment of the TAK Server and its releases, this guide assumes you will install the latest release.
Copying files from Windows/Mac to Linux
For this task, we will use secure copy (SCP) which is built into the secure shell ecosystem in most modern OS. To use this command, open a terminal, command prompt, or PowerShell window. Navigate to the directory where the TAK Server installation binaries are located.
Open in Terminal, Open PowerShell window here, or if you have Windows Subsystem for Linux (SWL), select Open Linux shell here. This will open a terminal window in the desired directory.The basic syntax for scp is scp options <sourceFile> <username>@<dstServer>. Since we are copying to Linux we need to specify a target directory within the Linux file structure. Typically this is ~/ which is the Linux user's home directory.
zsh: no matches found: when using * in the scp command we need to escape \ the wildcard.EXAMPLE:
scp takserver-5.\*.rpm [email protected]:~/# Copy files to Linux
scp takserver-5.*.rpm <username>@<takserver>:~/
# EXAMPLE
# scp takserver-5.*.rpm [email protected]:~/If preferred a graphical user interface to copy from Windows to Linux, WinSCP is a popular application for this task. For additional information on copying from MacOS to Linux can be found here.
After the installation files have been copied to the target host we can begin the installation procedures.
Rocky Linux/RHEL 8
# Install TAK Server 5.0 Database in Rocky Linux/RHEL 8
sudo dnf install takserver-database-5.0-RELEASE29.noarch.rpm --setopt=clean_requirements_on_remove=false -y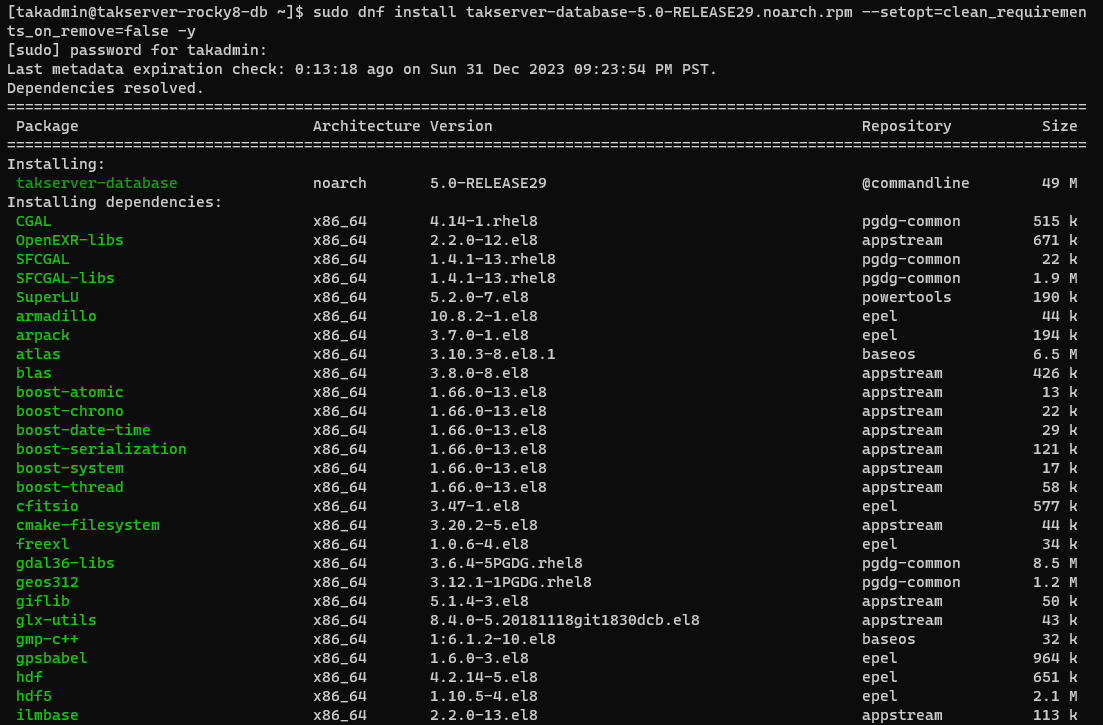
Ubuntu/Raspberry Pi OS
# Install TAK Server 5.x in Ubuntu/Raspberry Pi OS
sudo apt install ./takserver-database_5.0-RELEASE29_all.deb -y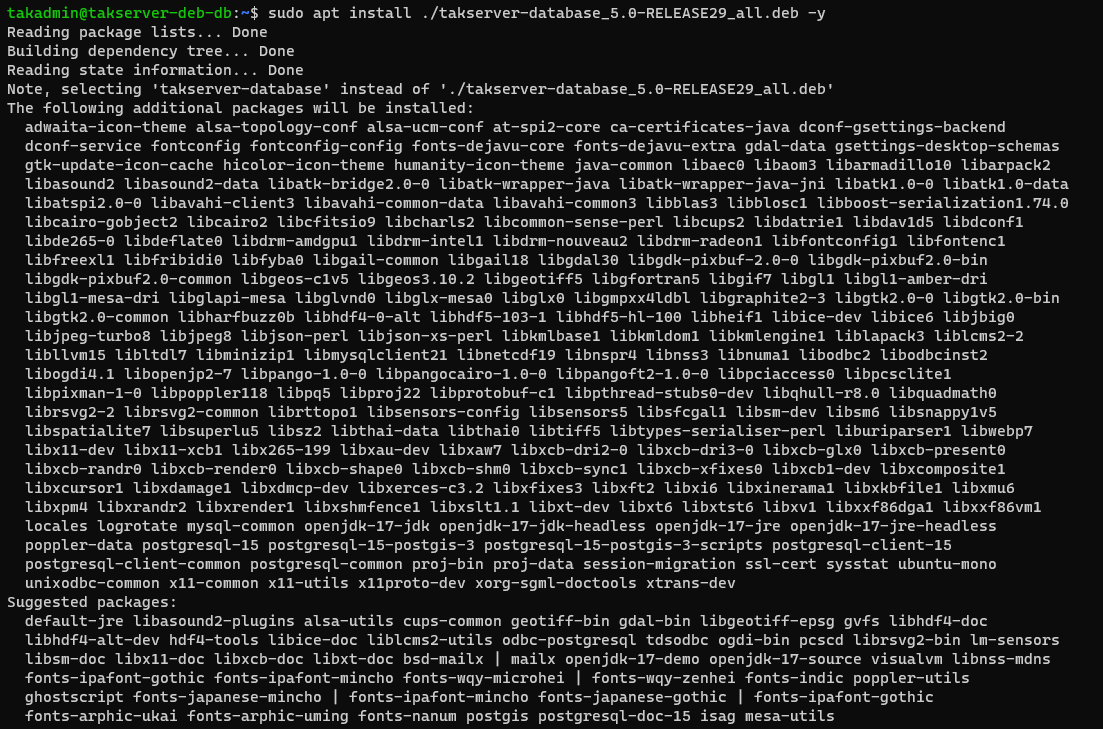
Configuring the Firewall
To accept connections to our TAK Server from the Core Server we need to modify the firewall.
Rocky Linux/RHEL 8
Modifying the firewall in Rocky Linux or RHEL requires us to use the firewall-cmd command. By default our firewall active zone is public but to verify we will use the firewall-cmd --get-active-zones to check. Once we have found which zone is active we will add the minimum ports required for our database server: TCP port 5432. After we modify the firewall we need to reload it to apply changes.
# Determine the active firewall (default is public in most installations)
sudo firewall-cmd --get-active-zones

# Modify the zone to allow secure client-to-server communications
sudo firewall-cmd --zone=public --add-port 5432/tcp --permanent

# Optionally, restrict to a known good host
sudo firewall-cmd --zone=public --add-source 192.168.178.141/32 --permanent

# Reload the firewall to apply changes
sudo firewall-cmd --reload

# Verify changes to the firewall
sudo firewall-cmd --list-all
Ubuntu/Raspberry Pi OS
In most installations of Ubuntu/Raspberry Pi OS, the firewall is not enabled or installed. To check we can run the ufw status command to check. If the command is not found we will need to install the firewall.
# Check the status of the Uncomplicated Firewall (UFW)
sudo ufw status

# Install UFW if not present
sudo apt install ufw -y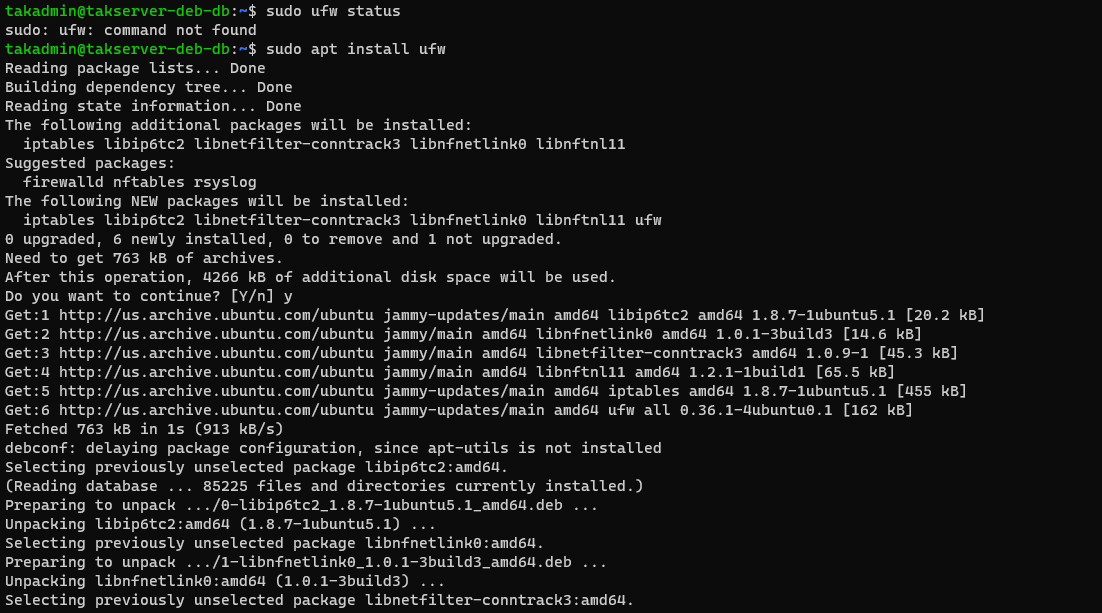
# Check the status of the Uncomplicated Firewall (UFW)
sudo ufw status

# Deny all incoming connections, allow all outgoing connections
sudo ufw default deny incoming
sudo ufw default allow outgoing

# Allow ssh connections
sudo ufw allow ssh

# Optionally, restrict to a known good host
sudo ufw allow from 192.168.178.186/32 proto TCP to any port 5432

# Enable UFW
sudo ufw enable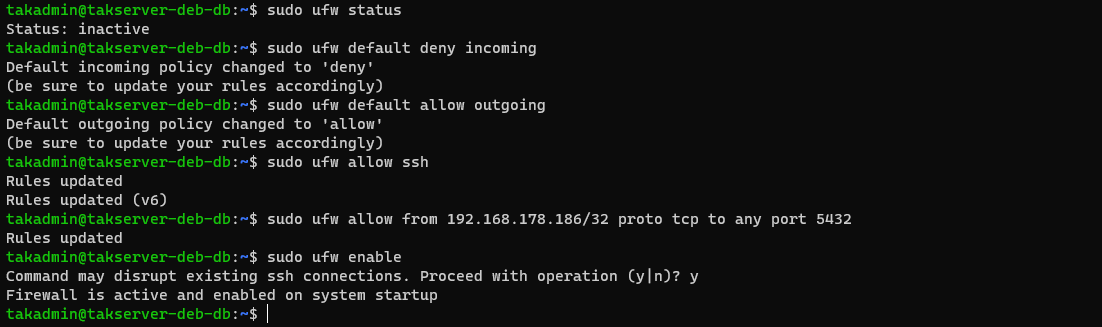
After the changes have been made to the database server proceed to install the core TAK Server binary. Prior too we need to get the established database password for our core server. For this execute the following command:
# Discover the database password
grep -Eo ".+password=\".+/>" /opt/tak/CoreConfig.example.xml
Note the password found within this command, it will be used when provisioning the CoreConfig.xml in the core TAK Server.
Core Server
Starting with a fresh installation of a supported OS, we will need to modify the Linux pluggable authentication module limits set within the /etc/security/limits.conf. Within this file, we need to increase the number of file handles allowed within the per-user limit for open files to support Java threads. We will configure the soft (user override) and hard (root override) limits within this file. We can edit the file using a command line text editor (vi/vim, or nano) or a one-line command string.
# Increase JVM threads
# Each 'tab' is six spaces when typing manually
echo -e "*      soft      nofile      32768\n*      hard      nofile      32768\n" | sudo tee --append /etc/security/limits.conf
To edit using vi or vim type: sudo vi /etc/security/limits.conf or to use nano type: sudo nano /etc/security/limits.conf. Some Linux distributions do not come with Nano preinstalled and may need to be installed before executing the command.
# Tail to view the end contents of a file
sudo tail -n 15 /etc/security/limits.conf
Rocky Linux/RHEL 8
# Install nano in Rocky and RHEL 8
sudo dnf install nano -yUbuntu/Raspberry Pi OS
# Install nano in Ubuntu or Raspberry Pi OS
sudo apt install nano -y
When using the sudo command you will be prompted to enter your password to elevate privileges. Once the editor has opened, scroll down to the end of the /etc/security/limits.conf file and insert the following lines; insert a tab between each value:
* soft nofile 32768
* hard nofile 32768
Once complete, exit the editor ensuring you save your changes. To validate the change, tail the limits.conf file.
Installing Java OpenJDK
Finally, install the appropriate Java OpenJDK version for the appropriate version outlined in the requirements.
Rocky Linux/RHEL 8
# Install Java 17 OpenJDK Devel
sudo dnf install java-17-openjdk-devel -y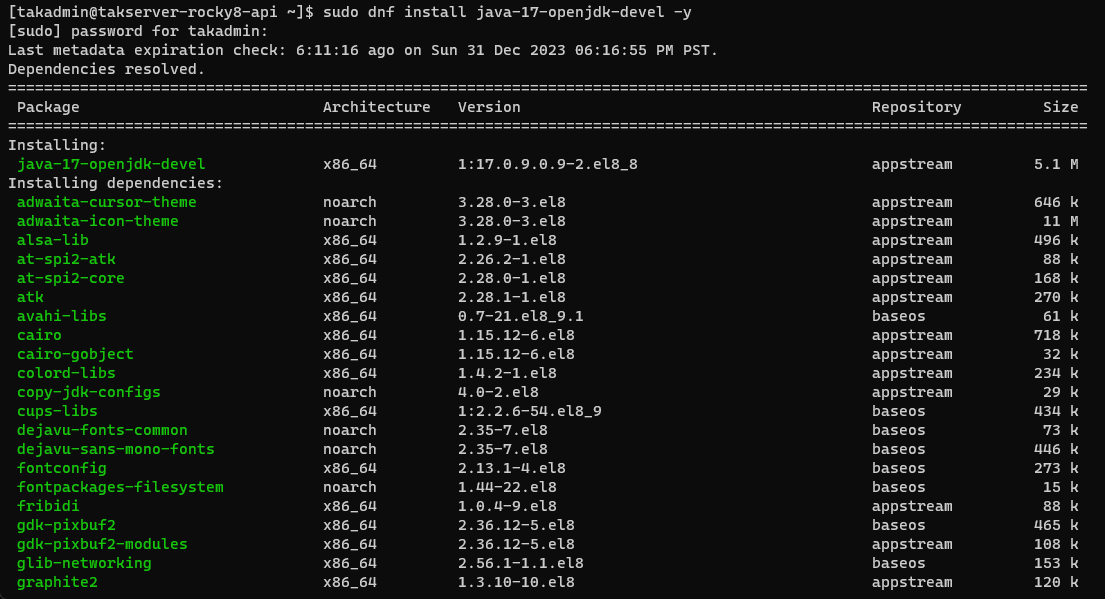
Ubuntu/Raspberry Pi OS
In some distributions, Java comes preinstalled. You can check if your distribution applies by executing the java --version command. If you get command not found this means you will need to install OpenJDK-17-jre.
# Install Java 17 for Ubuntu/Raspberry Pi OS
sudo apt install openjdk-17-jreInstallation Instructions
After the installation files have been copied (link here for instructions for copying files) to the target host we can begin the installation procedures.
Rocky Linux/RHEL 8
# Install TAK Server 5.0 Core in Rocky Linux/RHEL 8
sudo dnf install takserver-core-5.0-RELEASE29.noarch.rpm -y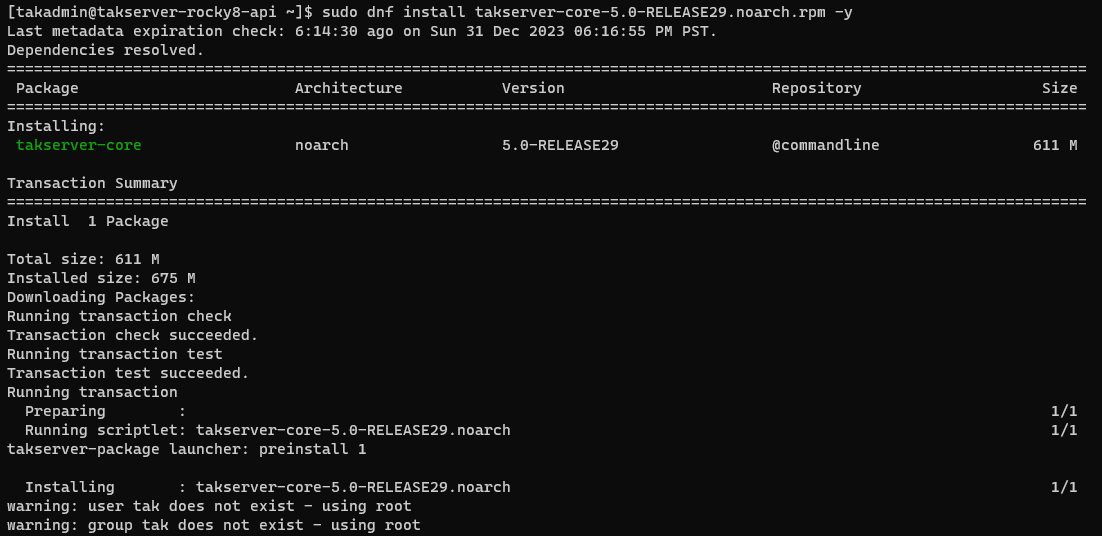
Security-Enhanced Linux (SELinux)
SELinux stands for Security-Enhanced Linux and is a security feature developed initially by the National Security Agency (NSA) that provides a technical control for supporting access security and mandatory access controls. In some installations of Linux SELinux is enabled to Enforce security configurations. To determine if SELinux is enforcing we will use the getenforce command to get the SELinux status.
# Check SELinux status
getenforce
What to do if SELinux is Enforcing? If SELinux is enforced we need to apply the SELinux profile for the TAK Server by installing an extra package before applying the SELinux profile.
Rocky Linux 8
# Install checkpolicy
sudo dnf install checkpolicy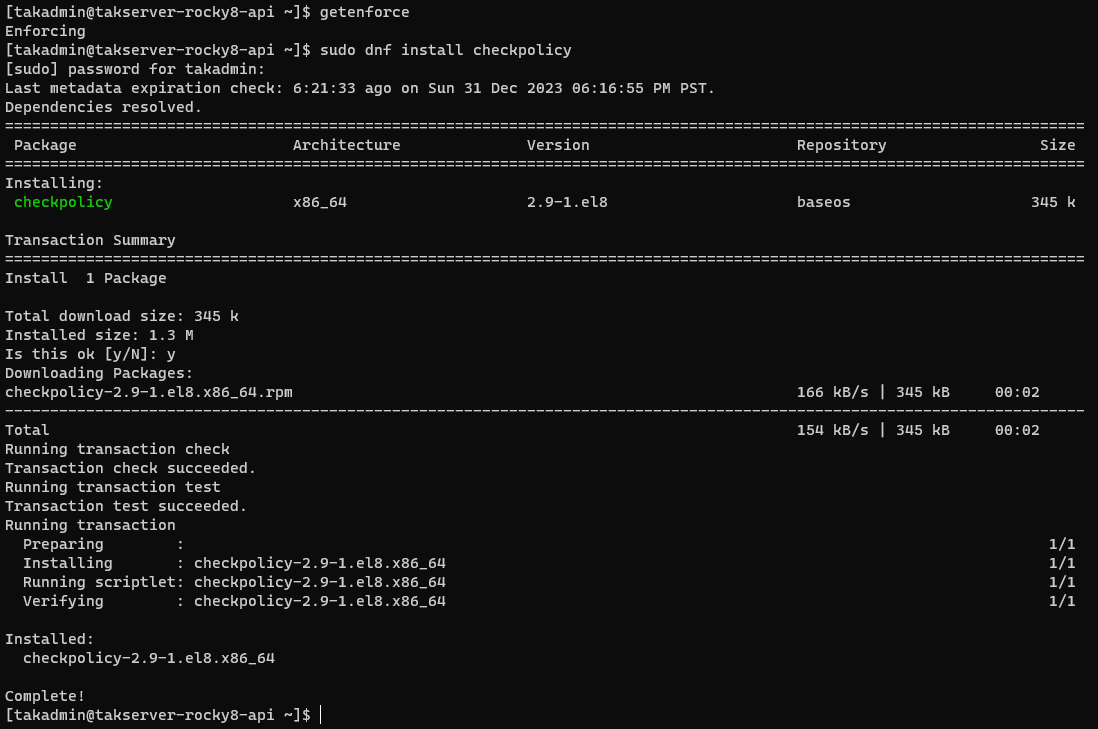
Rocky Linux/RHEL 8
# Apply the TAK Server SELinux Profile
 cd /opt/tak && sudo ./apply-selinux.sh
Ubuntu/Raspberry Pi OS
# Install TAK Server 5.0 Core in Ubuntu/Raspberry Pi OS
sudo apt install ./takserver-core_5.0-RELEASE29_all.deb -y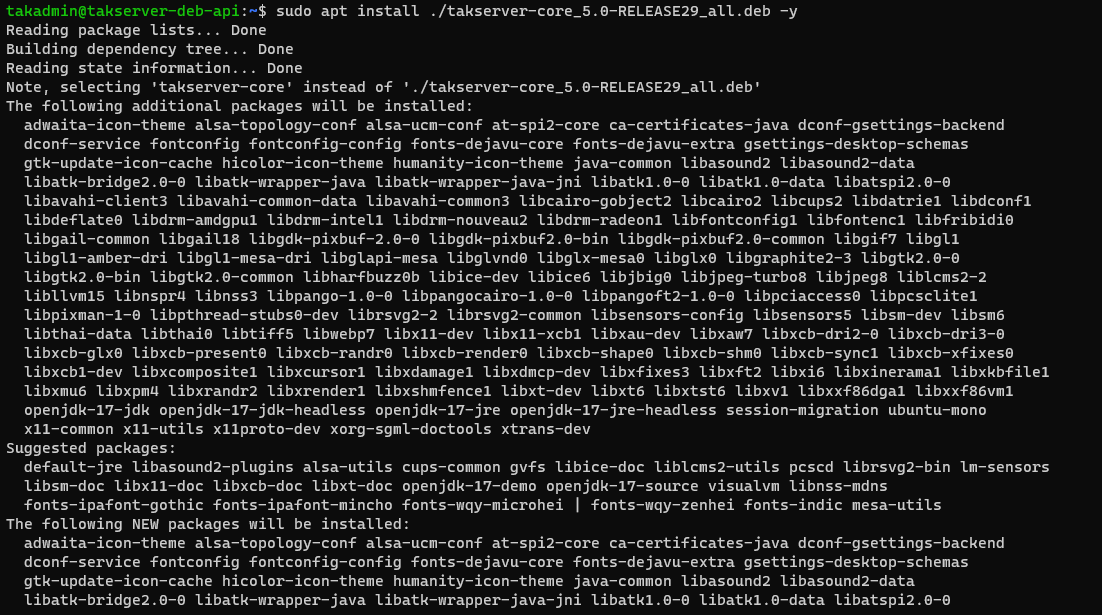
Core Configuration
After the core TAK Server has been installed, we need to modify the CoreConfig.example.xml with our IP address and database password from our previous installation. With any configuration changes to the TAK Server, we must switch to the tak user to prevent any permissions issues.
# Switch to the tak user
sudo su tak

# Change the database IP address; Replace <dbIPAddress> with the DB Server IP
grep -Eo ".+password=\".+/>" /opt/tak/CoreConfig.example.xml | sed -i 's/127.0.0.1/<dbIPAddress>/g' /opt/tak/CoreConfig.example.xml

# EXAMPLE
# grep -Eo ".+password=\".+/>" /opt/tak/CoreConfig.example.xml | sed -i 's/127.0.0.1/192.168.178.155/g' /opt/tak/CoreConfig.example.xml

# Verify change to CoreConfig for database IP address
grep -Eo ".+password=\".+/>" /opt/tak/CoreConfig.example.xml
After changing the IP address let's change the database password.
# Add the database password; replace <dbPassword> with the DB password
grep -Eo ".+password=\".+/>" /opt/tak/CoreConfig.example.xml | sed -i 's/""/"<dbPassword>"/g' /opt/tak/CoreConfig.example.xml

# EXAMPLE
# grep -Eo ".+password=\".+/>" /opt/tak/CoreConfig.example.xml | sed -i 's/""/"q9vzywkuHCYmcpn"/g' /opt/tak/CoreConfig.example.xml

grep -Eo ".+password=\".+/>" /opt/tak/CoreConfig.example.xml
Once we have made the required changes to the CoreConfig.example.xml we can move on to the post-configuration tasks.
Post-Configuration Tasks
After installing the TAK Server and applying the SELinux policy in Rocky Linux or RHEL the next task is to create the public key infrastructure (PKI) environment. This will allow us to create a self-signed server and client certificates to enable secure client-to-server communications.
/opt/tak directory, we will switch to the tak user.Initial Configuration
This section will establish our root and intermediate certificate authority (CA), the server certificate, and an admin client certificate. The sequence and execution of this task are very important in the PKI environment. As we create the CA's it establishes a chain of trust.
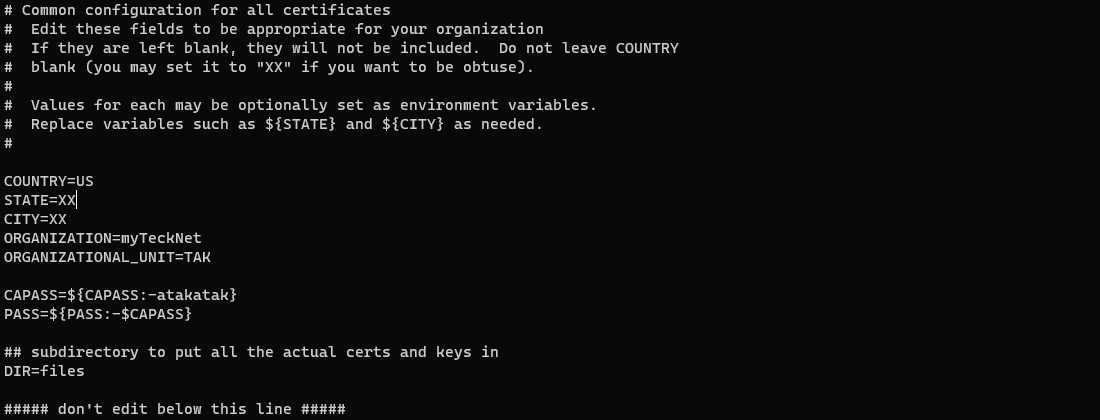
Before we create the first CA in our environment we need to edit the content within the cert-metadata.sh file to create the certificate information for our environment. At a minimum, it will need our country, state, city, organization, and organizational unit. Additionally, within this file, we can modify the default certificate password. To edit this file we need to switch users to the tak user using the sudo su - tak command.
# Switch user to the tak user using sudo su tak command
sudo su tak
Once we have switched to the tak user, we will notice that the prompt has swapped to bash. This signifies that we are in the tak user account. Navigate to the /opt/tak/certs directory and run the vi cert-metadata.sh command.
# Change directory to /opt/tak/certs
cd /opt/tak/certs
vi cert-metadata.sh
cert-metadata.sh Contents:
Edit the following values to match your organization or environment: COUNTRY, STATE, CITY, ORGANIZATION, and ORGANIZATIONAL_UNIT. Optionally, modify the CAPASS or PASS as required. CAPASS will only apply to our CA and PASS will apply to any other certificate request.
# Common configuration for all certificates
#  Edit these fields to be appropriate for your organization
#  If they are left blank, they will not be included.  Do not leave COUNTRY
#  blank (you may set it to "XX" if you want to be obtuse).
#
#  Values for each may be optionally set as environment variables.
#  Replace variables such as ${STATE} and ${CITY} as needed.
#

COUNTRY=US
STATE=${STATE}
CITY=${CITY}
ORGANIZATION=${ORGANIZATION:-TAK}
ORGANIZATIONAL_UNIT=${ORGANIZATIONAL_UNIT}

CAPASS=${CAPASS:-atakatak}
PASS=${PASS:-$CAPASS}

## subdirectory to put all the actual certs and keys in
DIR=files

##### don't edit below this line #####
...
cert-metadata.sh default values
STATE, CITY, ORGANIATION, or ORGANIZATIONAL_UNIT the values must be enclosed with quotes ".Example:
STATE="New York"CITY="New York City"Once complete, exit the editor ensuring you save your changes.
Creating the Root Certificate Authority
To create the self-signed root CA we will use the makeRootCa.sh command. Optionally, we can pass the --ca-name option to establish our certificate common name in one command; otherwise, we will be prompted to enter a name for our CA.
CAcommonName cannot contain spaces as the Linux namespace does not like them as much. Replace spaces with a dash (-) or underscore (_) when executing this command.# Create the Root CA
./makeRootCa.sh
# or
./makeRootCa.sh --ca-name <CAcommonName>
# EXAMPLE
# ./makeRootCa.sh --ca-name TAK-ROOT-CA-01Creating the Root Certificate Authority


Creating the Intermediate Certificate Authority
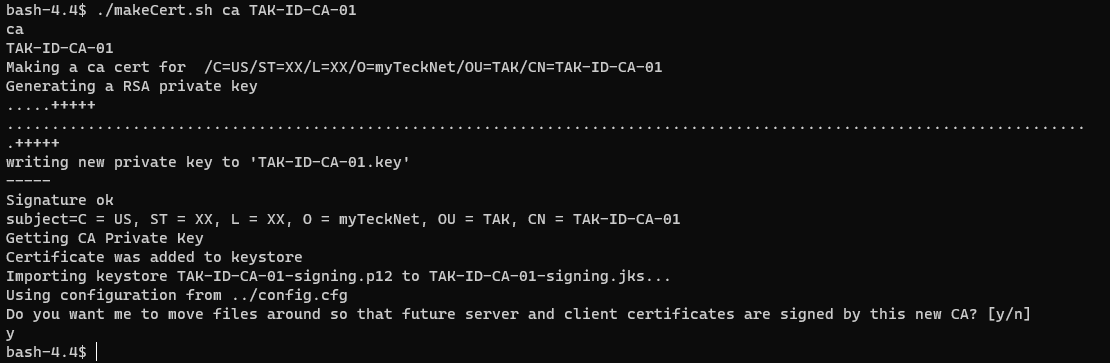
The intermediate CA is going to act on behalf of our root CA and will be signing and issuing certificates to our clients. To create the intermediate CA we need to use the makeCert.sh script with the ca switch to let the script know we are going to create a CA and make it our issuing and signing authority.
CAcommonName cannot contain spaces as the Linux namespace does not like them as much. Replace spaces with a dash (-) or underscore (_) when executing this command.# Create the Intermediate (Signing and Issuing) CA
./makeCert.sh ca
# or
./makeCert.sh ca <CAcommonName>
# EXAMPLE
# ./makeCert.sh ca TAK-ID-CA-01Creating the Intermediate Certificate Authority
When prompted Do you want me to move the files around so that future server and client certificates are signed by this new CA? [Y/N] type y as this is our desired outcome.
Creating the Server Certificate
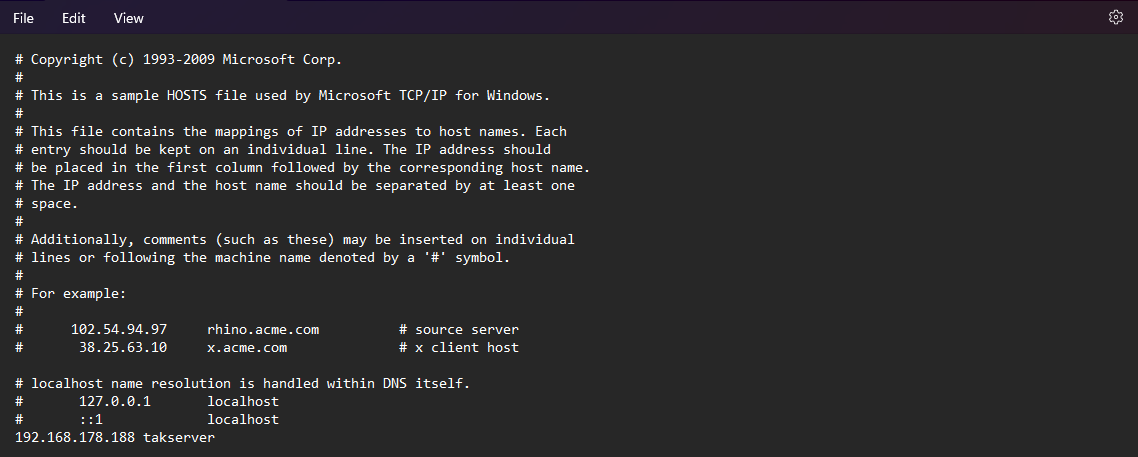
After creating our PKI environment we need to create our server certificate to start our server. This public certificate will be what our clients validate against when connecting. Again use the makeCert.sh script; however, this time use the server switch. This CA template includes both the client authentication and server authentication in the extended key properties. We will use the <commonName> of our certificate as takserver since this is the default file referenced within the core configuration. If you change this value we will need to change it in our core configuration file. takserver will also be the public-named registration that the certificate expects to receive. Otherwise, you will get a site not trusted error within your browser. Editing your system's hosts file can be used to override this by providing a local DNS name to query against.
# Creating our signed server certificate
./makeCert.sh server <commonName>

# EXAMPLE
# ./makeCert.sh server takserver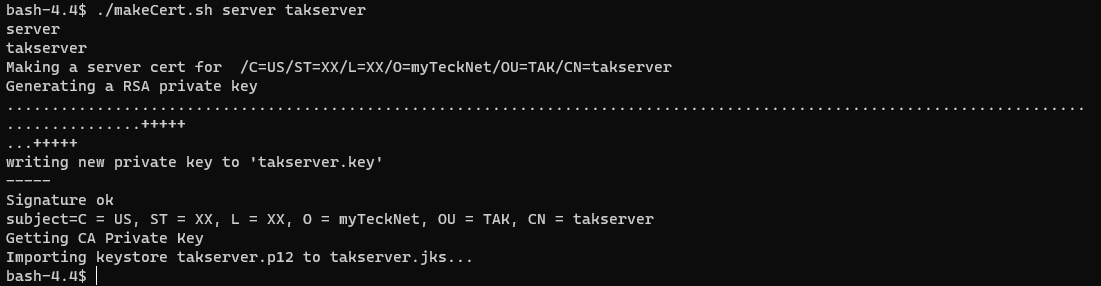
Optionally, instead of using takserver as our server commonName, you can replace this with the IP address of your TAK Server.
# Creating our signed server certificate
./makeCert.sh server <commonName>

# EXAMPLE
# ./makeCert.sh server 192.168.178.188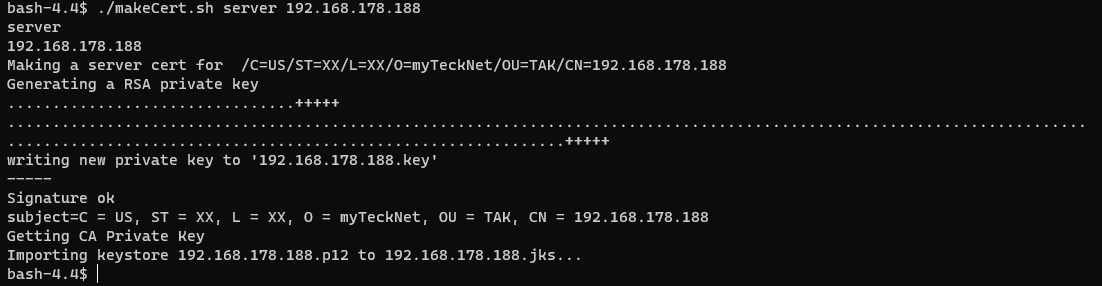
Since we are changing the name from takserver; which is the default, to our server IP address we need to update the CoreConfig.example.xmlserver to reference this new filename.
# Use sed to stream and replace takserver to our server IP address
sed -i 's/takserver/<TAKserverIPaddress>/g' /opt/tak/CoreConfig.example.xml

# EXAMPLE
# sed -i 's/takserver/192.168.178.188/g' /opt/tak/CoreConfig.example.xml
Modifying the Core Configuration
At this point, we have created the basic configuration to start our TAK Server. To summarize we have created both our root and intermediate CA and then our server certificate. Next, we need to modify the CoreConfig.example.xml which contains the baseline configuration for our TAK Server. Once we start the TAK Server this CoreConfig.example.xml will create the CoreConfig.xml which is the active configuration that our TAK Server will reference for all operations. By editing, CoreConfig.example.xml we ensure we have the same baseline even if we delete the CoreConfig.xml accidentally or make a change and our TAK Server fails to start. Within the CoreConfig.example.xml we need to change the default value stored for our CA from the root CA to our newly created intermediate CA.
This does two things, it allows our TAK Server to start successfully since the TAK Server is essentially a client of itself, and as such must trust who signed the certificate. Additionally, our TAK Server is going to issue client certificates and must trust the clients themselves via the trusted CA chain. This is known as our client keystore and then we have our server truststore. To modify our CoreConfig.example.xml to our new CA we will use the sed command which we will use to filter and modify text.
# Modify the default truststore-root with our new truststore-<CACommonName>
sed -i 's/truststore-root/truststore-<CACommonName>/g' /opt/tak/CoreConfig.example.xml

# EXAMPLE using our current configuration
sed -i 's/truststore-root/truststore-TAK-ID-CA-01/g' /opt/tak/CoreConfig.example.xml
To validate our change, use cat to view the contents and grep to match the pattern of truststore-TAK-ID-CA-01.
# Verify our changes
cat /opt/tak/CoreConfig.example.xml | grep truststore-
Starting the TAK Server
This completes the minimal steps for configuring our TAK Server to run. To start our TAK Server we need to exit the tak user session we are in and back into our normal account. Once back to our normal user session, we need to first enable the takserver.service then start it. By enabling the service we want our TAK Server to start after each system startup.
# Exit the tak user session
exit

# Enable the takserver.service, allowing it to start at system startup
sudo systemctl enable takserver.service

# Start the TAK Server service
sudo systemctl start takserver.service
To verify that our TAK Server is started we want to consult the logs to view its status. The TAK Server logs are stored in the /opt/tak/logs/ directory. The log we are looking for is the takserver-messaging.log, it may take some time for this log to be created - periodically check for this log until it is created. Once it is created we will monitor the contents of the log to inspect for errors.
# Monitor the /opt/tak/logs/ directory for the takserver-messaging.log
ls -l /opt/tak/logs/

# Tail a streaming output of the end of the log
tail -f /opt/tak/logs/takserver-messaging.log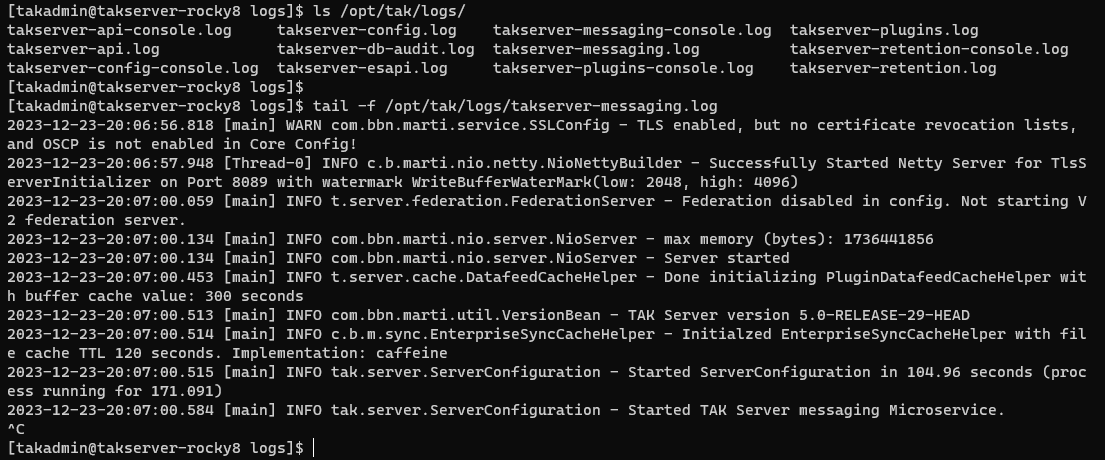
Within the log, we are looking for a few messages at minimum:
- INFO c.b.marti.nio.netty.NioNettyBuilder - Successfully Started Netty Server for TlsServerInitializer on Port 8089 with watermark WriteBufferWaterMark(low: 2048, high: 4096)
- This lets us know that the client-to-server listener is started and is accepting clients
- INFO com.bbn.marti.nio.server.NioServer - Server started
- This tells us the services have started
- INFO com.bbn.marti.util.VersionBean - TAK Server version 5.0-RELEASE-29-HEAD
- This lets me know what version is running and that all services have started
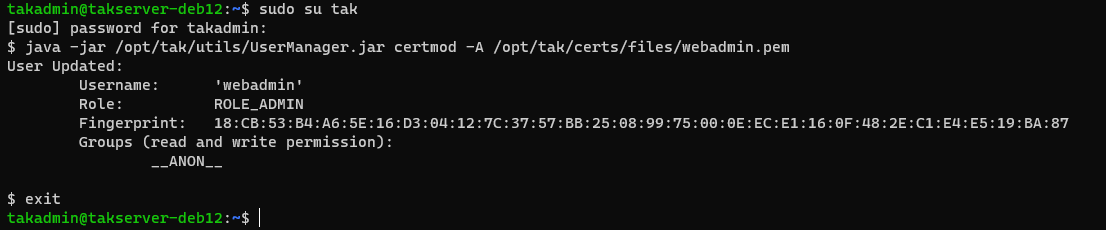
Creating the Admin Certificate
Now that our TAK Server is started we need to be able to administer the server. To do this we need to create an administrator account. The best and most secure way to do this is by creating a client certificate and elevating this certificate for administration. To create our administrative certificate we need to switch back to the tak user and change directories to the certs directory to run the makeCert.sh command again. Once we are there we will use ./makeCert.sh client webadmin to create our client certificate first.
# Switch to the tak user
sudo su tak

# Change directory to certs
cd /opt/tak/certs

# Make the Administrator Certificate
./makeCert.sh client <commonName>

# EXAMPLE
# ./makeCert.sh client webadmin
After creating the client certificate we need to assign this certificate to our TAK Server administrator. This requires us to use the UserManager.jar tool located in the /opt/tak/utils/ directory.
UserManager.jar
The UserManager.jar allows us to modify both user credentials and certificates. Additionally, we have the option to manage groups and permissions. For now, we need to modify the administrator certificate we just created by making it an administrator. To do this we will use the UserManager.jar certmod switch. More information on the UserManager.jar tool will be covered later.
# Modify the certificate to provide administrator access
java -jar /opt/tak/utils/UserManager.jar certmod -A /opt/tak/certs/files/<commonName>.pem

# EXAMPLE
# java -jar /opt/tak/utils/UserManager.jar certmod -A /opt/tak/certs/files/webadmin.pem
Now that we have created our administrator certificate, we need to move it so that we can copy and install it on our administrative workstation to manage the TAK Server remotely. First, we need to exit out of the tak user session and change directories back to our Linux user's home directory. After we have done that we will copy the administrator certificate and modify the permissions so that we can copy the file from Linux to our workstation using SCP.
# Exit the tak user session
exit

# Change directories to our Linux home directory
cd ~

# Move the administrative certificate to our home directory
sudo cp -v /opt/tak/certs/files/webadmin.p12 .

# Change the ownership to our Linux user
sudo chown -R <userName>:<userGroup> /home/<username>

# EXAMPLE
# sudo chown -R takadmin:takadmin /home/takadmin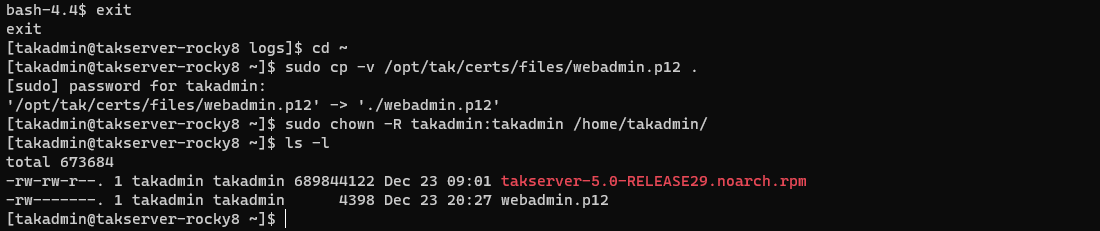
Before we copy our administrative certificate to our workstation we need to modify the Linux firewall to allow clients to connect to our TAK Server.
Configuring the Firewall
To accept connections to our TAK Server we need to modify the firewall. By default, we want to ensure we accept secure connections over TLS established by our PKI environment.
This is not an all-inclusive list but by default, these are the ports used for secure communications:
| Service | Protocol | Port | Source | Destination | Direction |
|---|---|---|---|---|---|
| TAK Signaling | TCP/S | 8089 | Client | Server | IN |
| TAK API WebUI WebTAK |
TCP/S |
8443 |
Client |
Server |
IN |
Federation |
TCP/S |
8444(Legacy) 9000(v1) 9001(v2) |
Server |
Server |
IN |
| Certificate Provisioning |
TCP/S | 8446 | Client | Server | IN |
TCP/S = TLS/SSL TCP
NOTE: Unless annotated, most connections use a random source port to the target destination rather than a 1:1 mapping. An example is a client connecting to TCP/8089 would leave the client using a port called an ephemeral port with a destination port of TCP/8089 to the server.
Rocky Linux/RHEL 8
Modifying the firewall in Rocky Linux or RHEL requires us to use the firewall-cmd command. By default our firewall active zone is public but to verify we will use the firewall-cmd --get-active-zones to check. Once we have found which zone is active we will add the minimum ports required to connect our clients: 8089 and 8443. After we modify the firewall we need to reload it to apply changes.
# Determine the active firewall (default is public in most installations)
sudo firewall-cmd --get-active-zones

# Modify the zone to allow secure client-to-server communications
sudo firewall-cmd --zone=public --add-port 8089/tcp --add-port 8443/tcp --permanent

# Reload the firewall to apply changes
sudo firewall-cmd --reload

# Verify changes to the firewall
sudo firewall-cmd --list-all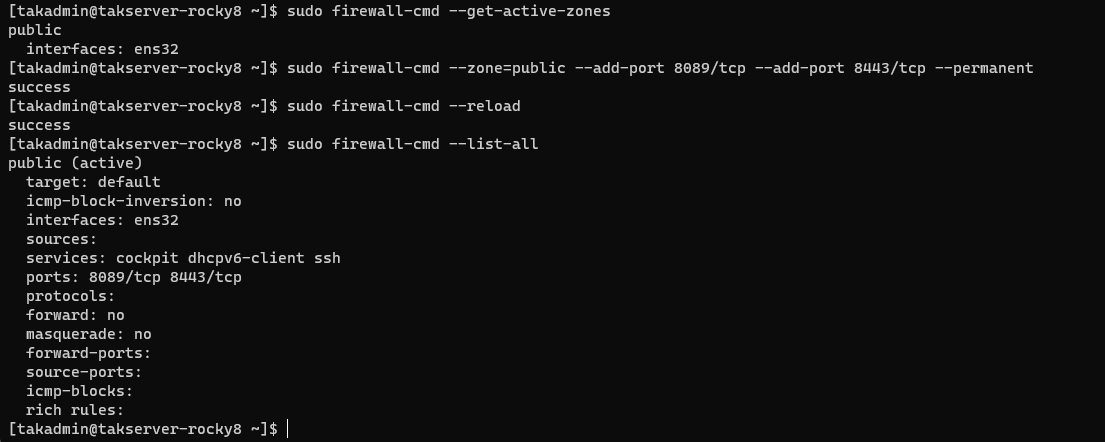
Ubuntu/Raspberry Pi OS
In most installations of Ubuntu/Raspberry Pi OS, the firewall is not enabled or installed. To check we can run the ufw status command to check. If the command is not found we will need to install the firewall.
# Check the status of the Uncomplicated Firewall (UFW)
sudo ufw status

# Install UFW if not present
sudo apt install ufw -y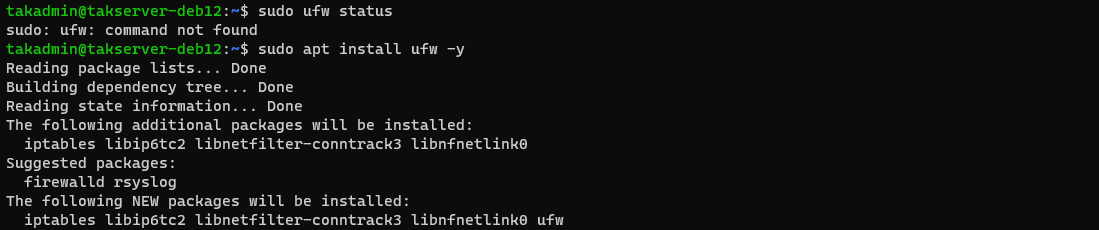
With ufw installed, we need to configure the minimum ports required for client-to-server communications: TCP 8089 and 8443.
# Check the status of the Uncomplicated Firewall (UFW)
sudo ufw status

# Deny all incoming connections, allow all outgoing connections
sudo ufw default deny incoming
sudo ufw default allow outgoing

# Allow ssh connections
sudo ufw allow ssh

# Allow TAK ports for client-to-server communications
sudo ufw allow 8089/tcp
sudo ufw allow 8443/tcp

# Enable UFW
sudo ufw enable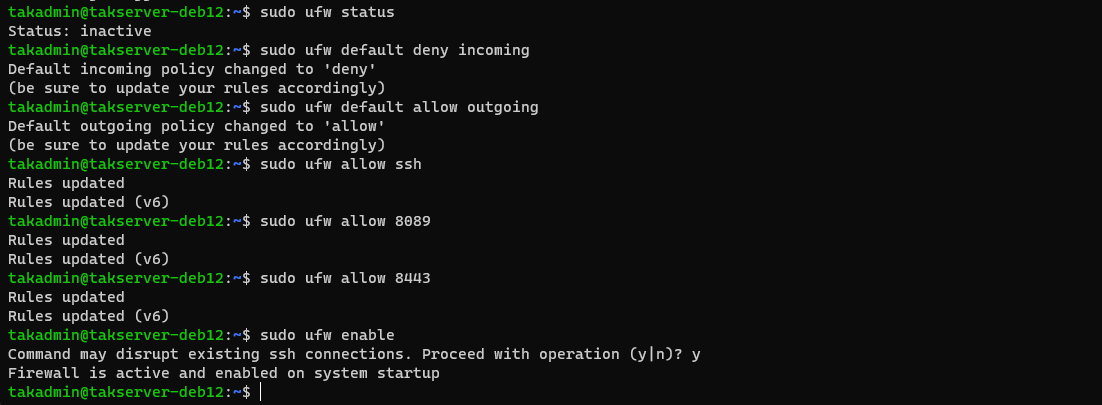
After we have modified the firewall we can now attempt to access the Marti dashboard with our administrative certificate.

The Administrative Dashboard
By this point, we have installed our prerequisites - EPEL, PostgreSQL, PostGIS, and Java. We have installed our TAK Server, created our PKI environment, established an administrative certificate, and modified our firewall to accept client connections. Now we are ready to access our TAK Server and start administering it. To access the TAK Server administrative dashboard Marti we need to copy over our administrative certificate from Linux to our workstation. From our workstation navigate to a directory to store our administrative certificate. Next, use SCP to copy the file from Linux to this directory. Just like copying files from our workstation to Linux using SCP, we will do this in the reverse order syntax: scp <username>@<srcServer>:~/ <destinationFile>.
# Copy files from Linux
scp <username>@<takserver>:~/<commonName>.p12 .

# EXAMPLE
scp [email protected]:~/webadmin.p12 .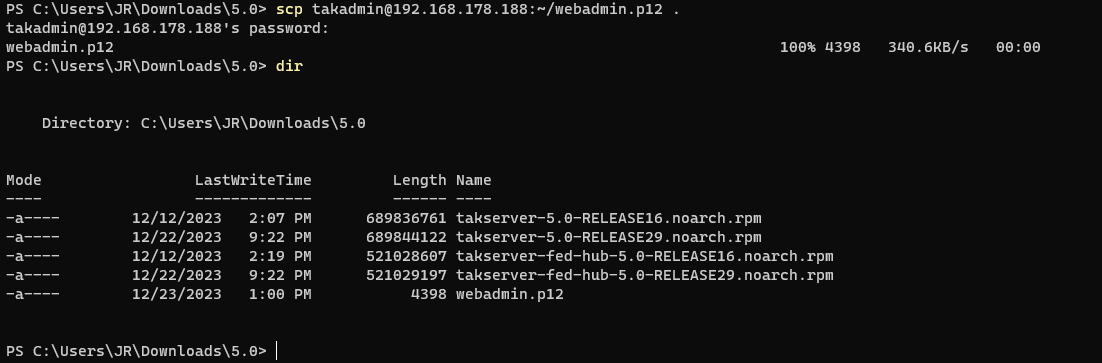
Depending on your browser will determine how you install this administrative certificate. Most browsers use the underlying OS truststore whereas Firefox has an internal truststore outside of the inherited OS truststore so we will demonstrate how to do this next.
Mozilla Firefox
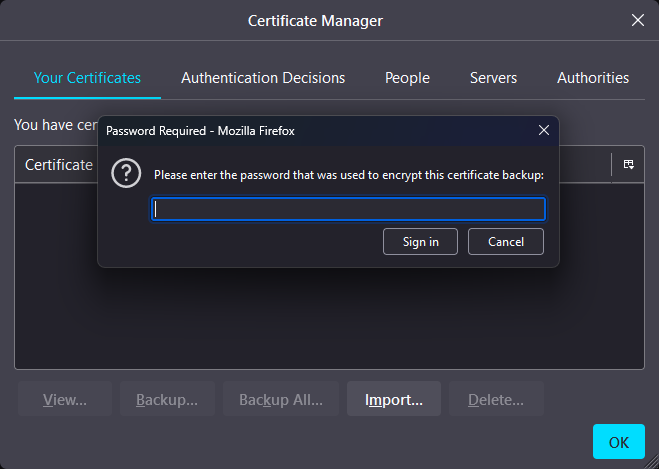
Open the Firefox web browser and type about:preferences#privacy into the navigation bar. Scroll to the Security section and click on View Certificates. Alternatively, you can type certificates in the Find in Settings search bar. In the Certificate Manager select the Your Certificates tab and click on Import.
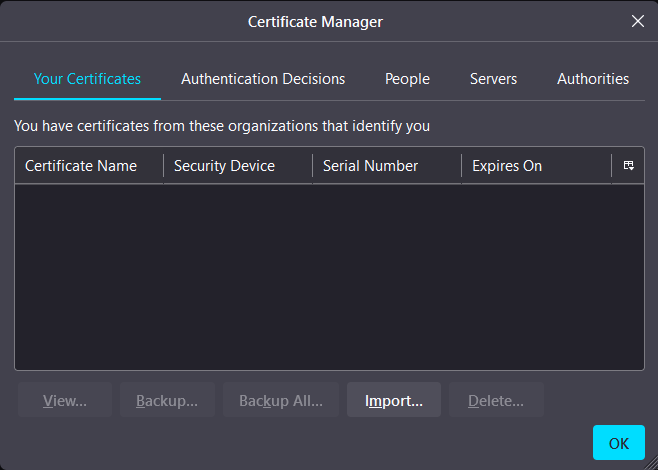
In the file dialog navigate to the webadmin.p12 file and select Open to import the private key and public certificate contained with the webadmin.p12 file. Enter the certificate password when prompted - default is atakatak; otherwise, this is the password modified within the cert-metadata.sh during setup.
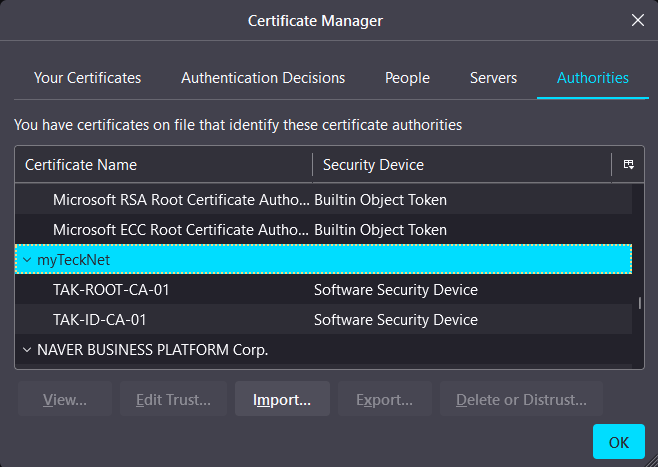
After the certificate has been successfully imported, click on the Authorities tab and find the Organization name entered in the cert-metadata.sh. Click on each of your CAs and click on Edit Trust.
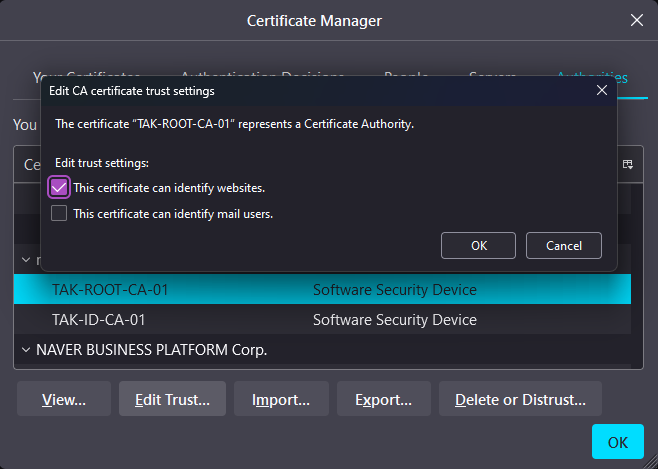
Under Edit CA certificate trust settings, click on the checkbox next to This certificate can identify websites. This will allow us in the future to trust our self-signed CA.
After completing this step, click OK to close the Certificate Manager. Within the URL bar attempt to access the Marti dashboard by going to https://<takserver>:8443/Marti. Since we are accessing the TAK Server using the IP Address and not the common name we used in the creation of our server certificate we will get this error. This is because the server certificate's common name is takserver and our client is expecting to connect to takserver and not an IP Address. Within Firefox we can click on Accept the Risk and Continue to attempt to access our server.

If you modified your systems hosts file as referenced here you could alternatively browse to https://takserver:8443/Marti and not get this SSL error.
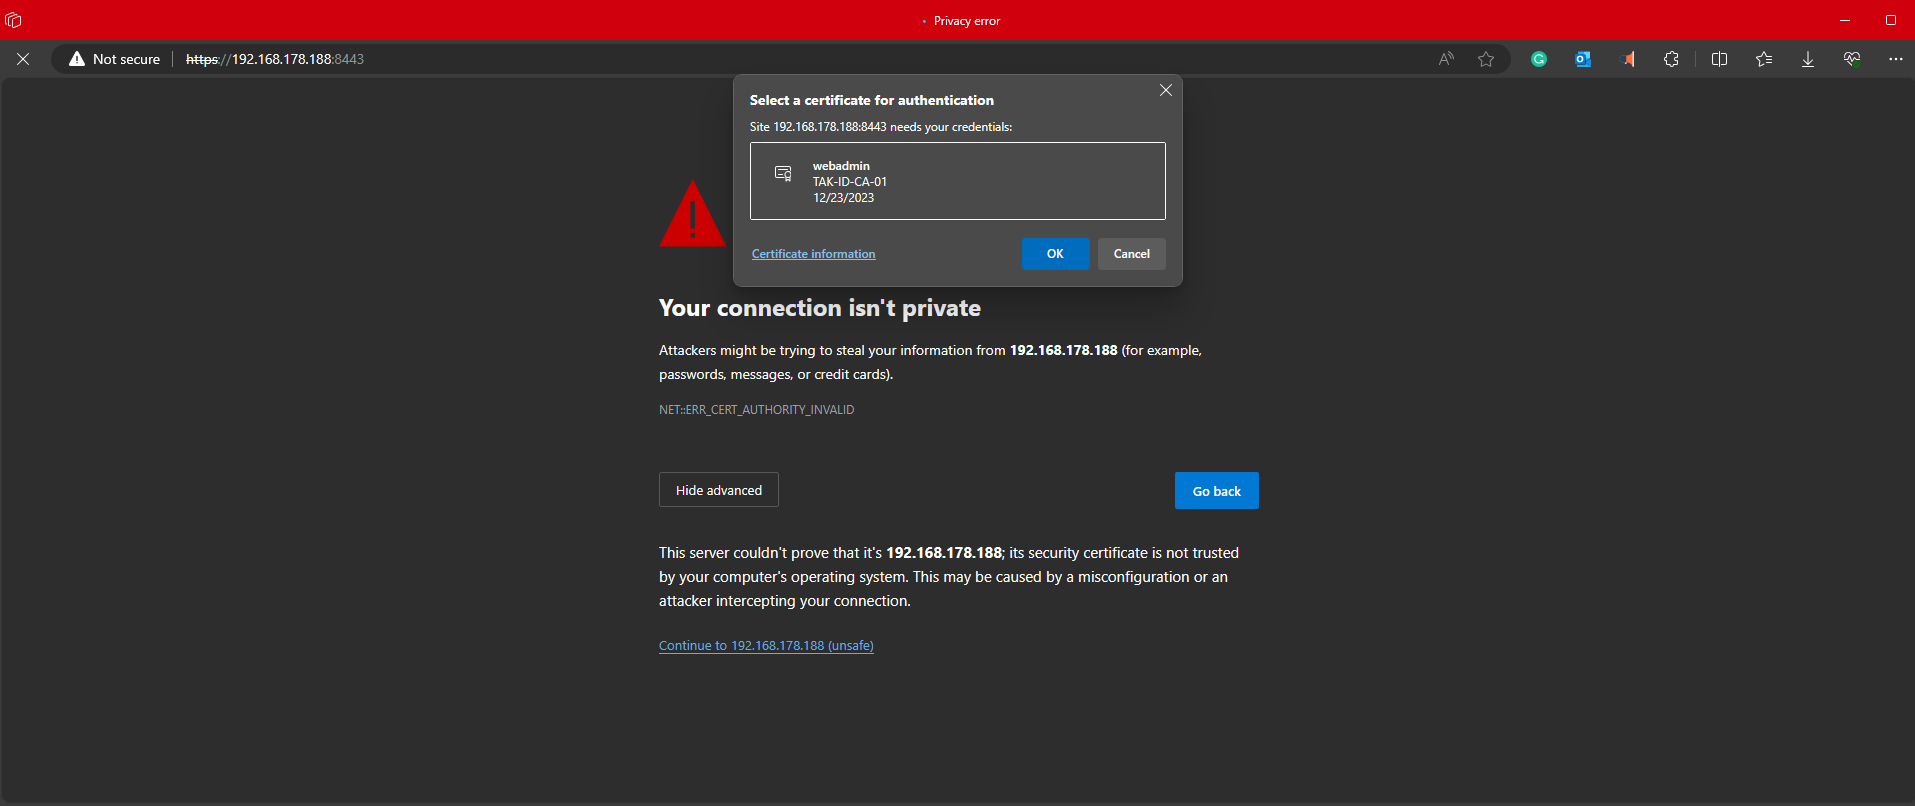
If we performed all the steps correctly we should be prompted with our administrative certificate to authenticate to our server. If so, click OK to log in.

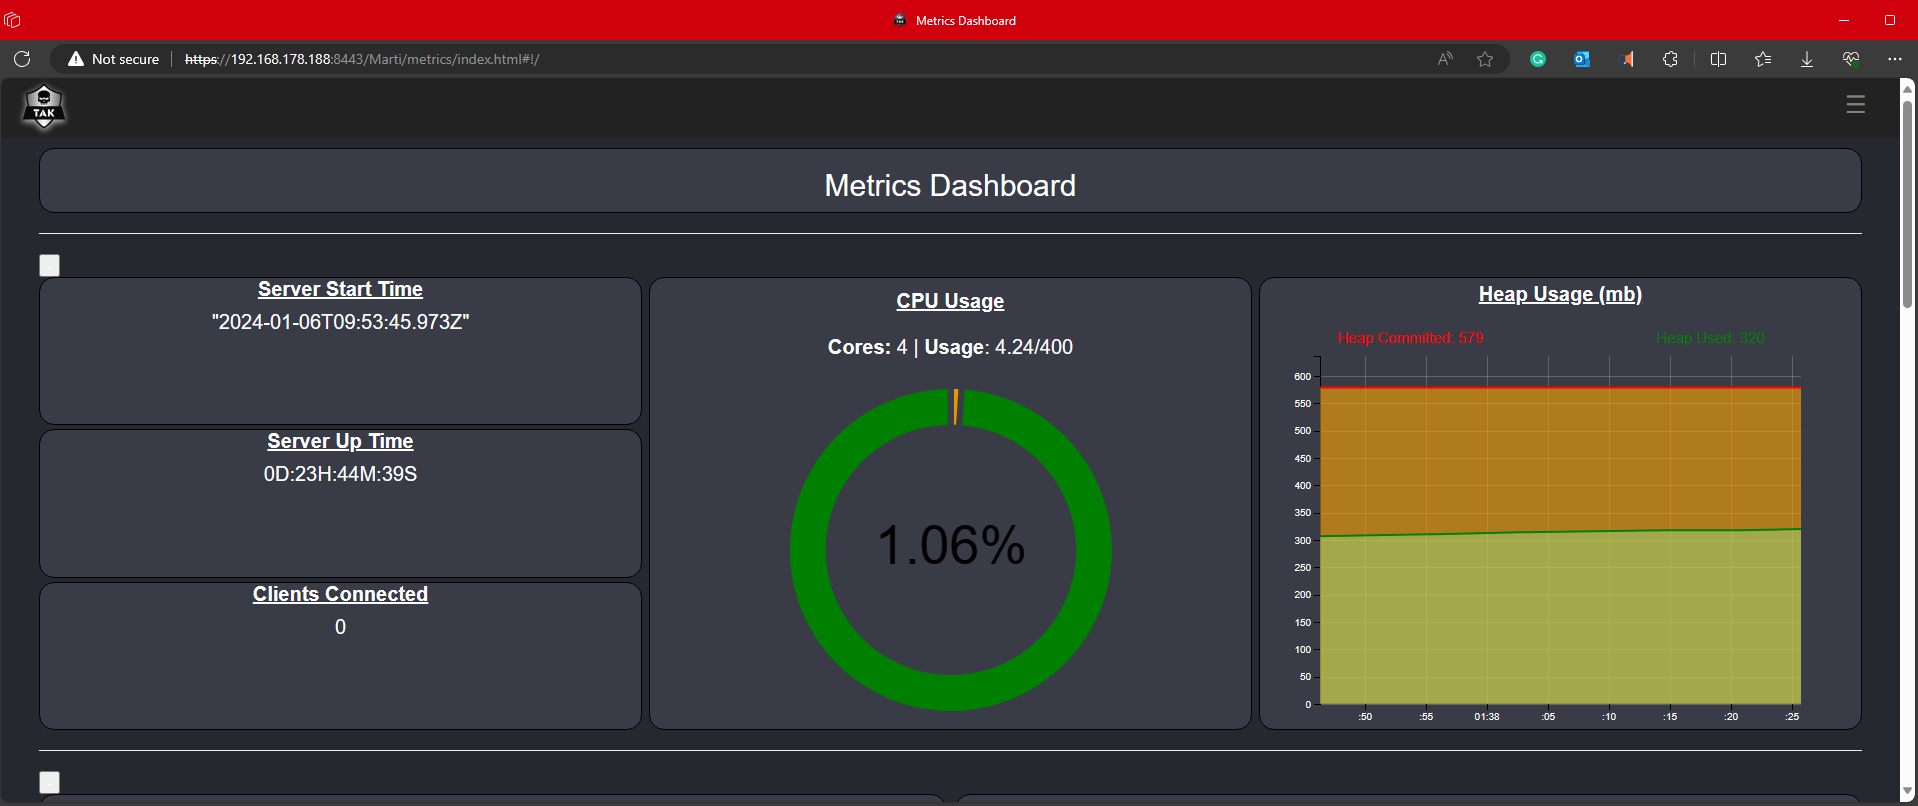
Upon successful login, we are brought to the Metrics Dashboard, by default. If we are brought to WebTAK then we need to go back and execute the UserManager.jar certmod command again and ensure we use the -A to make our certificate an administrator.

Other Browsers
Windows
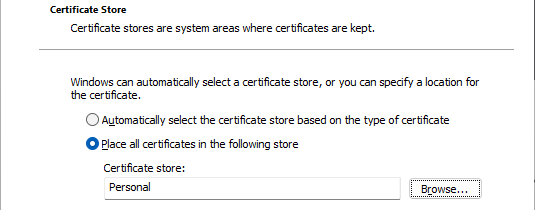
Most browsers will inherit from the host operating system truststore. To import the administrative certificate in Windows we can double-click it to open the Certificate Import Wizard. By default, the Store Location will be the Current User at our first prompt. Keep the defaults and click Next on the next two prompts. When prompted for our certificate password enter atakatak or the password set in the cert-metadata.sh during setup. When asked to specify a Certificate Store select Place all certificates in the following store and click Browse. Select the Personal from the list of available Certificate Stores. Click Next and host to import our certificate to our host truststore.
After our certificate has been imported we can verify the certificate in the Certificate Manager (certmgr.msc) under Personal, Certificates folder.
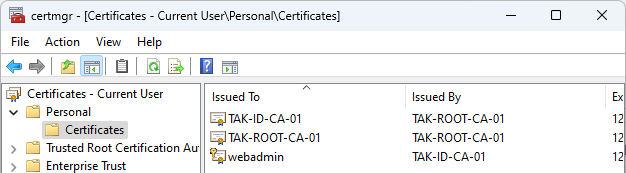
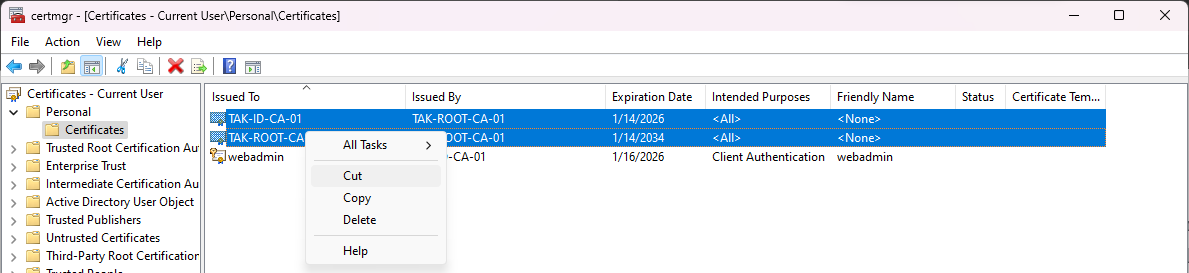
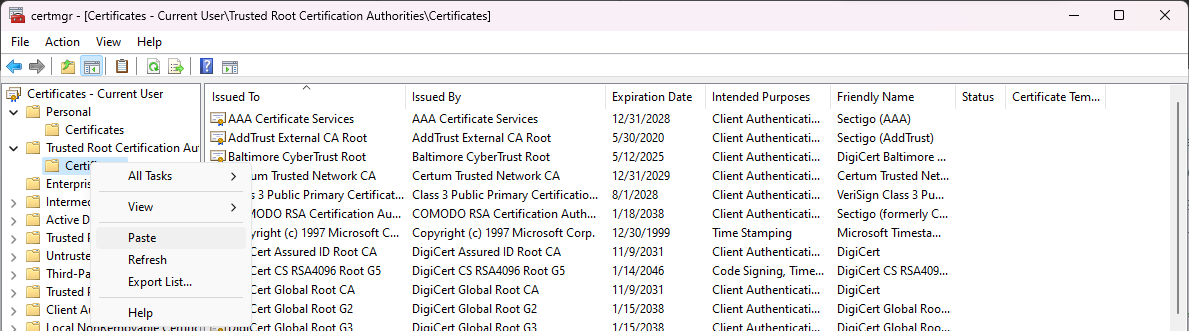
Additionally, we need to move our CA into our Trusted Root Certificate Authorities > Certificates truststore to trust our CA within our OS. If you created your takserver certificate using your TAK Server IP address this will also fix this error within the browser: NET::ERR_CERT_AUTHORITY_INVALID. To move the CA certificates, select them both and select cut then paste them into theTrusted Root Certificate Authorities > Certificates.
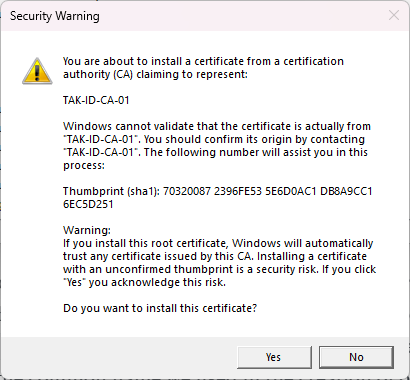
When pasting the CA certificates you may see the following security warning. Click on Yes to install each certificate.
Microsoft Edge/Chome
Microsoft Edge/Chrome read certificates from the underlying current user truststore. Within the URL bar attempt to access the Marti dashboard by going to https://<takserver>:8443/Marti. Since we are accessing the TAK Server using the IP Address and not the common name we used in the creation of our server certificate we will get this error. This is because the server certificate's common name is takserver and our client is expecting to connect to takserver and not an IP Address. Click Advanced and click Continue to ... attempt to access the TAK Server.
commonName you will not receive the below warning if you installed the CA certificates to your OS truststore.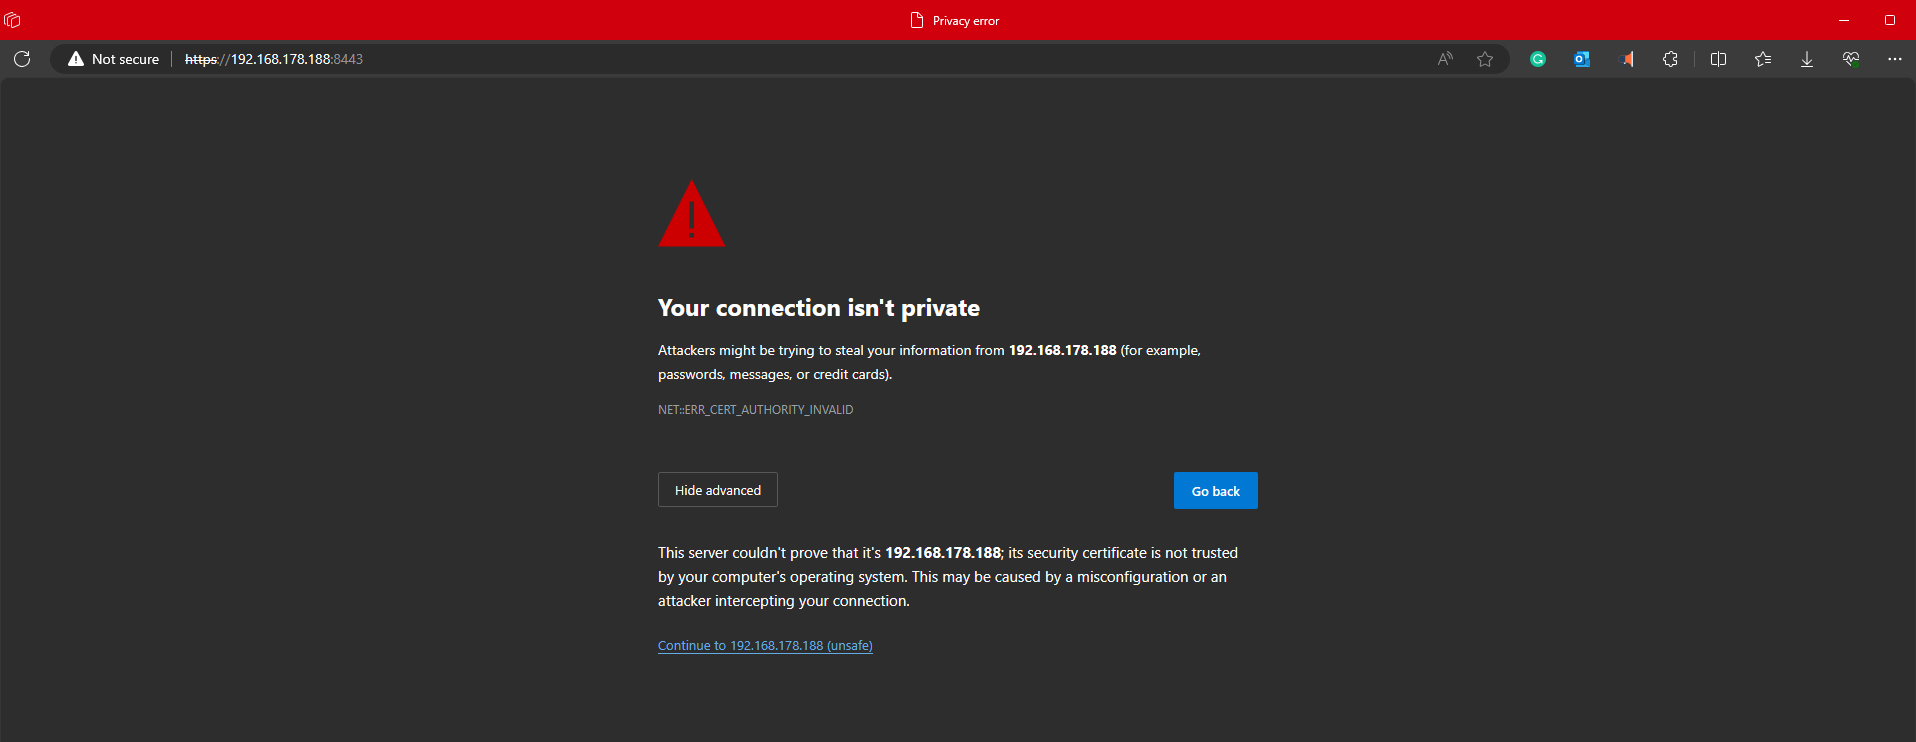
If we performed all the steps correctly we should be prompted with our administrative certificate to authenticate to our server. If so, click OK to log in.
Upon successful login, we are brought to the Metrics Dashboard, by default. If we are brought to WebTAK then we need to go back and execute the UserManager.jar certmod command again and ensure we use the -A to make our certificate an administrator.
MacOS
We need to import the administrative certificate into the keychain if using a Mac and Safari. Open the keychain access application and select File, Import Items...
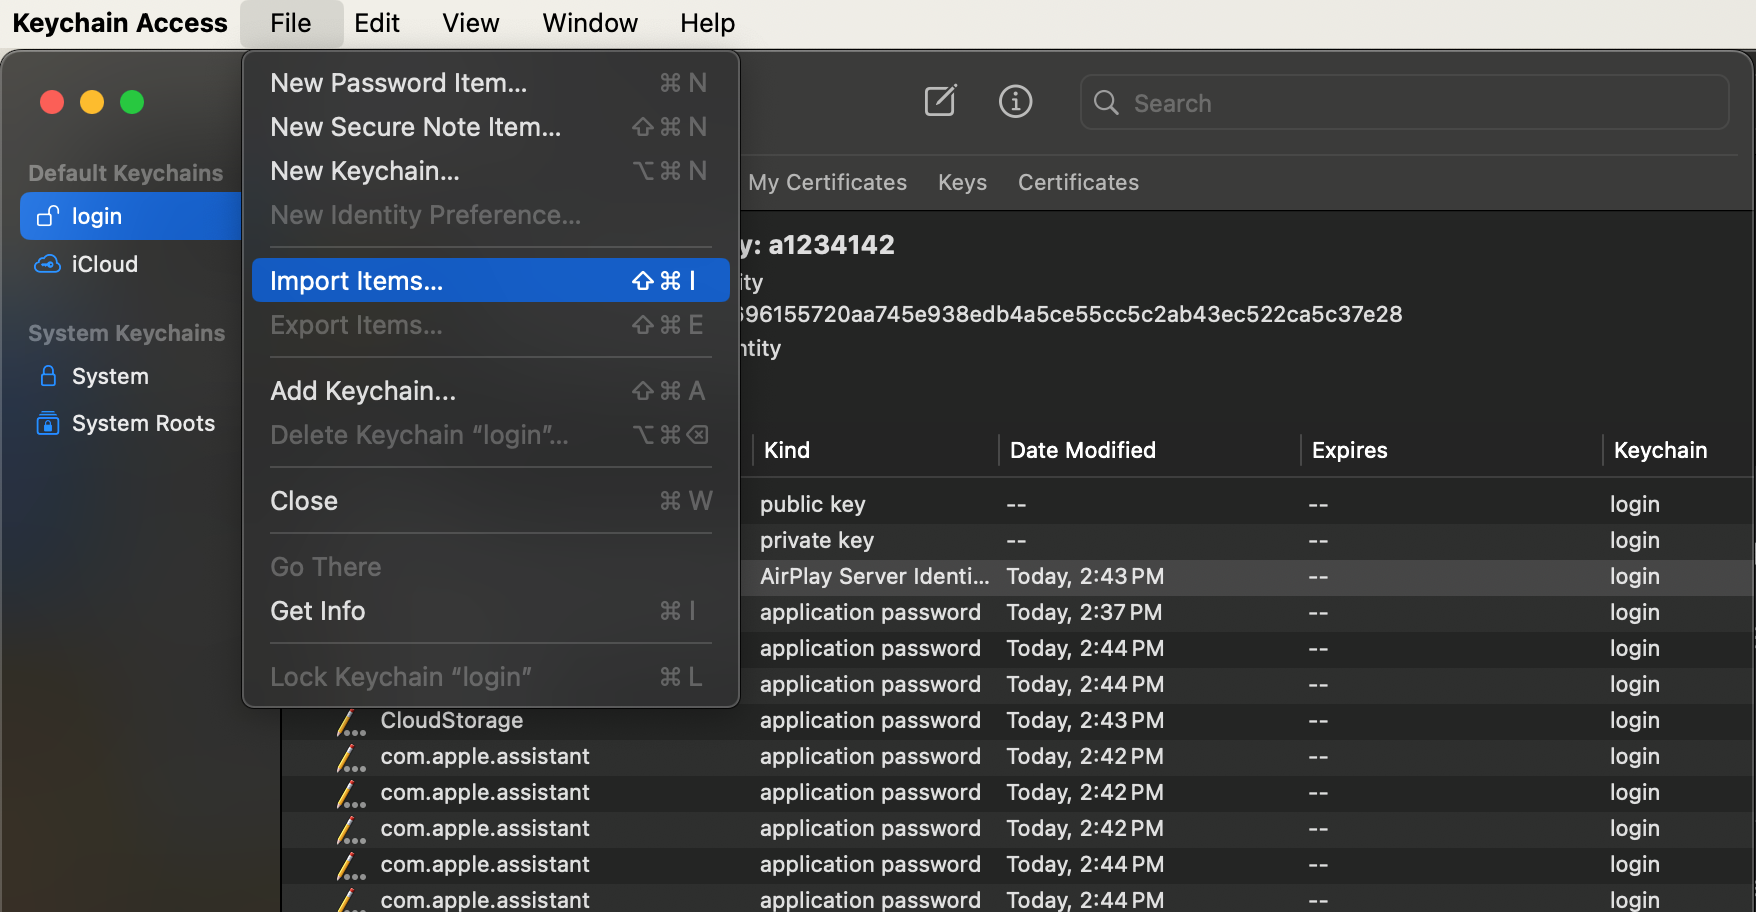
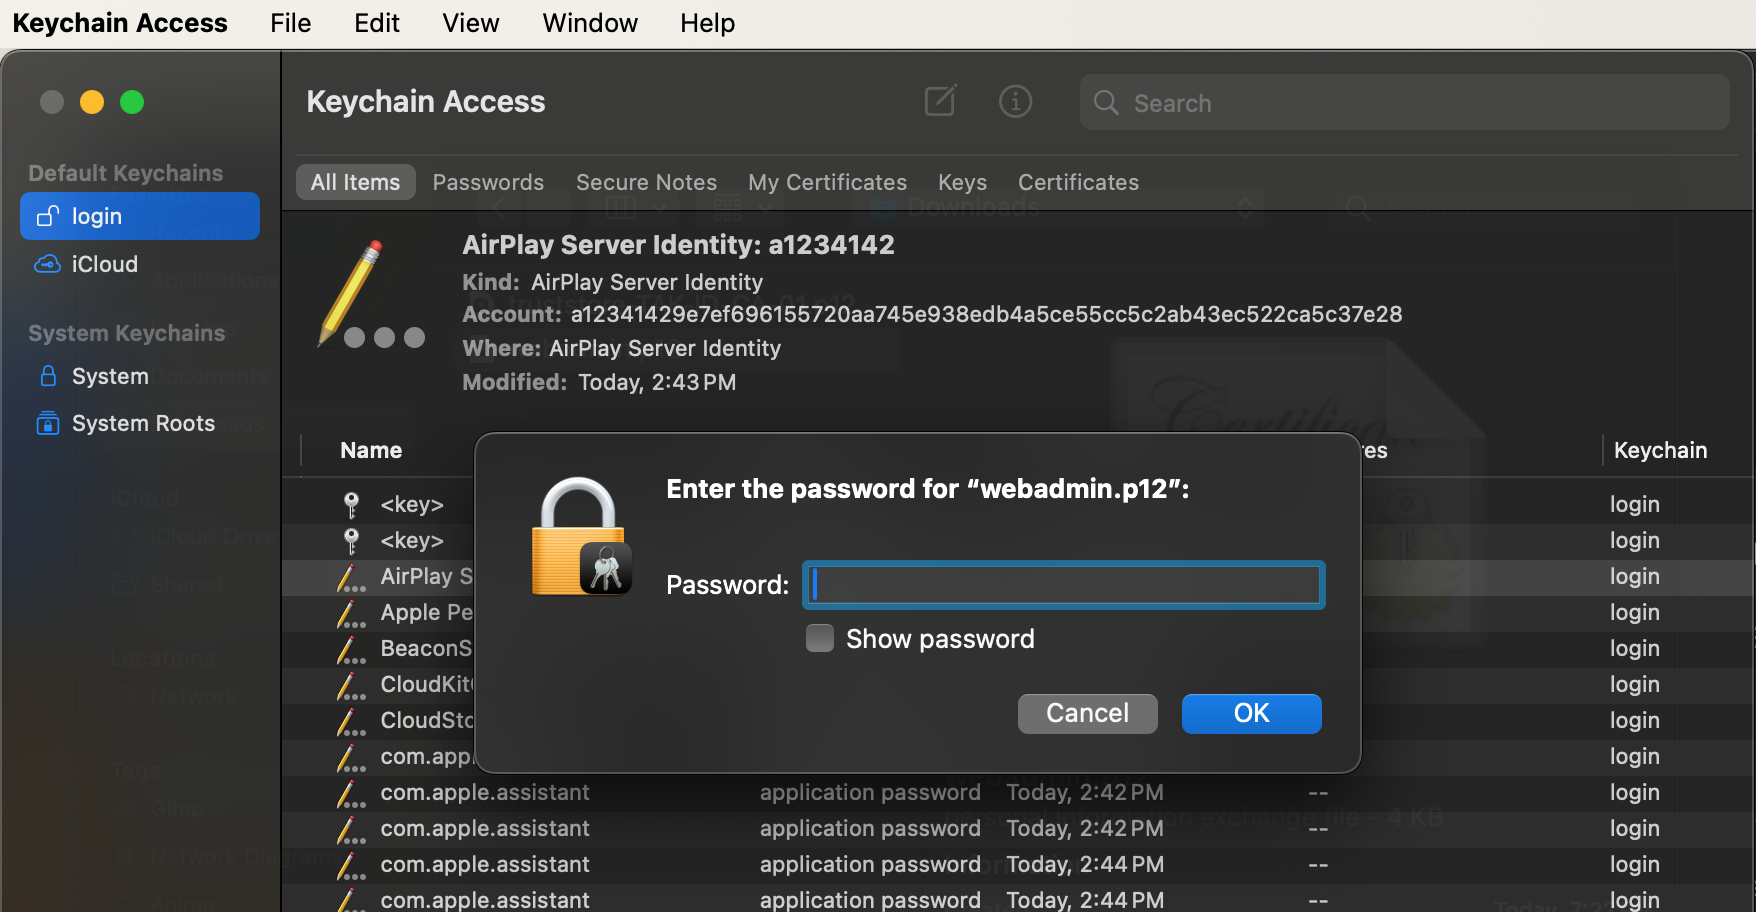
When the file dialog opens, select the administrative certificate.
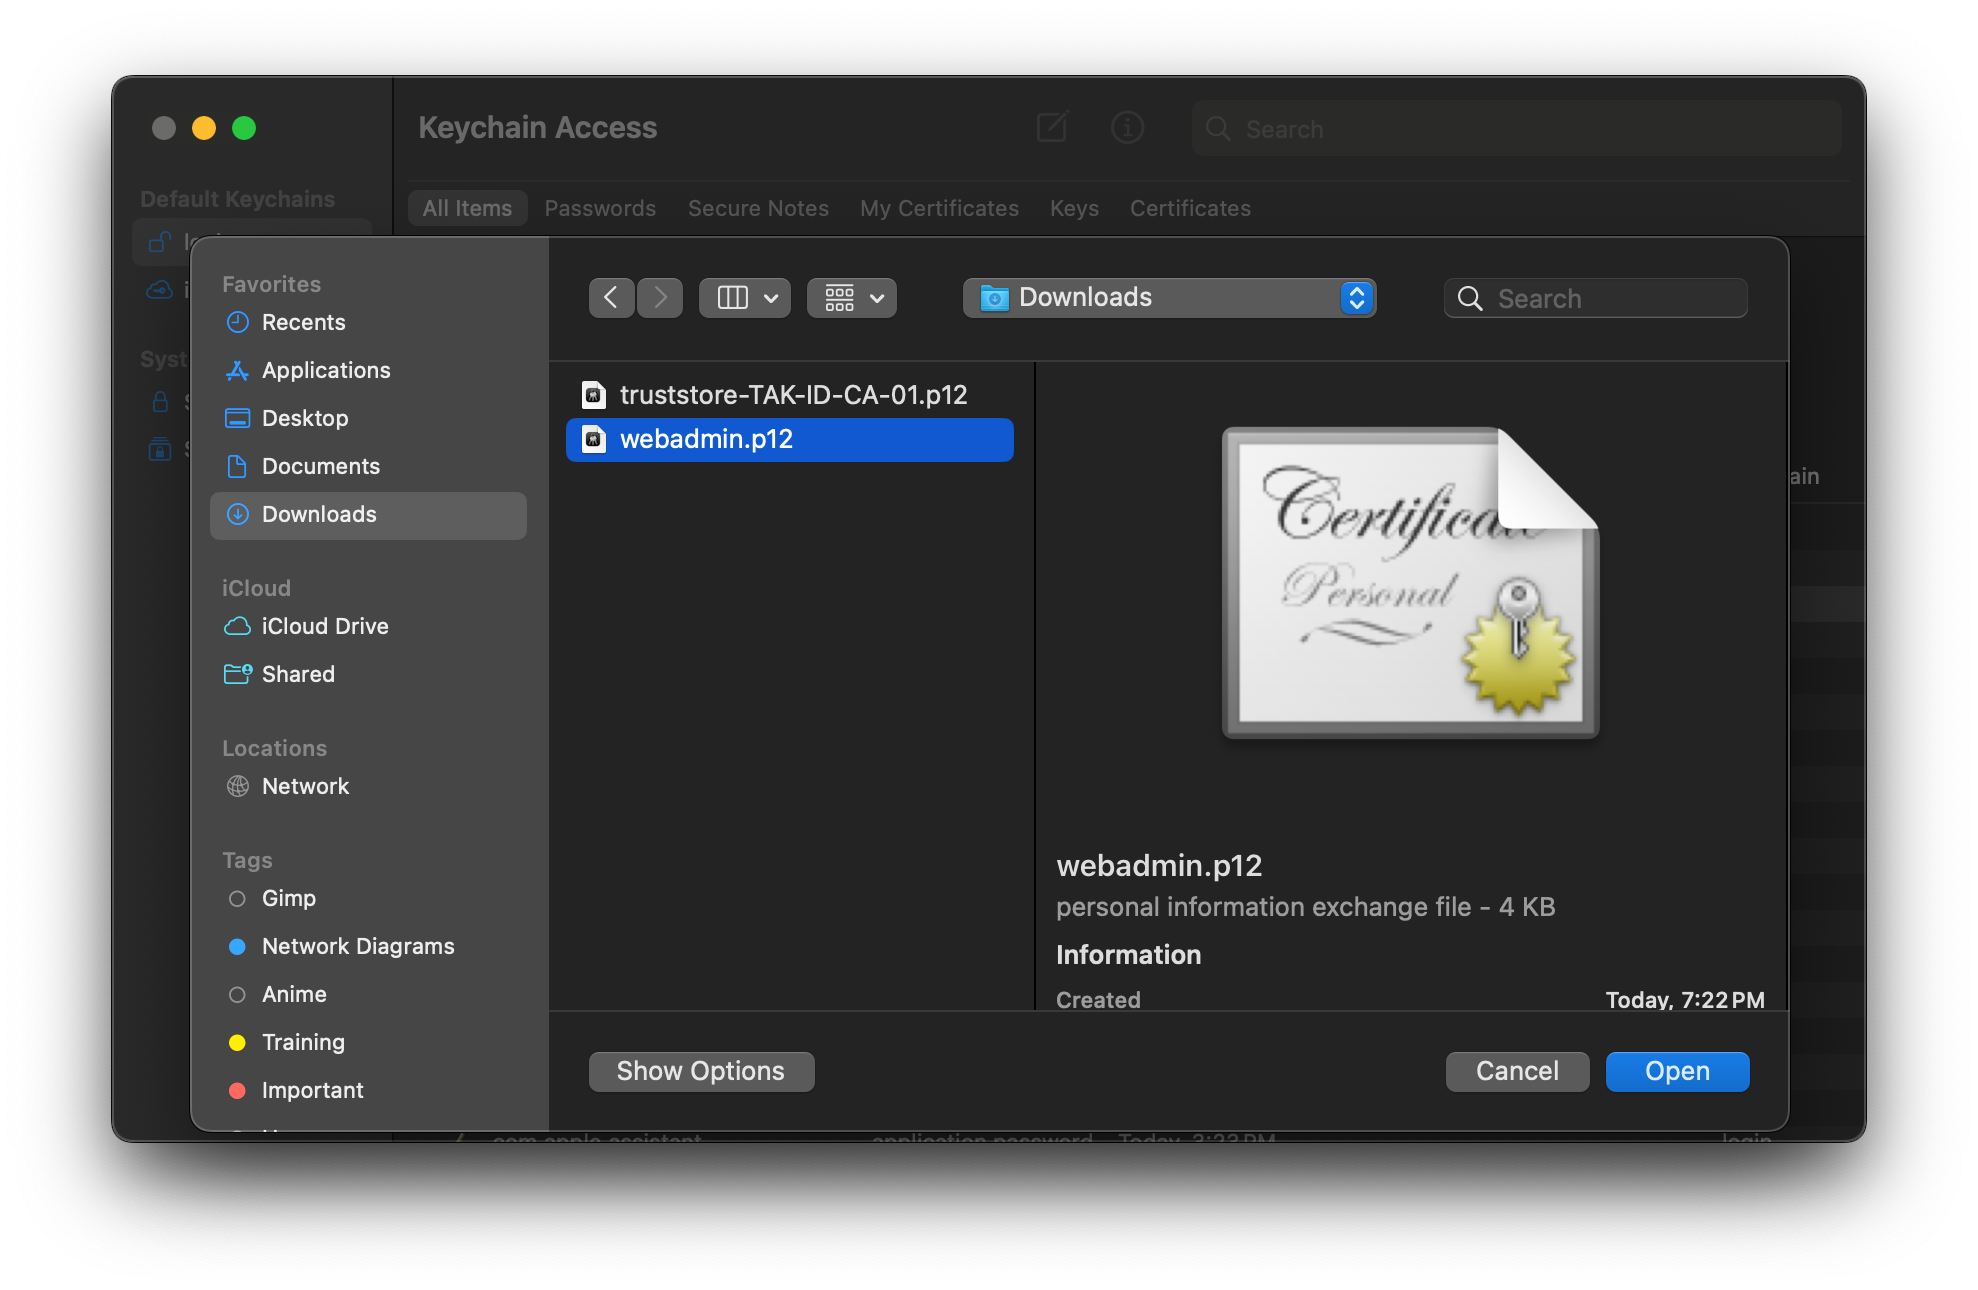
When prompted, enter the password to extract the certificate.
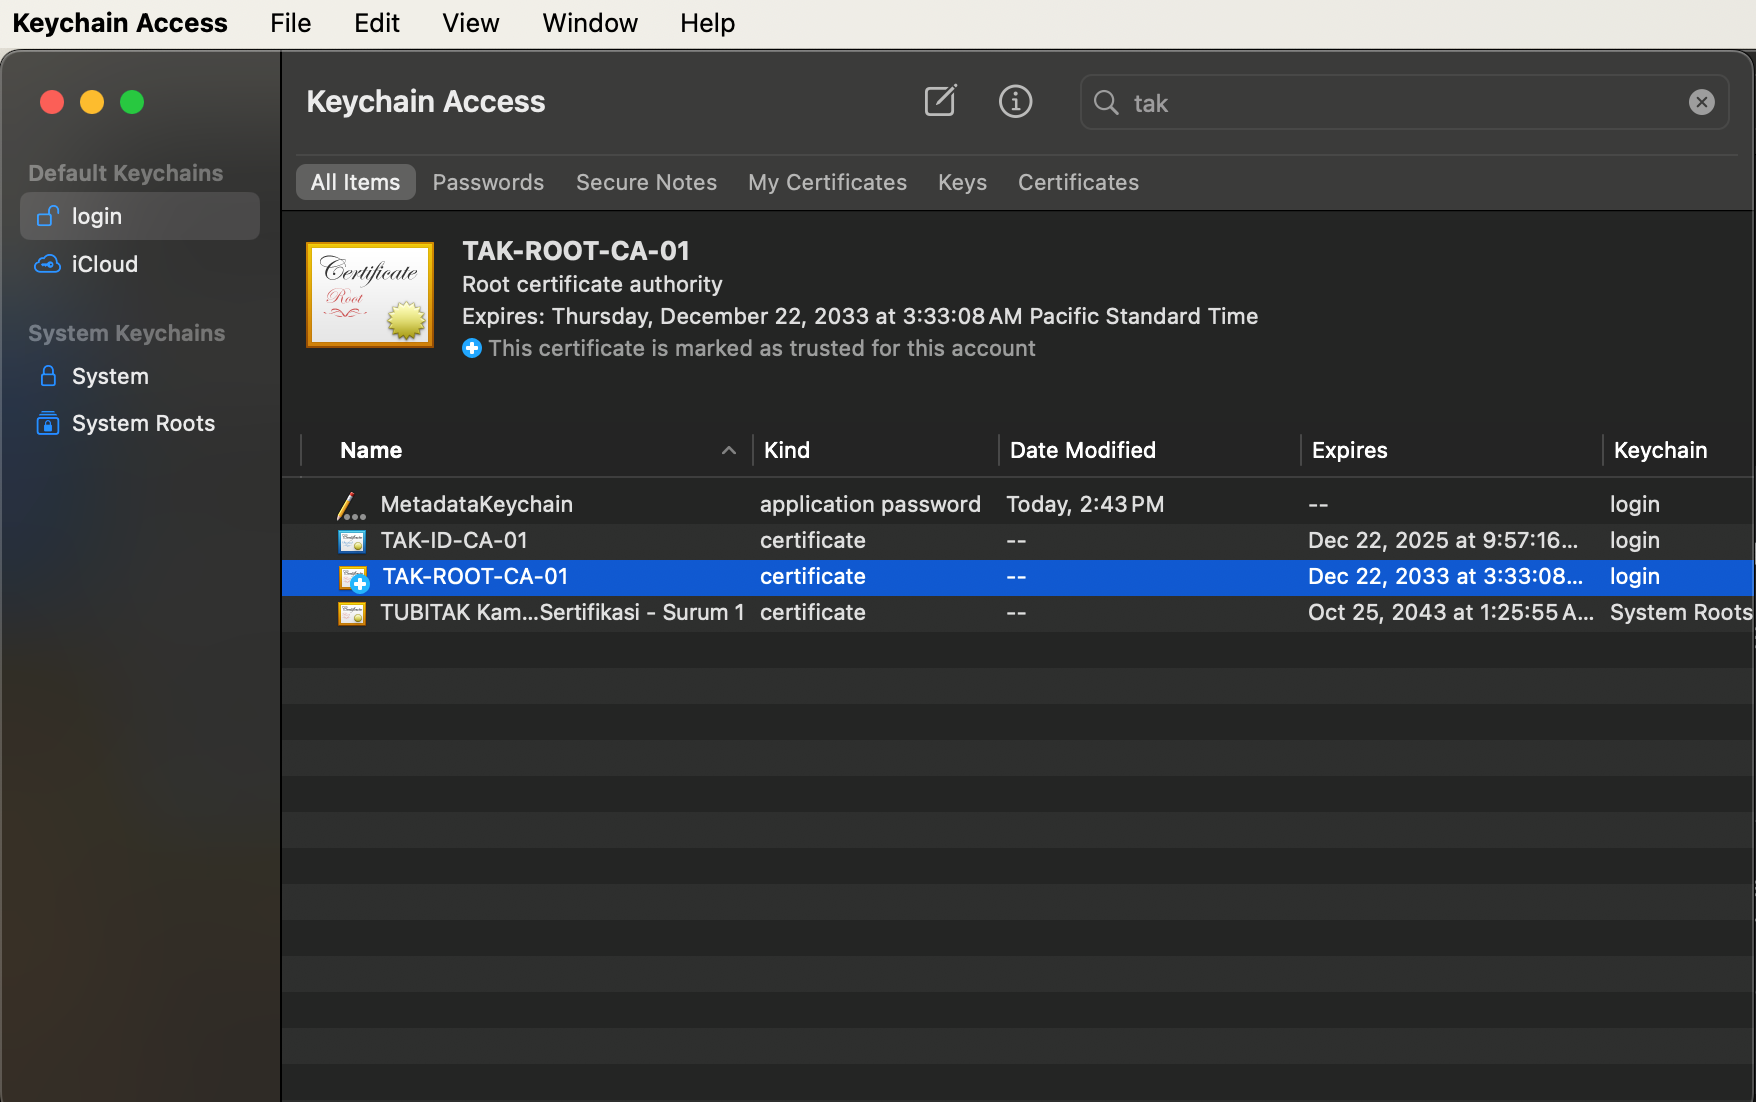
After the certificate is extracted, we additionally want to edit the root certificate to Always Trust. To do this find the root certificate, right-click Get Info and expand trust. From the dropdown select Always Trust and close the dialog.
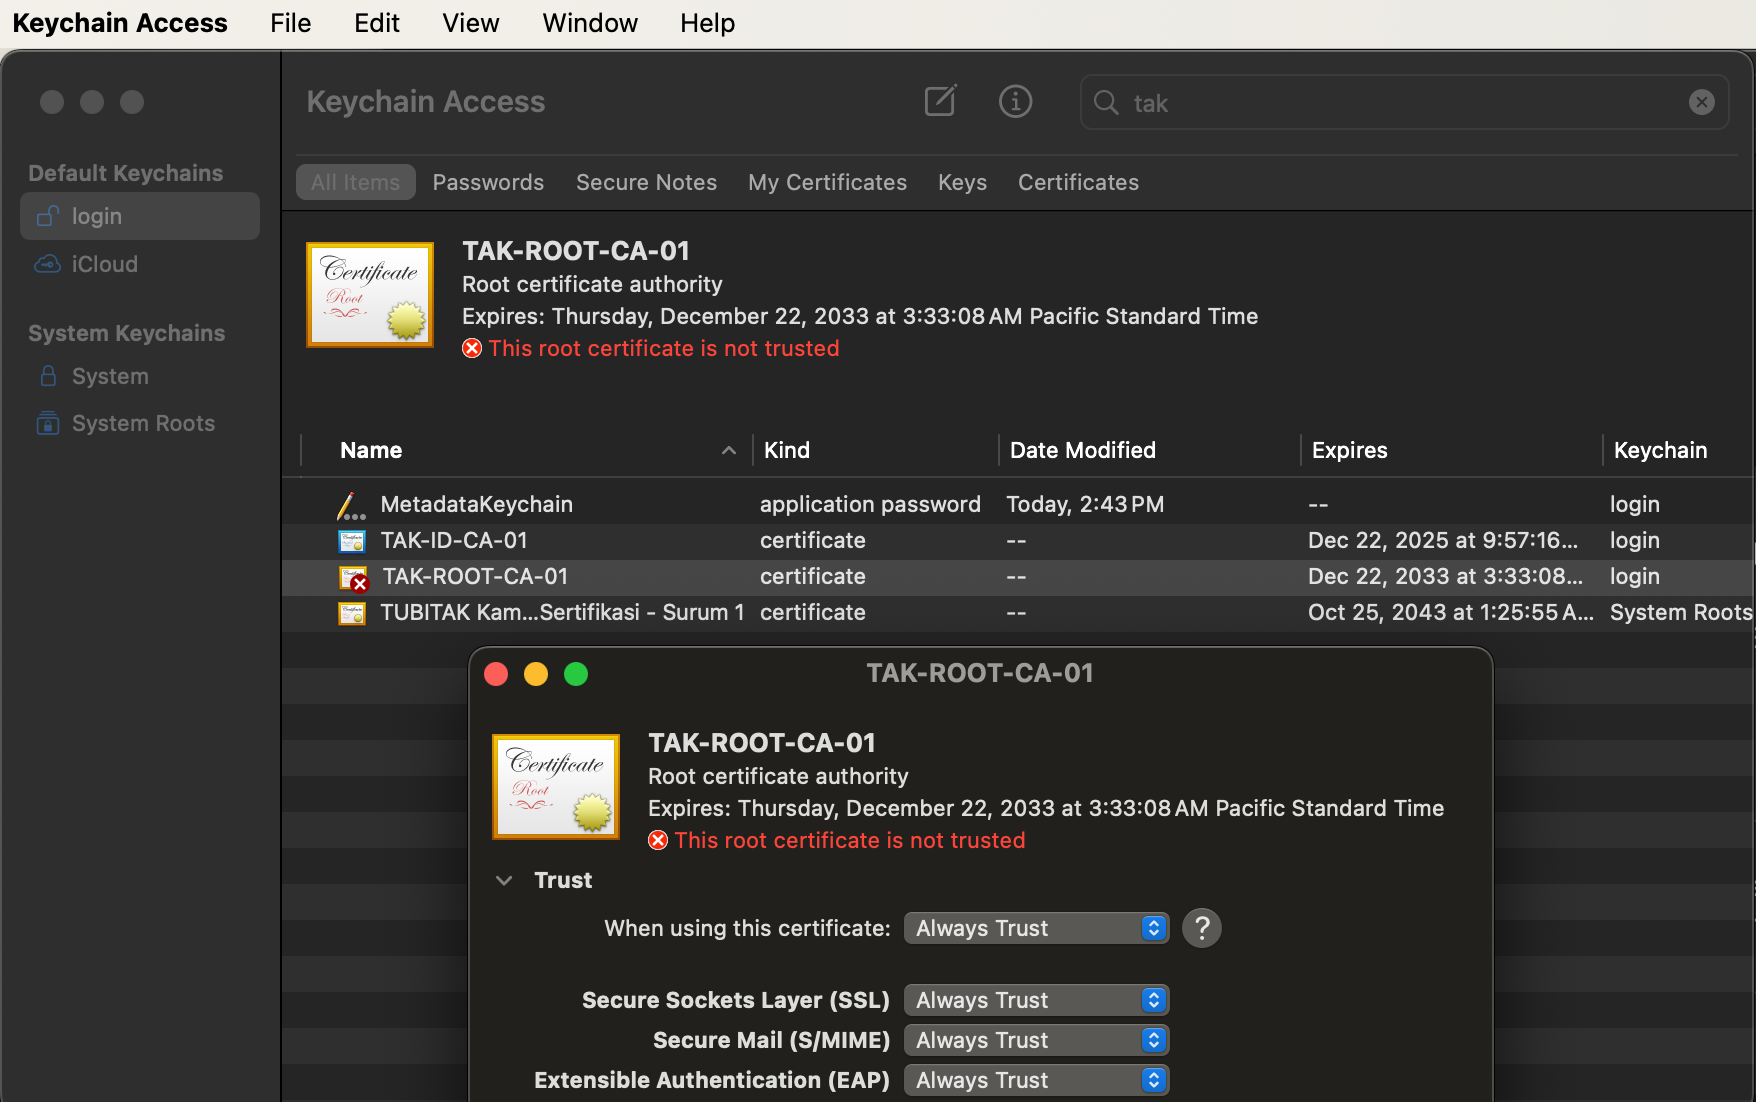
Refresh the window and verify that the certificate is now trusted. If it is, we can attempt to log in using Safari.
Safari
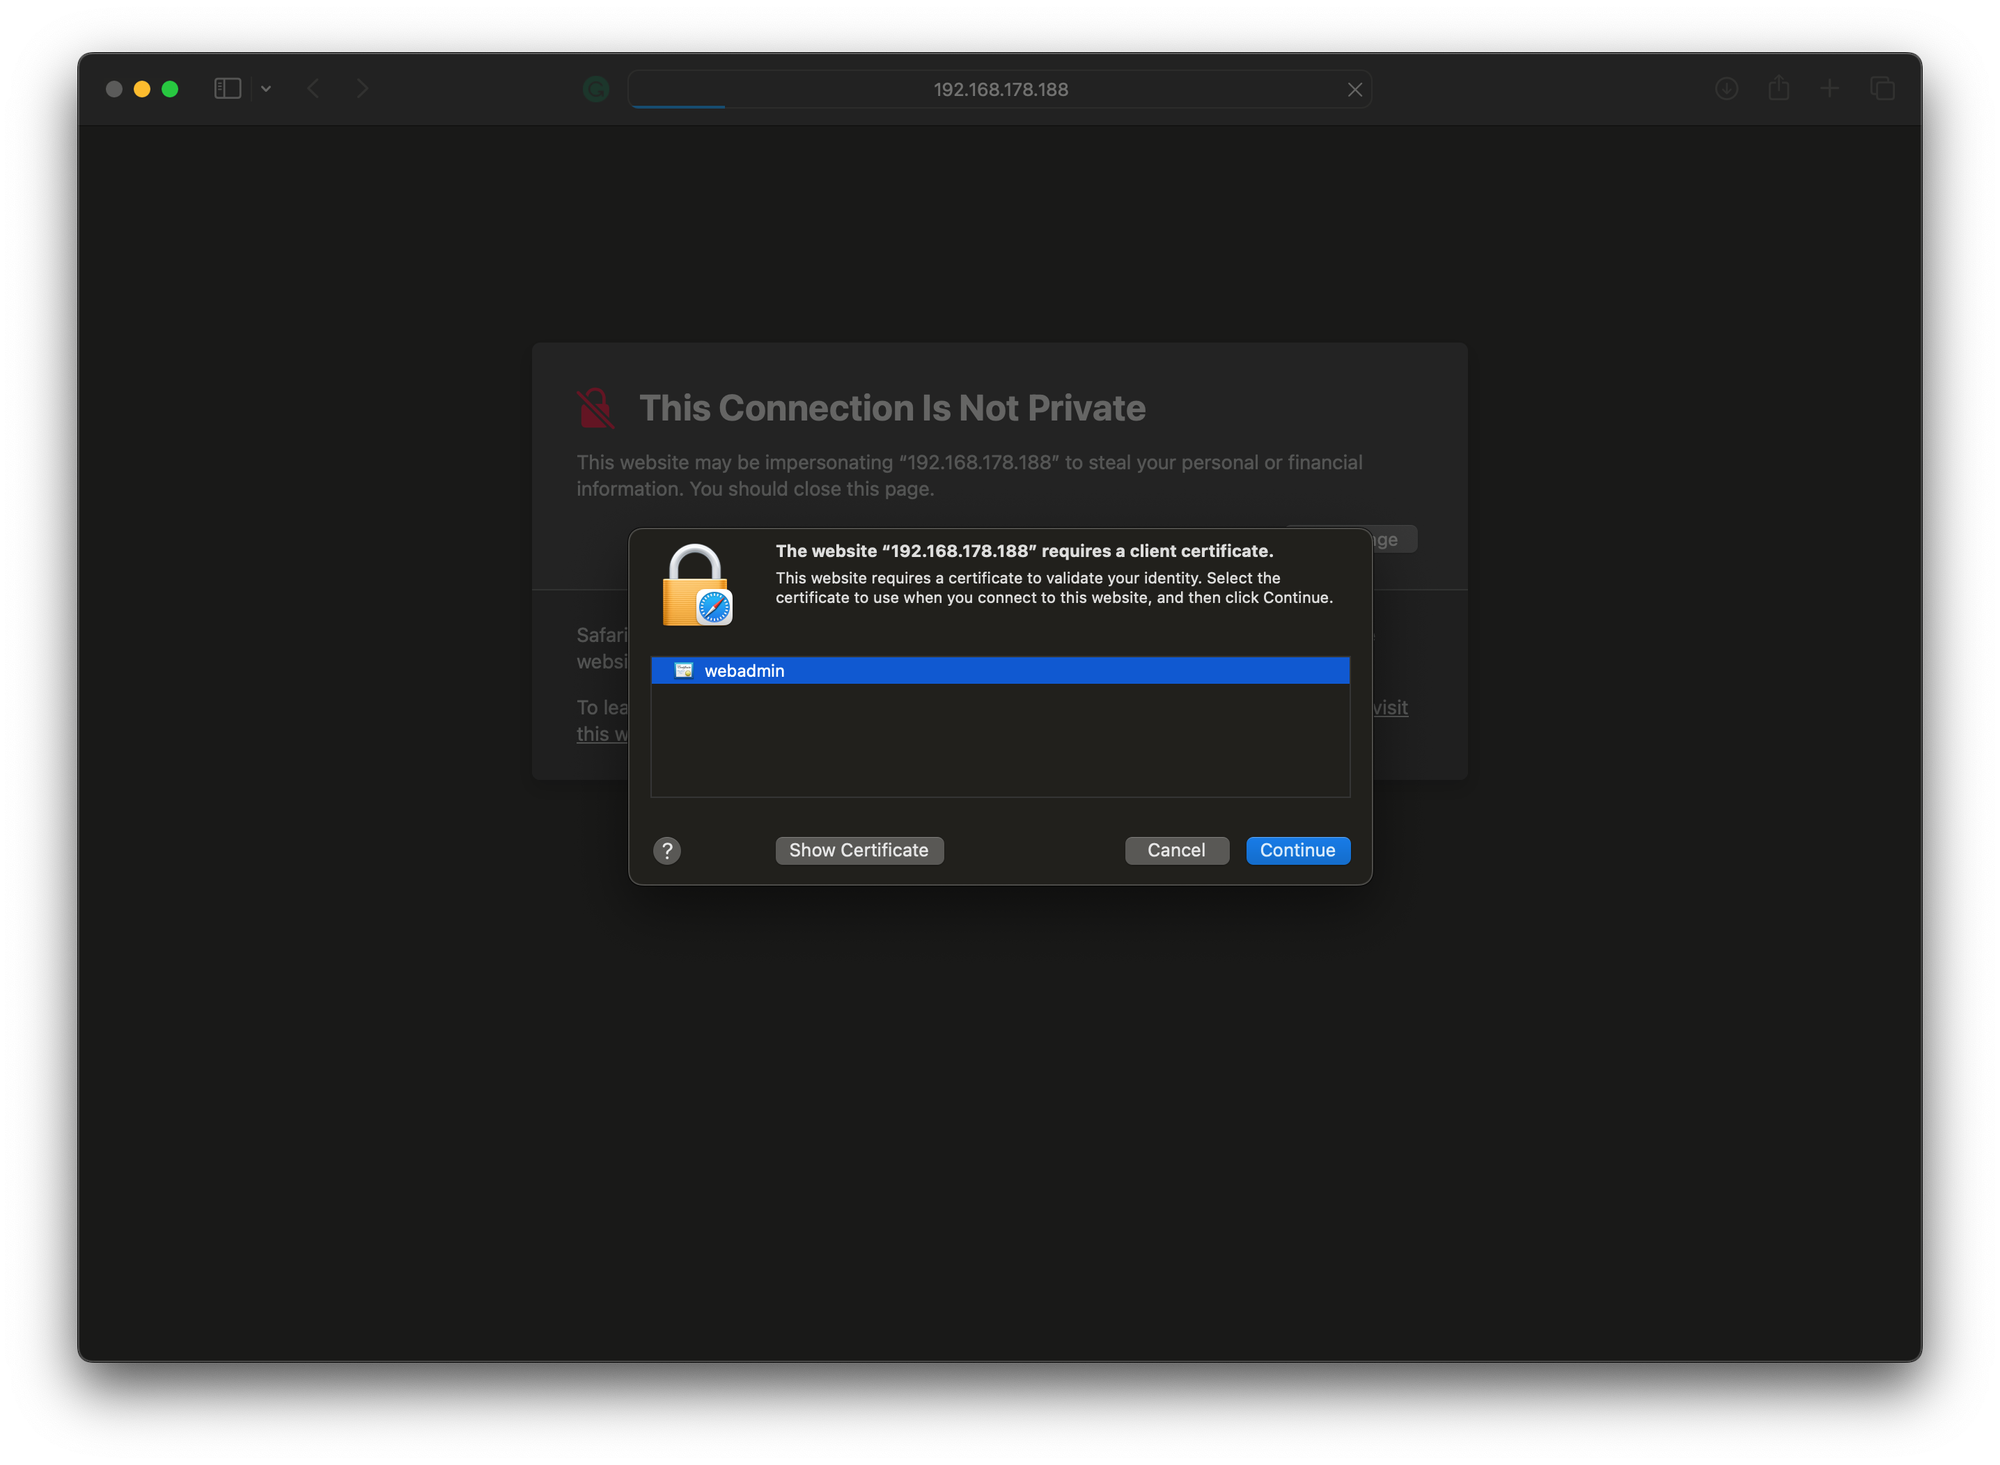
Open the Safari web browser and navigate to https://<takserver>:8443/Marti. You will get a This Connection is Not Private, this is because the certificate name, connection, and trust do not match. We can ignore this and click visit this website to continue.
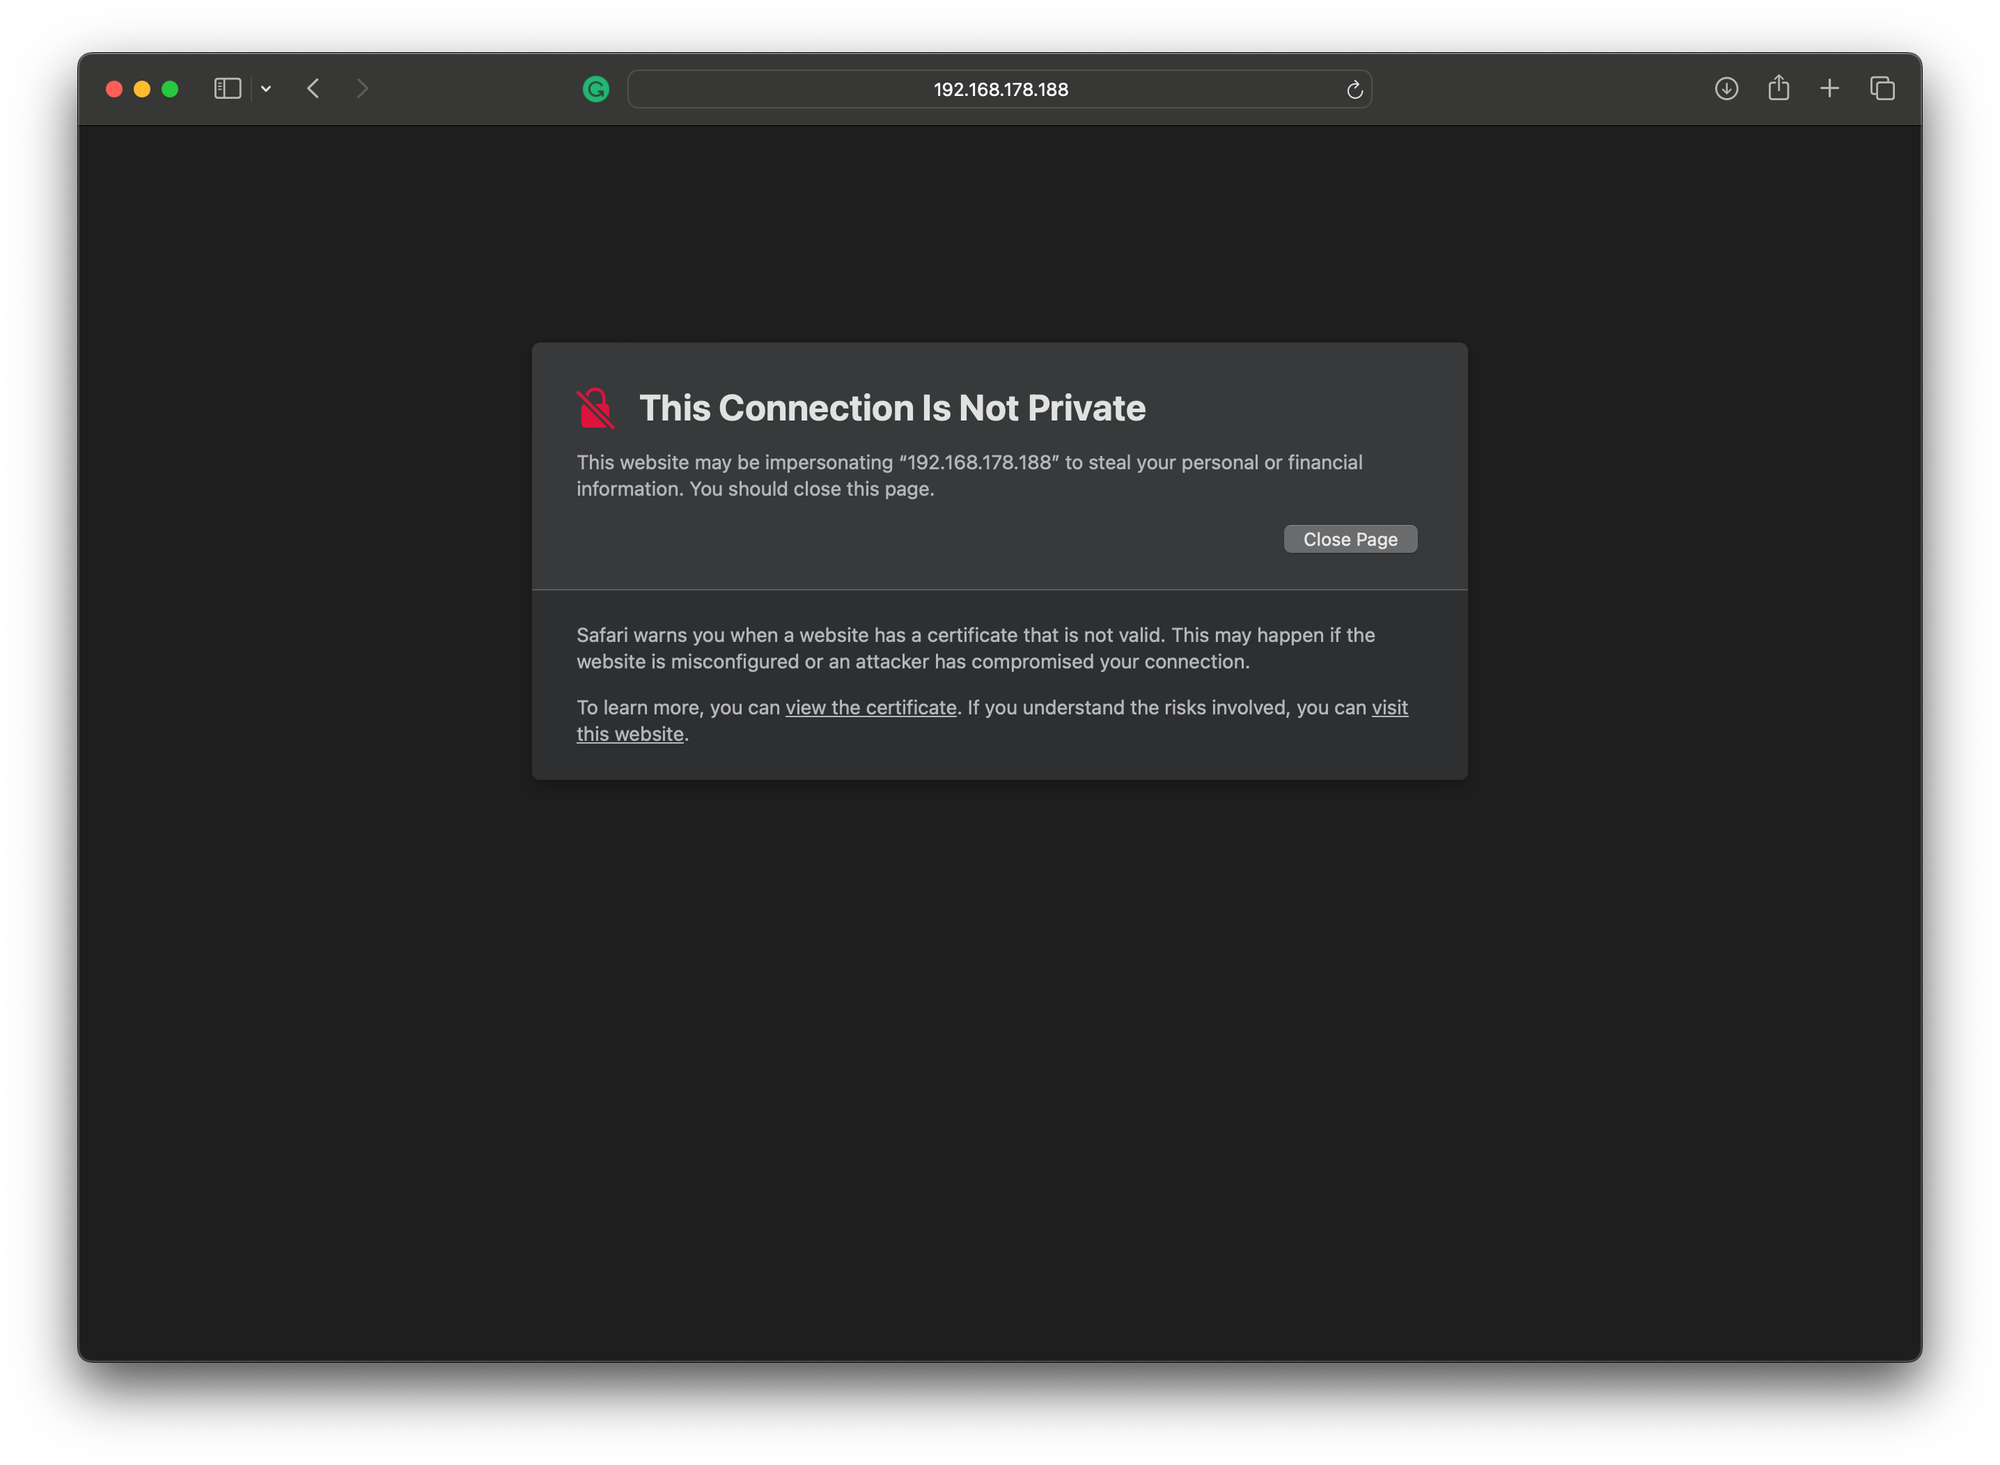
After we accept the site not trusted banner, we should be prompted for the administrative certificate we imported. Click Continue and enter YOUR user administrative password and click on Always Trust to proceed with the login.
Metrics Dashboard
When logging into the TAK Server, you will be presented with the Marti dashboard that displays the server's metric information. Below is a list of default graphs and information regarding the data that is being displayed.
- Server Start Time/Up Time
- The format for this is in ZULU which is yyyy-MM-ddTHH:mm:ss.SSSZ
- T is assumed literally to separate the date from the time
- ss.SSS is seconds and milliseconds
- Z is zero-hour offset or "Zulu time (UTC)"
- The format for this is in ZULU which is yyyy-MM-ddTHH:mm:ss.SSSZ
- CPU Usage
- Identifies how many cores the system has and its usage
- Heap Usage
- The TAK Server runs within one or more Java virtual machines (JVM)
- Clients Connected
- Displays how many clients are currently connected
- Network Input/Output
- Displays network utilization of traffic the server is processing
- Queue(s)
- Submission
- Broker
- Repository
Navigation Menu
At the top right of the Marti dashboard will be the hamburger menu (≡) that will drop down multiple available menus and pages for additional configuration and management. Below is a list of available menu options and a brief description.
- Data
- CoT Query
- Allows you to send CoT Events from the server to a device as CoT messages
- File Manager
- Previously called Enterprise Sync, contains all files uploaded to the server either as a Data Package or through DataSync
- Send Mission Package
- Allows you to upload and send a Data Package to connected clients
- Video Feed Manager
- Used to publish video feed URLs to connected clients
- Mission Manager
- Used to manage DataSync missions stored on the server
- ExCheck
- Used to manage ExCheck templates from the server
- CoT Query
- Situational Awareness
- Export Mission
- Allows you to export CoT events stored in the server as a KMZ/KML overlay
- KML SA Feed
- Exports a streaming KML file for import in applications such as Google Earth
- WebTAK
- Opens the web browser version of TAK
- Export Mission
- Configuration
- Inputs and Data Feeds
- Allows you to create new input ports for pushing CoT messages to the TAK Server
- Federation
- Used to manage TAK Server to TAK Server connections
- Federate Certificate Authorities
- Used to manage TAK Server public CAs used for TAK Server Federation
- Injectors
- Used to inject CoT, Sensor, and SPI
- Security and Authentication
- Allows you to view the Security and Authentication configuration of the TAK Server. Used to configure certificate enrollment or AD/LDAP authentication backend
- Inputs and Data Feeds
- Administrative
- Database
- Views the database configuration and allows for database maintenance
- Data Retention
- Allows you to configure CoT retention policies and archive missions to manage database storage usage
- Manage Users
- Used for managing users and groups using the flat file authentication method which is used by default
- Client Certificates
- Used to manage client certificates issued through certificate enrollment
- Device Logs
- When configured at the client level, allows for debug and error logs to be uploaded to the TAK Server for centralized logging
- Device Profiles
- Allows you to create specific profiles to push Data Packages and configurations to specific groups either at enrollment or connection
- File Config
- Allows you to adjust the upload file size limit to the TAK Server
- VBM Configuration
- VisiBellum MCS (VBM) for use with external COP Managers
- Database
- Monitoring
- Alarms
- Allows you to view and manage Alerts set to the TAK Server
- Metrics Dashboard
- Default splash page when logging into the TAK Server, used to view system resources
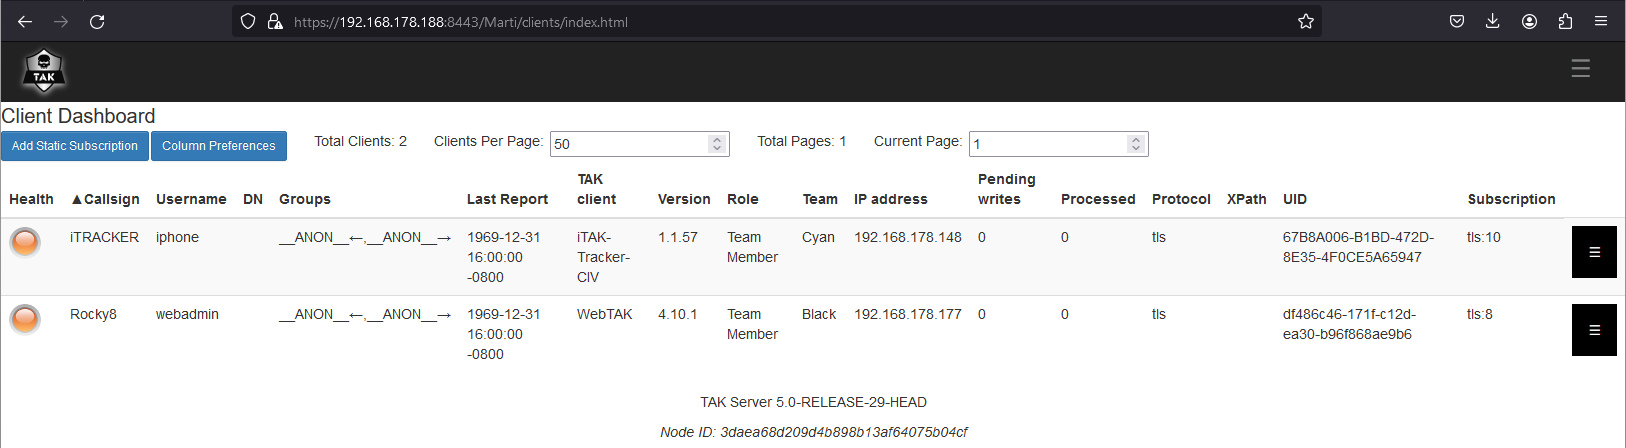
- Client Dashboard
- Allows you to view details about connected clients, federations, and subscriptions
- Alarms
- Plugins
- Displays any installed TAK Server plugins
Managing Users and Groups
This is the most common task that as an administrator we will be performing. We must understand that we have two methods of managing our users and groups. We have the makeCert.sh and UserManager.jar which we have used already, the other is using the Manage Users dashboard. With the makeCert.sh we are creating "soft" certificates which are manually generated followed by the UserManager.jar placing that certificate in a group. The other method is using certificate enrollment where the client gets its certificate directly from the server and is placed in the group automatically. Furthermore, you have the option of placing the certificate or user in an inGroup or outGroup individually. More detailed information regarding users and groups can be found here.
JR
Soft Certificate Management
To generate certificates using this method, we will follow the same sequence used in creating the admin certificate. To create a client certificate we first need to go into the tak user and navigate to the /opt/tak/certs/ directory.
# Switch to the tak user
sudo su tak

# Navigate to the /opt/tak/certs directory
cd /opt/tak/certs
Once we are in this directory we will use the makeCert.sh script to create another client certificate. The basic syntax for this task is ./makeCert.sh client <commonname>.
# Create client certificates
./makeCert.sh client <commonName>

# EXAMPLE
./makeCert.sh client wintak
Once our certificate is created we need to use UserManager.jar to allow us to manage it in the Marti web dashboard. This time our syntax will be java -jar /opt/tak/utils/UserManager.jar certmod -g <group> /opt/tak/certs/files/<commonname>. Below we are going to add the wintak client to the __ANON__ group.
Marti web dashboard.# Add the client to a group
java -jar /opt/tak/utils/UserManager.jar certmod -g __ANON__ /opt/tak/certs/files/<commonName>
# EXAMPLE
# java -jar /opt/tak/utils/UserManager.jar certmod -g __ANON__ /opt/tak/certs/files/wintak.pem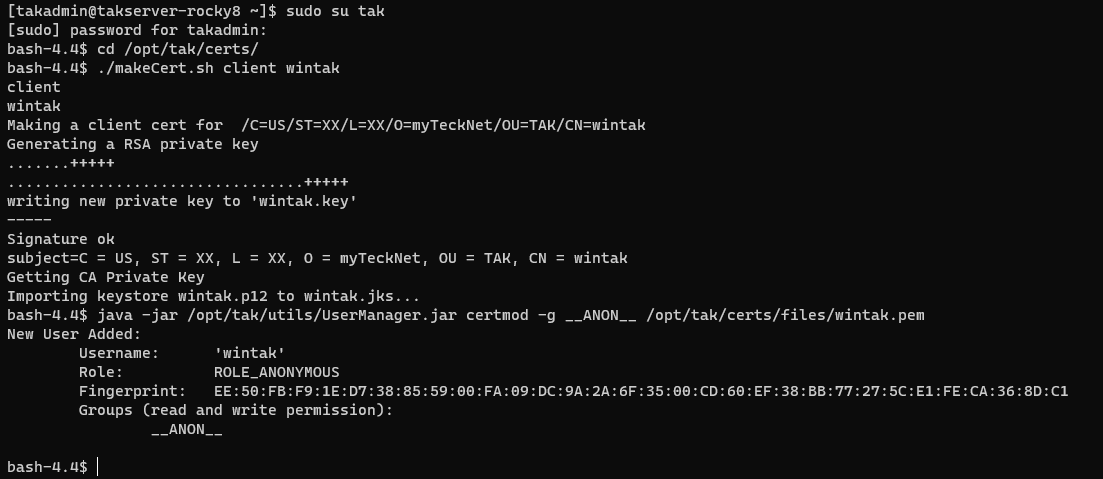
This completes the basic creation of a user soft certificate; however, we need to copy it to our home directory so that we can move it to our administrative workstation. Additionally, we are going to copy over an extra file which is our TAK Servers public certificate file. If you are following along this should be truststore-TAK-ID-CA-01.
# Exit the tak user account
exit

# Change directory back to our home directory
cd ~

# Copy our client certificate and public CA certificate
sudo cp -v /opt/tak/certs/files/wintak.p12 .
sudo cp -v /opt/tak/certs/files/truststore-TAK-ID-CA-01.p12 .

# Restore ownership to our home directory
sudo chown -R takadmin:takadmin /home/takadmin

Certificate AutoEnrollment
This process involves changing some configurations in our TAK Server to issue certificates to clients upon successful authentication. For our authentication source, we will use the TAK Server to store our client credentials. To begin the configuration we need to determine who our signing authority is and select an appropriate truststore file.
# Identify our signing truststore
ls -l /opt/tak/certs/files/*-signing.jks
Next, open the Marti dashboard and navigate to Configuration > Security and Authentication. Under Security Configuration, select Edit Security. Check the Enable Certificate Enrollment and from the options click on TAK Server CA. Enter the following configuration information:
- Signing Keystore File = certs/files/
<CACommonName>-signing.jks - Signing Keystore Password = default
atakatakor the password defined within the cert-metadata.sh file - Validity Days = Enter the days the certificate is to be valid for. When the certificate period has passed the client will have to re-enter their credentials to request a new certificate
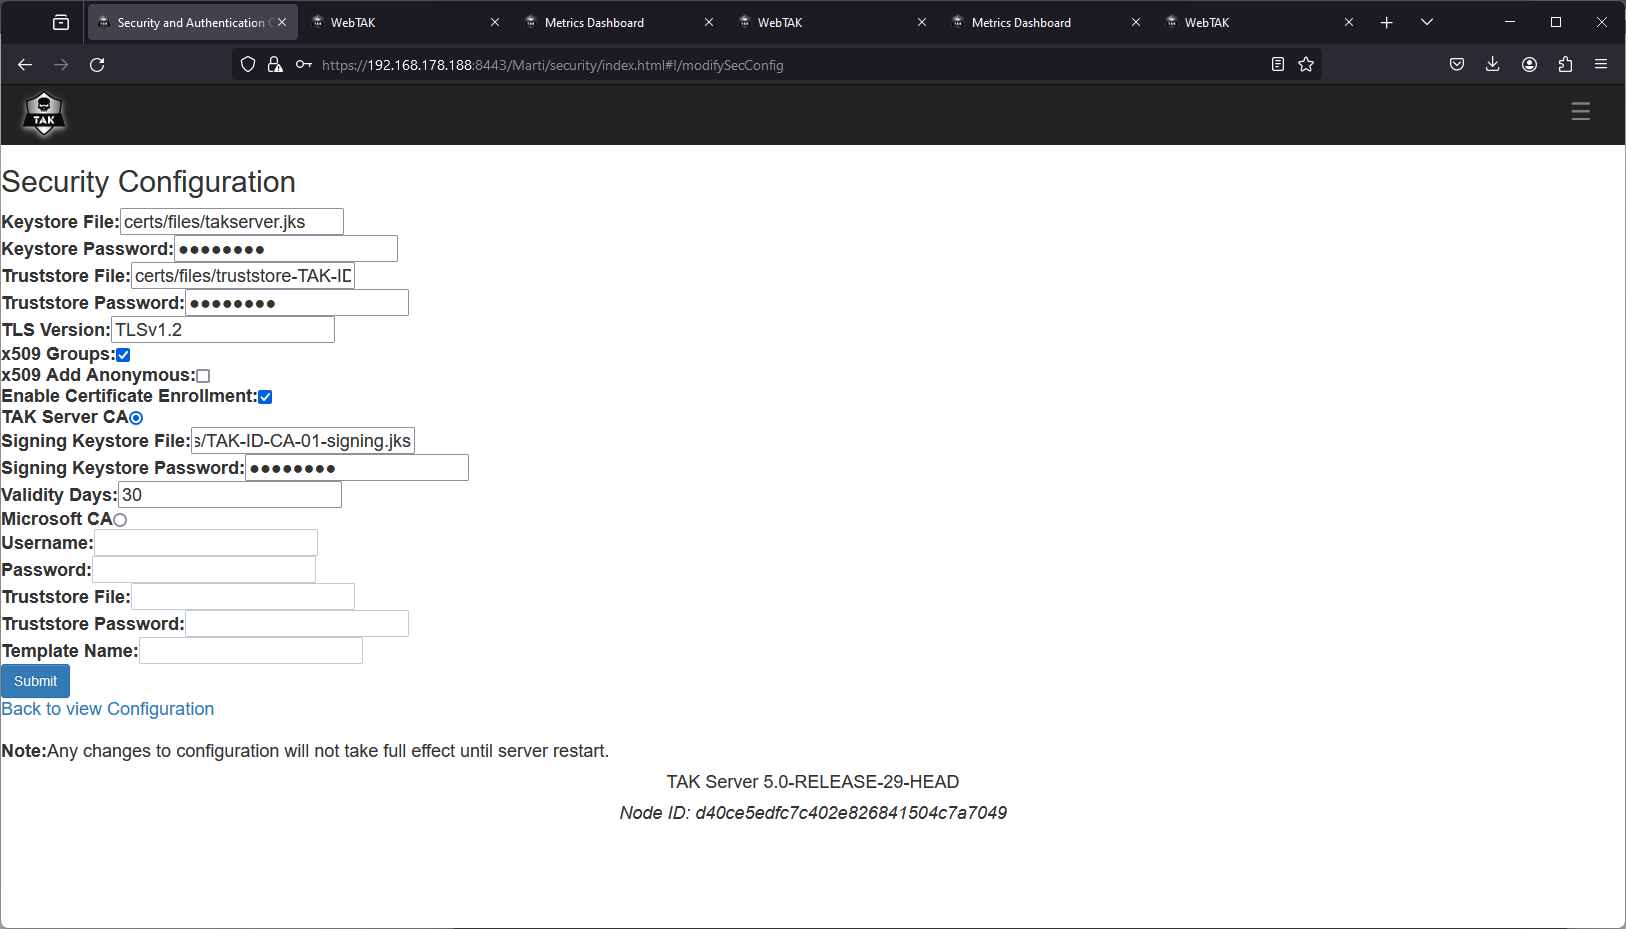
After reviewing the configuration changes, click on Submit to apply the changes immediately. What this does is append new elements in our CoreConfig.xml file identified by the certificateSigning block. We can see this change below. In this block, we identify the intended CA as the TAKServer. Under nameEntries the default values for Organization and Organizational Unit are TAK. This means our certificate subject would have OU=TAK, O=TAK. Recall in our cert-metadata.sh we also assigned these values. To maintain some consistency in our environment we may want to modify these values. To change these values we will need to edit the CoreConfig.xml file directly as the tak user, and after we have made our changes we must restart the takserver.service.

To change these settings execute the following steps:
# Enter the tak user
sudo su tak

# Change directories to the tak directory
cd /opt/tak

# Edit the CoreConfig.xml
vi CoreConfig.xml
In the CoreConfig.xml, using the arrow keys to navigate down to the start of the certificateSigning element. Another method is to use the search function within vi/vim. When opening the file using vi/vim, use the / key and type certificateSigning and it will bring you to the first instance of the searched value.
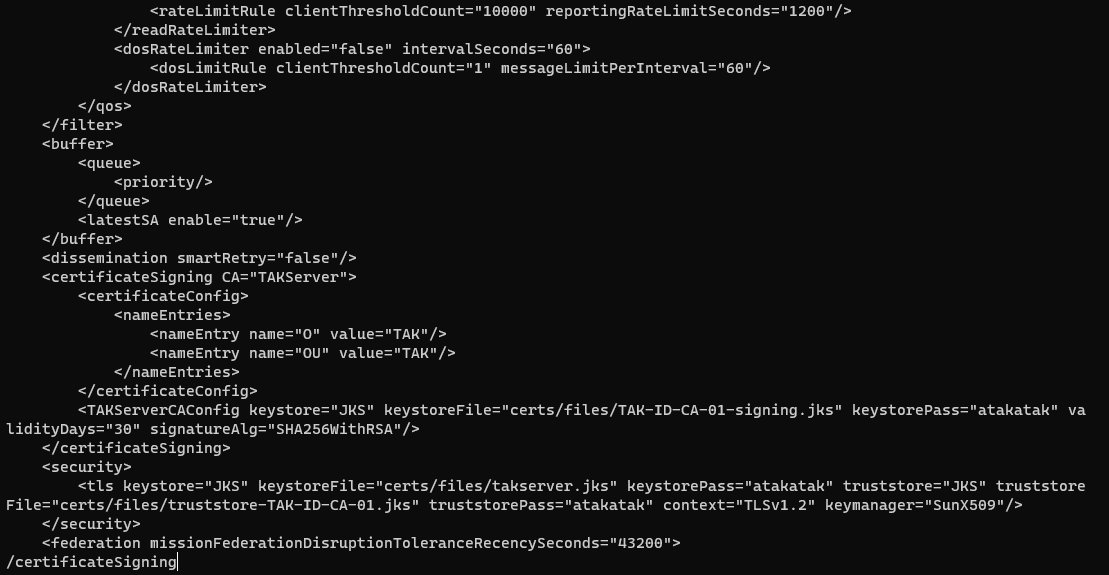
Replace instances of TAK within the nameEntry as required. You can add additional nameEntry for OU as required to match your environment. In the below example, certificates will be issued as CN=XXX,OU=TAK,OU=Users,O=myTecknet.
nameEntry values as seen below. If you have iTAK/iTAK Tracker within your environment, do not add additional OU nameEntry values. <certificateSigning CA="TAKServer">
<certificateConfig>
<nameEntries>
<nameEntry name="O" value="myTeckNet"/>
<nameEntry name="OU" value="TAK"/>
<nameEntry name="OU" value="Users"/>
</nameEntries>
</certificateConfig>
<TAKServerCAConfig keystore="JKS" keystoreFile="certs/files/TAK-ID-CA-01-signing.jks" keystorePass="atakatak" validityDays="30" signatureAlg="SHA256WithRSA"/>
</certificateSigning>One additional important value we want to add is CAkey and CAcertificate to the TAKServerCAConfig element. The CAkey and CAcertificate require the full path to the CA; otherwise, it will not update the CRL referenced later on. Replace CAcommonName with the CA configured used in the makeCert.sh ca <CAcommonName> command.
<TAKServerCAConfig keystore="JKS" keystoreFile="certs/files/TAK-ID-CA-01-signing.jks" keystorePass="atakatak" validityDays="30" signatureAlg="SHA256WithRSA" CAkey="/opt/tak/certs/files/<CAcommonName>" CAcertificate="/opt/tak/certs/files/<CAcommonName>"/>
# Add the CAkey and CAcertificate values to support certificate revocations
<TAKServerCAConfig keystore="JKS" keystoreFile="certs/files/TAK-ID-CA-01-signing.jks" keystorePass="atakatak" validityDays="30" signatureAlg="SHA256WithRSA" CAkey="/opt/tak/certs/files/<CAcommonName>" CAcertificate="/opt/tak/certs/files/<CAcommonName>"/>

# EXAMPLE
# <TAKServerCAConfig keystore="JKS" keystoreFile="certs/files/TAK-ID-CA-01-signing.jks" keystorePass="atakatak" validityDays="30" signatureAlg="SHA256WithRSA" CAkey="/opt/tak/certs/files/TAK-ID-CA-01" CAcertificate="/opt/tak/certs/files/TAK-ID-CA-01"/>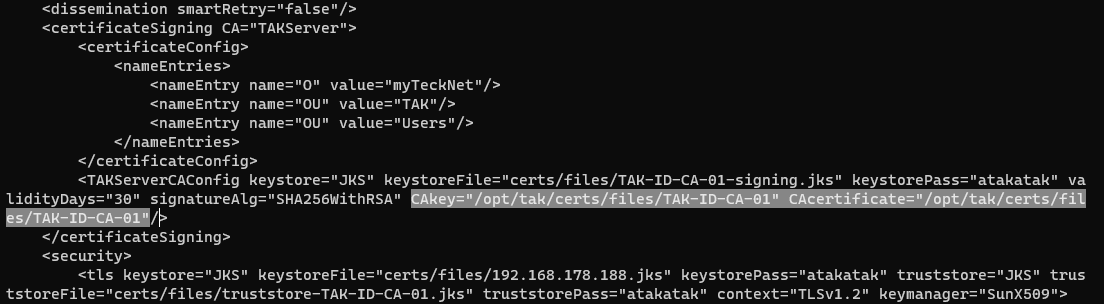
Finally, to apply for revoked certificate checking we need to add the following x509checkRevocation="true" to our <auth> element within the CoreConfig.xml. This and the values above are not added automatically when configuring certificate autoenrollment and play a key role in revoking certificates covered later on.

After we have made our changes and saved them we should check that our CoreConfig.xml validates. To do this we can issue the ./validateConfig.sh from within the /opt/tak/ directory.

validateConfig.sh is a very underutilized tool in many TAK deployments. When making changes to the CoreConfig.xml directly it is recommended to run this command before restarting the takserver.service to prevent unnecessary troubleshooting.If the CoreConfig validates, restart the takserver.service and monitor the log to ensure that the takserver has started properly.
# Exit the tak user
exit

# Restart the takserver.service
sudo systemctl restart takserver.service

# Monitor the log for errors
tail -f /opt/tak/logs/takserver-messaging.log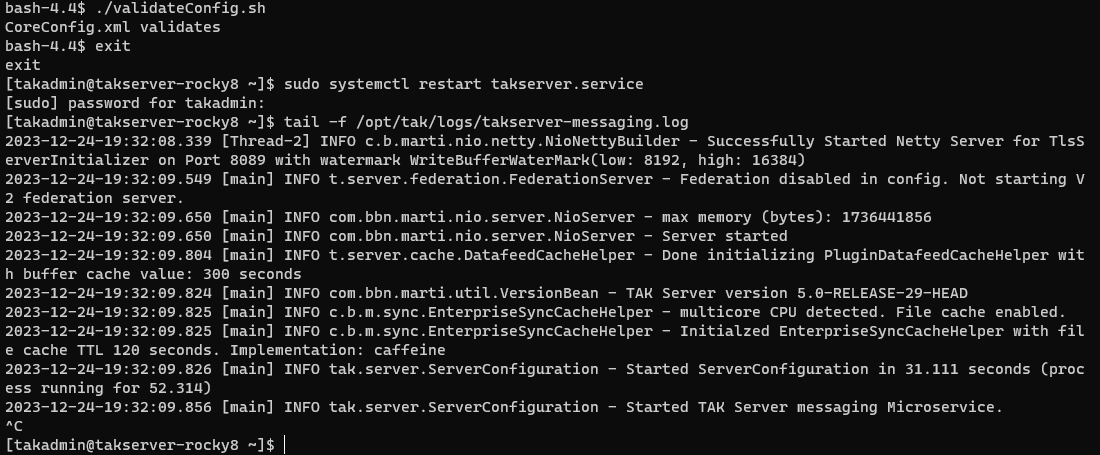
CoreConfig.xml and not the CoreConfig.example.xml. This ensures that if we ever delete the CoreConfig.xml we have a working backup. If you have a working CoreConfig.xml that you want to convert to a known good, either copy the new contents to the CoreConfig.example.xml or copy the CoreConfig.xml to CoreConfig.example.xml directly overwriting the original. #LivingontheEdgeEnrolling clients
With Certificate Enrollment configured the next step is to start managing users. This will be done via the Manage User UI under the Administrative menu in the administrative dashboard. To create a user/client click on Add User and fill in the Username, Password, and Group information. Once complete click on Create New User to create and apply the changes.

More detailed information on users and groups can be found here.
JRThe certificate enrollment process is communicated to the TAK Server over TCP port 8446. This port is not enabled by default and must be added manually. In Rocky Linux/RHEL, we can do this using the firewall-cmd, whereas Ubuntu/Raspberry Pi OS is executed using ufw.
Rocky Linux/RHEL 8
# Allow 8446/TCP - Certificate Enrollment Port
sudo firewall-cmd --zone=public --add-port 8446/tcp --permanent

# Reload firewall to apply changes
sudo firewall-cmd --reload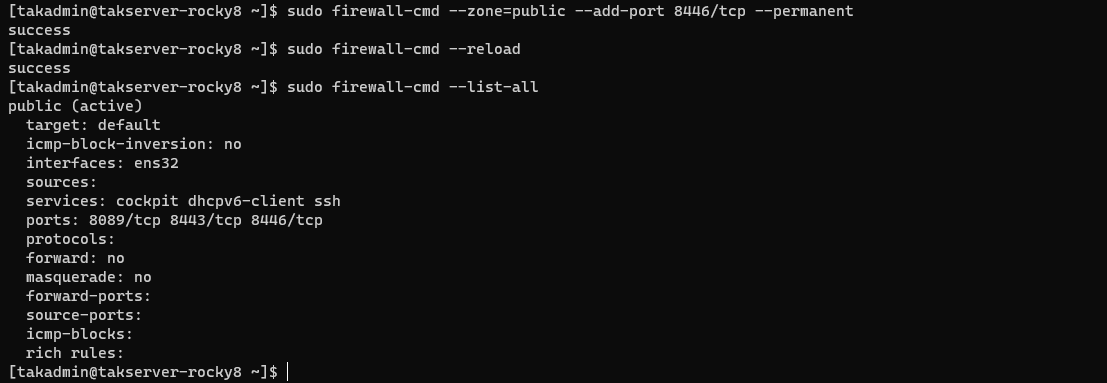
Ubuntu/Raspberry Pi OS
# Allow 8446/TCP - Certificate Enrollment Port
sudo ufw allow 8446/tcp

# View ufw state and status
sudo ufw status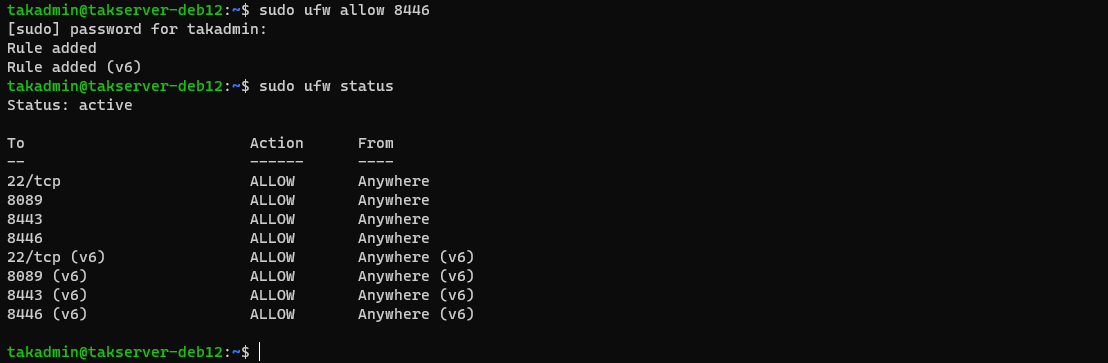
To enroll clients using this method we need to install the TAK Server's certificate authority certificate (Install Certificate Authority) and provide the user credentials. Additionally, we need to check the two checkboxes: Enroll for Client Certificate and Use Authentication. Enter the username and password and click OK. If prompted again enter the credentials a second time.
At the bottom, a status bar will cycle until a certificate is generated and issued to the client.

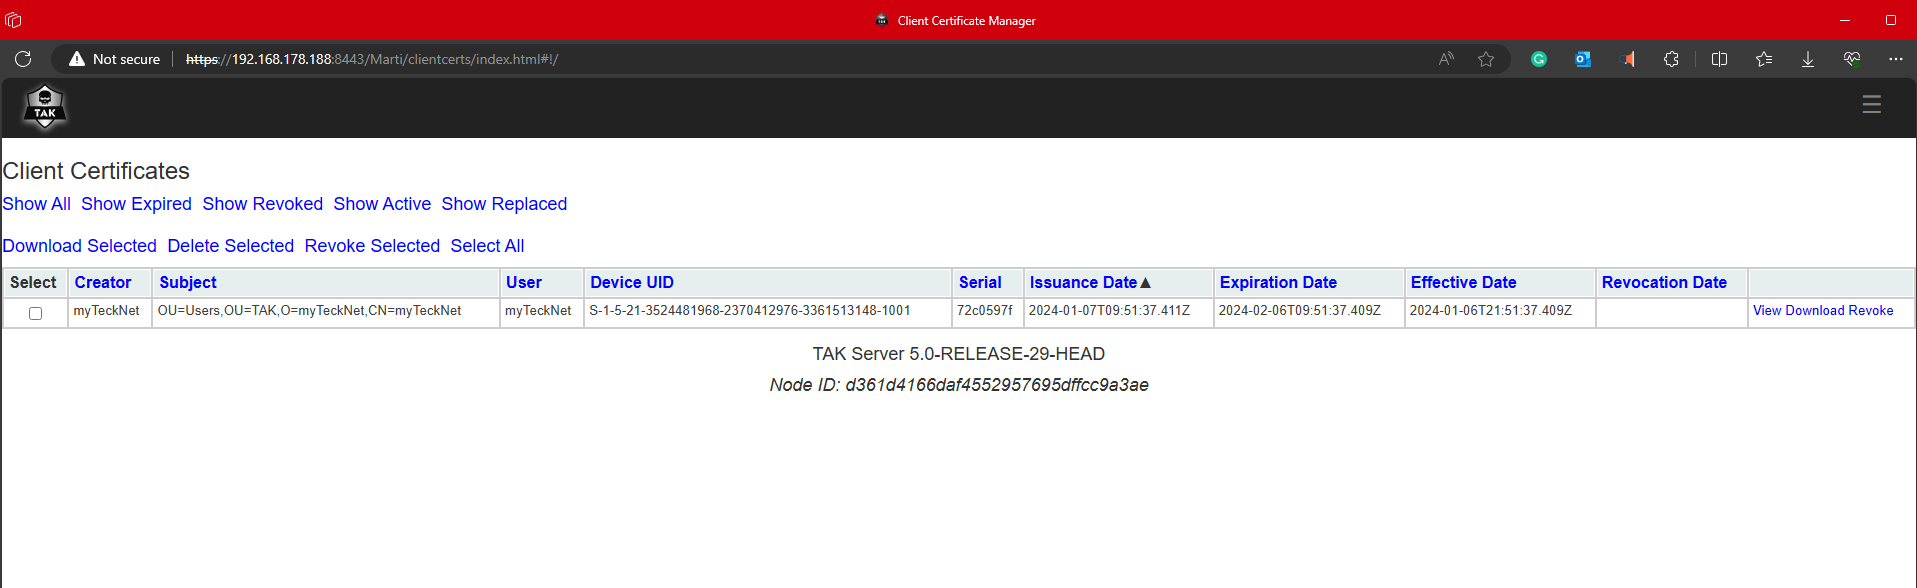
Upon successful enrollment, the client certificates can be inventoried under the, Administrative > Client Certificates menu.
Revoking Certificates
Revoking a certificate is used when we want to prevent access to a client before the certificate expiration date or when a client no longer requires access. To revoke a certificate we need to know some information about the certificate: what is the certificate's common name, who signed the certificate, and the private key associated with the signing certificate authority. To determine this we can view the contents of the certificate we wish to revoke using the openssl command. The basic syntax for our command is: openssl x509 -text -in /opt/tak/certs/files/<commonName>.pem | grep -Eo "Issuer:.+".
makeCert.sh client command.# Determine certificate issuing signing certificate authority
openssl x509 -text -in /opt/tak/certs/files/<commonName>.pem | grep -Eo "Issuer:.+"
# EXAMPLE
# openssl x509 -text -in /opt/tak/certs/files/revokedClient.pem | grep -Eo "Issuer:.+"
We see that the TAK-ID-CA-01 CA is who signed our certificate to revoke. Now that we know this we can revoke it. Our first step is to change into the tak user and navigate to the certs directory - /opt/tak/certs/. Next, we will issue the revokeCert.sh command. The basic syntax for this command is: ./revokeCert.sh <pathtoCert> <pathtoCAKey> <pathtoCA>.
# Change to the tak user
sudo su tak

# Change directories to the certificate directory
cd /opt/tak/certs

# Revoke our target certificate
./revokeCert.sh /opt/tak/certs/files/<commonName> /opt/tak/certs/files/ca-do-not-share /opt/tak/certs/files/ca

# EXAMPLE
./revokeCert.sh /opt/tak/certs/files/revokedClient /opt/tak/certs/files/ca-do-not-share /opt/tak/certs/files/ca
After we revoke our certificate we may want to view the CRL to verify our revoked certificate.
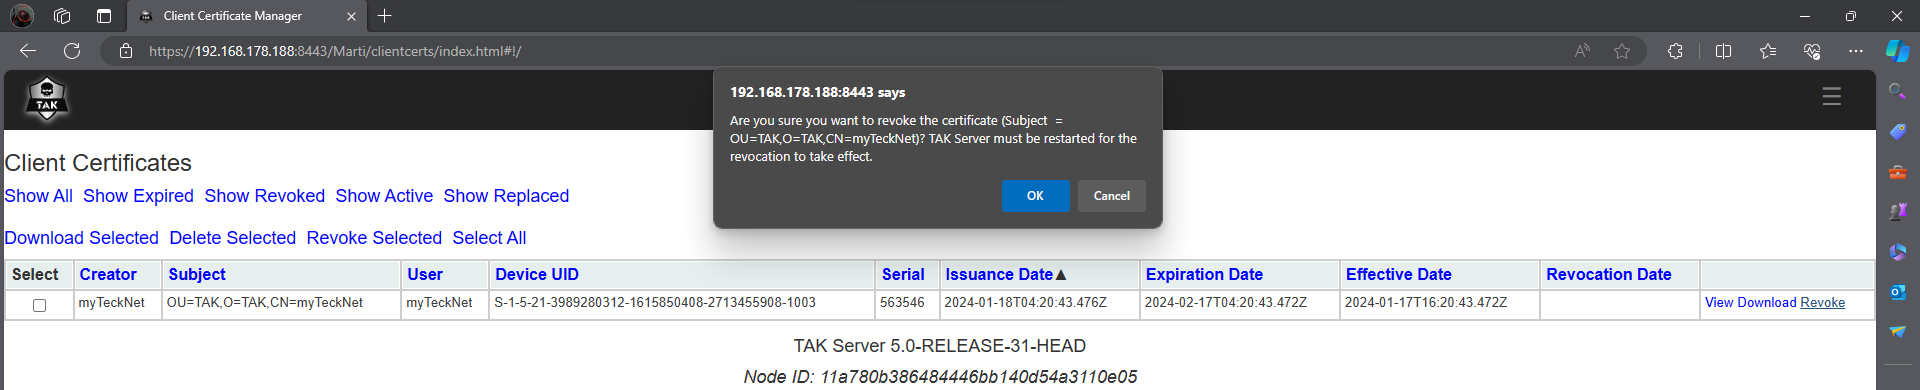
Client Certificate UI
If you configured the TAK Server for certificate autoenrollment we can revoke client certificates from the Client Certificate UI. When you click on a certificate to revoke you will get a warning about restarting the TAK Server service to update the CRL.
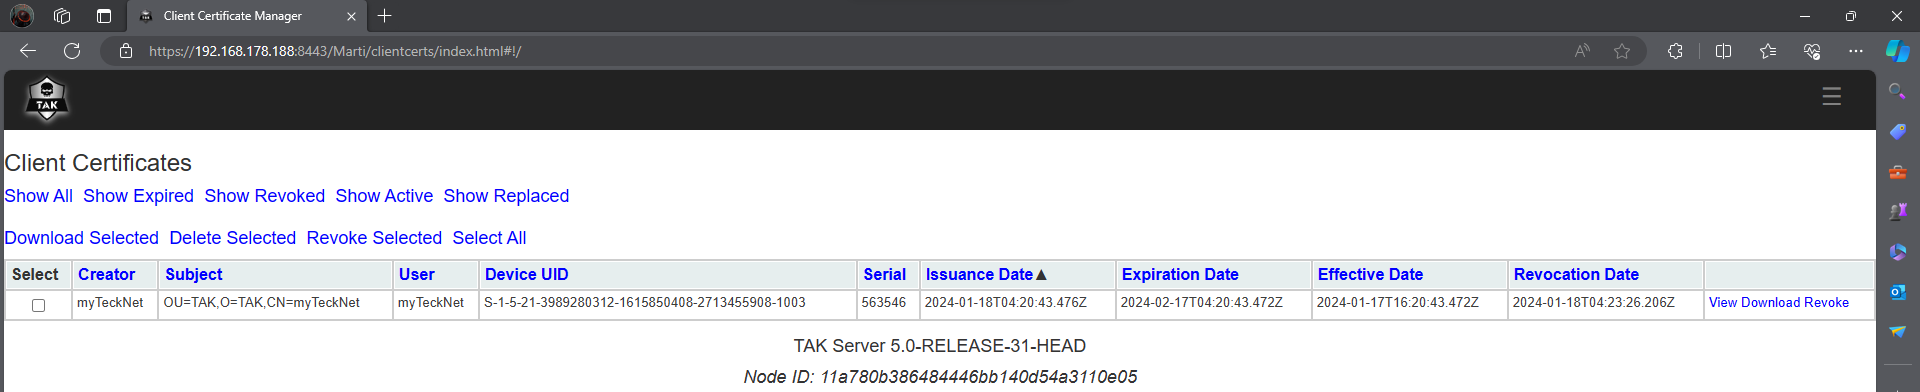
Once the certificate is revoked the client will begin to cycle on connect and disconnect. When we inspect the takserver-messaging.log we have the following notifying us that a revoked certificate attempted to connect and is denied.
- 2024-01-17-20:26:27.758 [epollEventLoopGroup-4-1] ERROR c.b.m.nio.codec.impls.X509AuthCodec - X509 auth exception info: CN: myTeckNet. Message: Attempt to use revoked certificate : OU=TAK,O=TAK,CN=myTeckNet
com.bbn.marti.remote.exception.RevokedException: Attempt to use revoked certificate : OU=TAK,O=TAK,CN=myTeckNet
at com.bbn.marti.groups.X509Authenticator.auth(X509Authenticator.java:134)
... - 2024-01-17-20:26:27.760 [epollEventLoopGroup-4-1] ERROR c.b.m.nio.codec.impls.X509AuthCodec - TakException in doTlsAuth Attempt to use revoked certificate : OU=TAK,O=TAK,CN=myTeckNet
com.bbn.marti.remote.exception.RevokedException: Attempt to use revoked certificate : OU=TAK,O=TAK,CN=myTeckNet
at com.bbn.marti.groups.X509Authenticator.auth(X509Authenticator.java:134)
...
Additionally, you will see that the TAK Server attempts to add the client subscription, and then immediately removes it, incrementing the id=tls every time.
- 2024-01-17-20:45:07.106 [epollEventLoopGroup-4-2] INFO c.b.m.s.DistributedSubscriptionManager - Added Subscription: id=tls:19 source=192.168.178.177
- 2024-01-17-20:45:07.108 [takserver-scheduled-1] INFO c.b.m.s.DistributedSubscriptionManager - Removed Subscription: tls:19
Certificate Revocation List
Our CRL contains a list of revoked certificates expected by our CA. To view the contents of this CRL we can use the openssl to view its contents. To view the CRL execute the following command: openssl crl -in <pathtoCRL> -inform PEM -text -noout.
makeCert.sh client command.# View the contents of the CRL file
openssl crl -in /opt/tak/certs/files/ca.crl -inform PEM -text -noout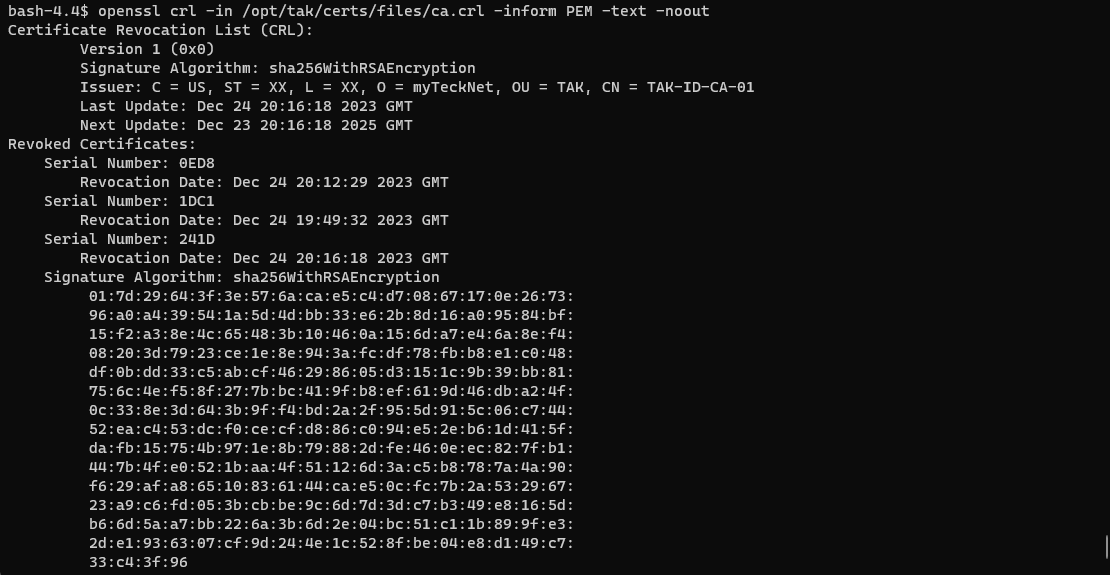
Cross-reference the serial of our revoked certificate with the list of revoked certificates. If you have a large list of revoked certificates use grep to search for your revoked certificate serial number.
# View the contents of the CRL file
openssl -crl -in /opt/tak/certs/files/ca.crl -inform PEM -text -noout

# Search list for a revoked certificate
openssl -crl -in /opt/tak/certs/files/ca.crl -inform PEM -text -noout | grep <revokedSN>

# EXAMPLE
# openssl -crl -in /opt/tak/certs/files/ca.crl -inform PEM -text -noout | grep 241D
After we have revoked our certificate and verified the revoked certificate we need to publish this revoked certificate to our TAK Server. To do this we need to add a line to our configuration before the end of the security element in the CoreConfig.xml to point to the CRL file.
# Switch user to the tak user
sudo su tak
# Change directories to the tak directory
cd /opt/tak
# Edit the CoreConfig.xml
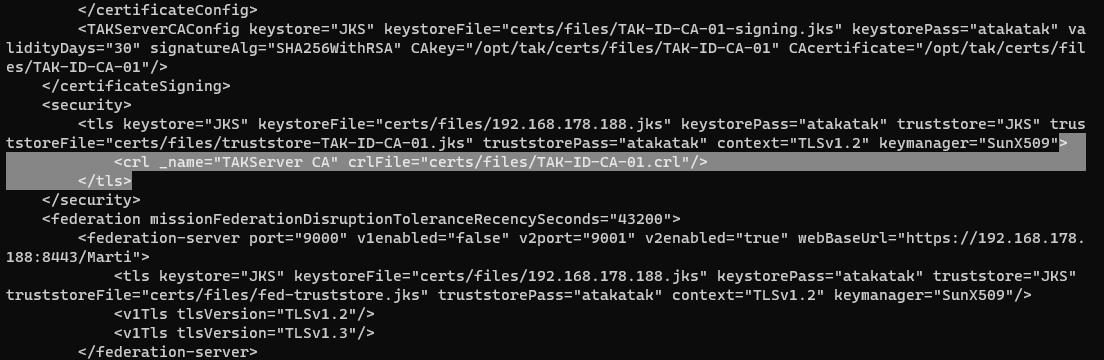
vi CoreConfig.xmlWithin the CoreConfig.xml we need to look for this element and modify it.
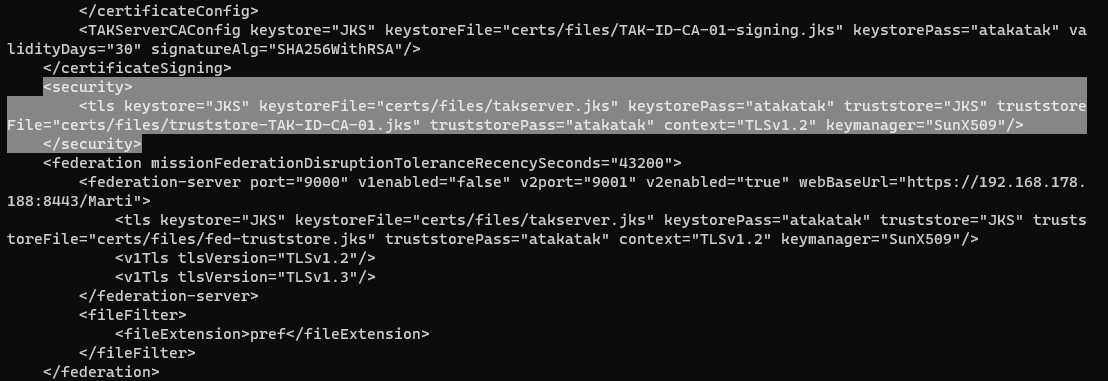
At the end of the tls element we need to remove the / after the keymanager="SunX509 attribute to break the tls element. In a new line add <crl _name="TAKServer CA" crlFile="certs/files/ca.crl"/></tls>. Replace ca.crl with the name of our issuing CAcommonName. Hint this is the same CAcommonName used in the makeCert.sh ca <CAcommonName> command.
# CRL element
<crl _name="TAKServer CA" crlFile="certs/files/ca.crl"/>

# EXAMPLE
# <crl _name="TAKServer CA" crlFile="certs/files/TAK-ID-CA-01.crl"/>
Standard CRL element syntax
Review and save the changes to write to the CoreConfig.xml file. Run the validateConfig.sh to ensure our CoreConfig.xml checks out. If everything validates, exit out of tak restart the takserver.service and monitor the logs for any errors.
Now that we have a general understanding of how to manage our client certificates.
Updating the TAK Server
To update the TAK Server when a new release is published start by transferring the update to the TAK Server and then executing the installation command:
Rocky Linux/RHEL 8
# Update TAK Server 5.0R29 to R*
sudo dnf install takserver-5.0-RELEASE*.noarch.rpm --setopt=clean_requirements_on_remove=false -y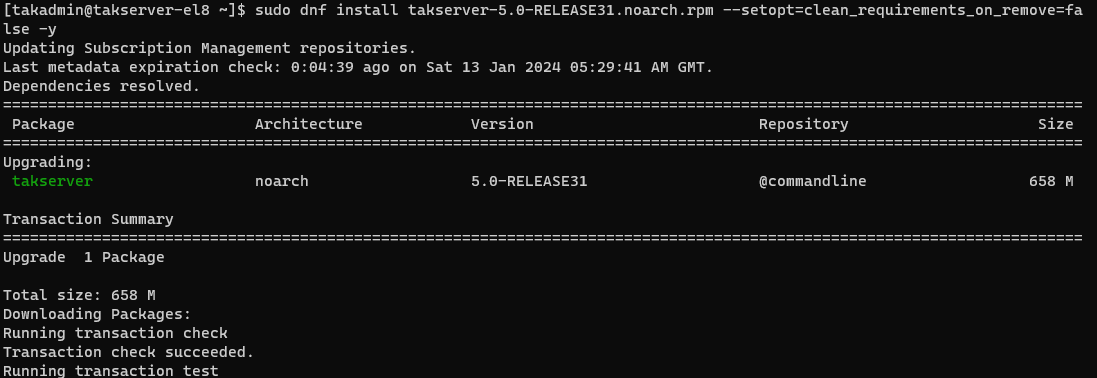
Ubuntu/Raspberry Pi OS
# Update the TAK Server on Ubuntu/Raspberry Pi OS
sudo apt install ./takserver-5.0-RELEASEx_all.deb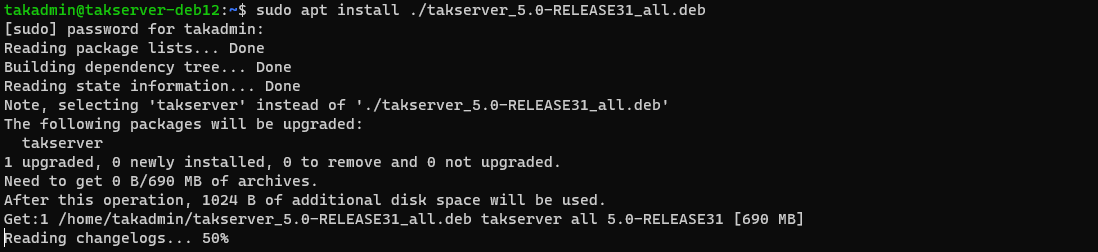
After the update is completed we need to reload the service manager followed by restarting the takserver.service.
# Reload the system manager
sudo systemctl daemon-reload

# Restart the TAK Server
sudo systemctl restart takserver

# Stream the log to find errors
sudo tail -f /opt/tak/logs/takserver-messaging.log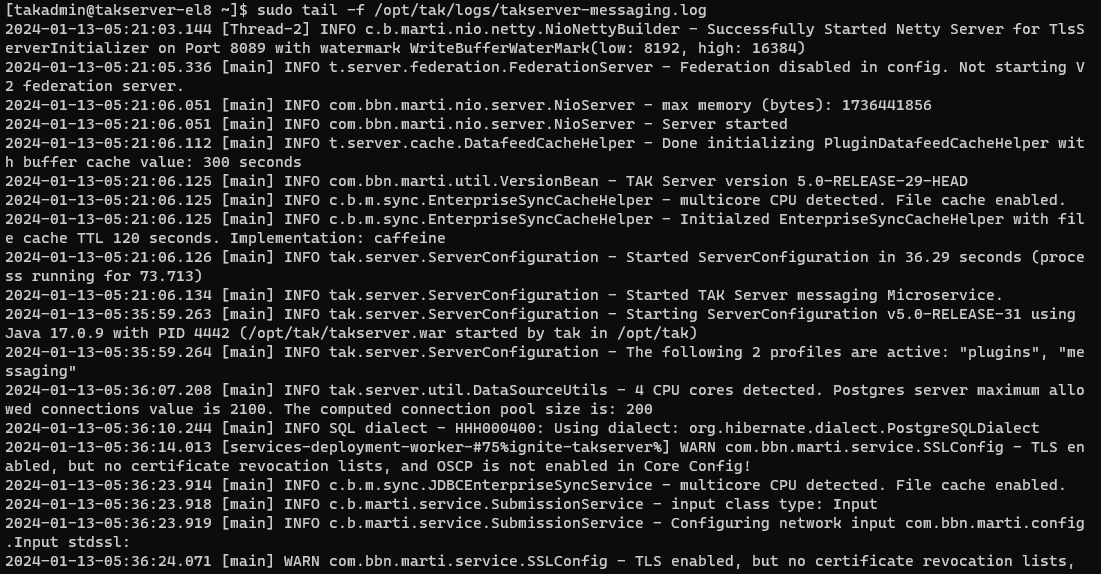
This completes the update of the TAK Server.
Connecting TAK Clients
A standard client connection requires the TAK Server public CA certificate and an issued client certificate for secure connections using the SSL protocol under TCP port 8089. The additional port 8443 is the secure API port for client-to-server communication for configuration updates. When using certificate autoenrollment the client certificate request is sent to TCP port 8446 and 8443 before establishing the connection over 8089.
Windows TAK (WinTAK)
Launch the WinTAK application and progress through the first run procedures.
- Once completed select the hamburger menu (≡) from the top left and select
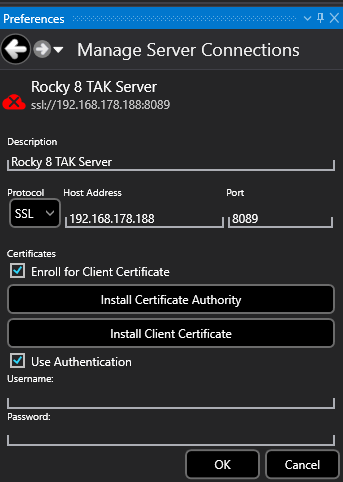
Settings>Network Preferences>Manage Server Connections - Click
Add Itemto add a new server connection. Alternatively, we can click the red cloud (☁️) at the bottom right, our TAK Network Status icon - Add a description under
Description, such as department or unit - Keep
SSLunderProtocoland enter the TAK Server information underHost Address. TheHost Addresscan accept an IP Address or a fully qualified domain name or hostname- Keep the Port information of 8089, this is our default client-to-server connection port
- Under
Certificates, click onInstall Certificate Authorityto install the TAK Server public certificate truststore- For example, this is the truststore-TAK-ID-CA-01.p12 we downloaded earlier
- Click on
Install Client Certificateand select our client certificate to install- For example, this is the wintak.p12 we downloaded earlier
Once we have entered all the required information we can click Ok and we should see that we are connected to our TAK Server.
WinTAK - Soft Certificate Connection
Android TAK (ATAK)
Launch ATAK, if this is the first time running the application proceed through the initial configuration prompts.
- Once completed select the hamburger menu (≡) from the top left and select
Settings>Network Preferences>Network Connection Preferences>Manage Server Connections - Click (⋮) and select
Addto create a new TAK Server connection - Add a description under
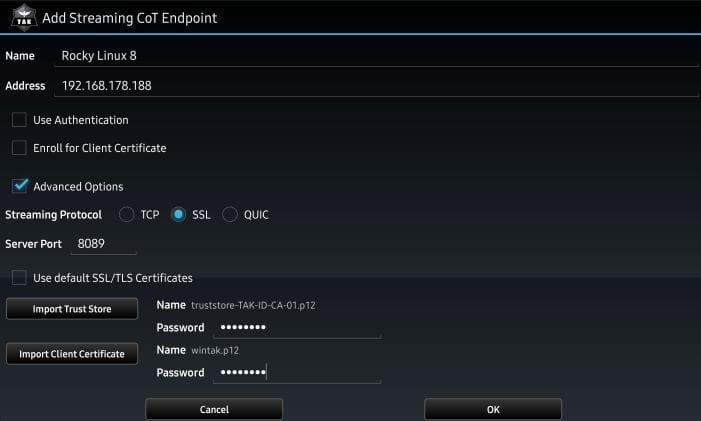
Name, such as department or unit - Enter the TAK Server information under
Host Address. TheHost Addresscan accept an IP Address or a fully qualified domain name or hostname - Click the checkbox for
Advanced Options - Keep
SSLunderStreaming Protocol- Keep the Port information of 8089, this is our default client-to-server connection port
- Uncheck the
Use default TLS/SSL Certificates - Click on
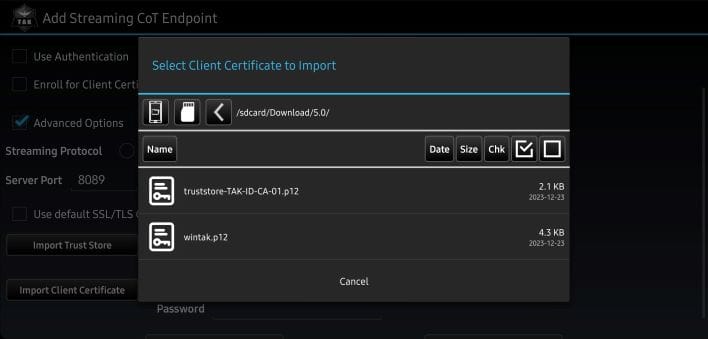
Import Trust Storeto install the TAK Server public certificate truststore- For example, this is the truststore-TAK-ID-CA-01.p12 we downloaded earlier
- Click on
Import Client Certificateand select our client certificate to install- For example, this is the wintak.p12 we downloaded earlier
Once we have entered all the required information we can click Ok and we should see that we are connected to our TAK Server.
ATAK - Soft Certificate Connection

ATAK via the Google Play Store
iOS TAK (iTAK)
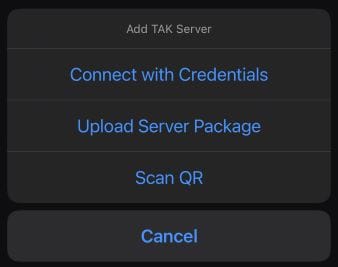
Onboarding iTAK to a TAK Server works in one of three methods:
- Connect with Credentials
- This is similar to ATAK Quick Connect which requires the TAK Server to use a publicly signed certificate that the iPhone trusts. A third-party private certificate can work as long as it's stored within the iPhone's certificate store.
- Upload Server Package
- This is the most common in environments that do not have a public-facing TAK Server. It requires the iTAK device access to a TAK Server Data Package specifically for iTAK. iTAK Data Package creation and format can be found here.
- Scan QR Code
- This is similar to Connect with Credentials and requires the QR Code to have the TAK Server address embedded within the QR Code
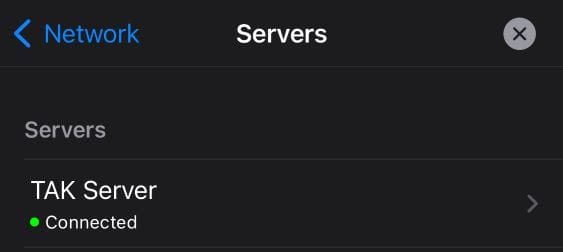
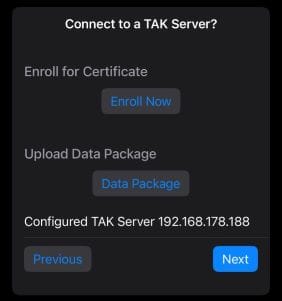
In this guide we will use a iTAK Data Package created using the guide found here. With iTAK open, select Settings (⚙️) > Network > Servers. At the bottom of the Servers dialog, there is a plus-sign (➕) to Add TAK Server.
JR
Select Upload Server Package, and browse the iTAK device folders for the TAK Server Data Package. Once you select the target TAK Server Data Package the server connection will be automatically imported. If configured correctly; both TAK Server and the path to the TAK Server, the client will say Connected.
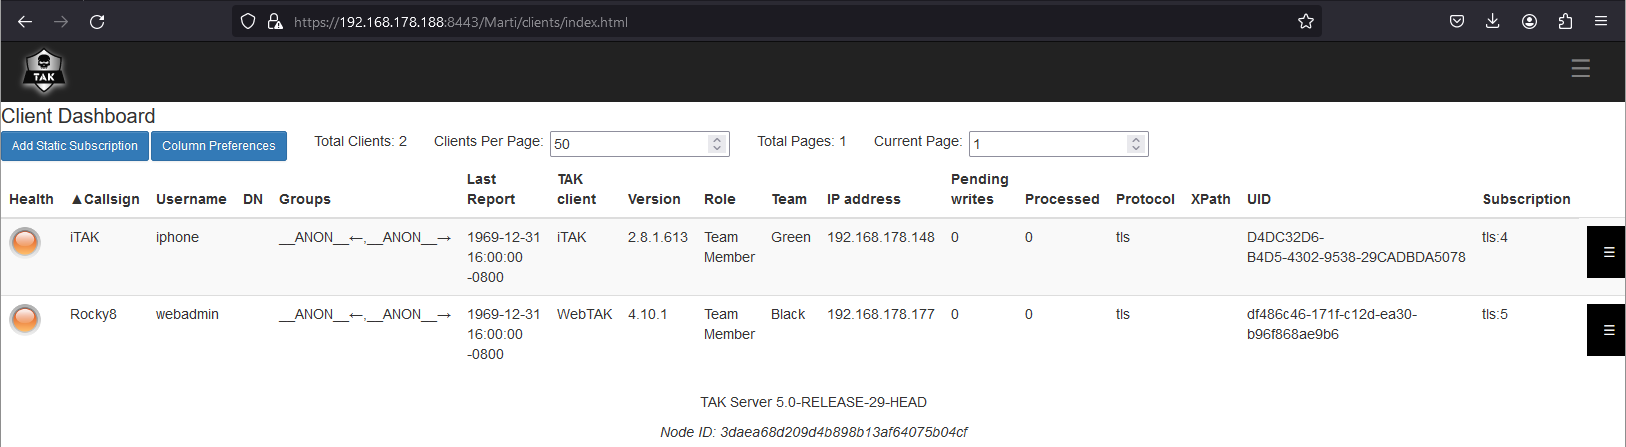
From Marti administrative dashboard, click on the hamburger menu (≡), select Monitoring > Client Dashboard, and verify the connected client. Under the TAK Client column, we can see that iTAK is connected with associated information.

iTAK via the Apple Store
TAK Tracker
TAK Tracker is a lightweight TAK client that provides one-way situational awareness reporting to the TAK Server with bidirectional chat. This is a good solution for situations that only require reporting and not SA.
ATAK-Tracker
Launch ATAK-Tracker, if this is the first time running the application proceed through the initial configuration prompts.
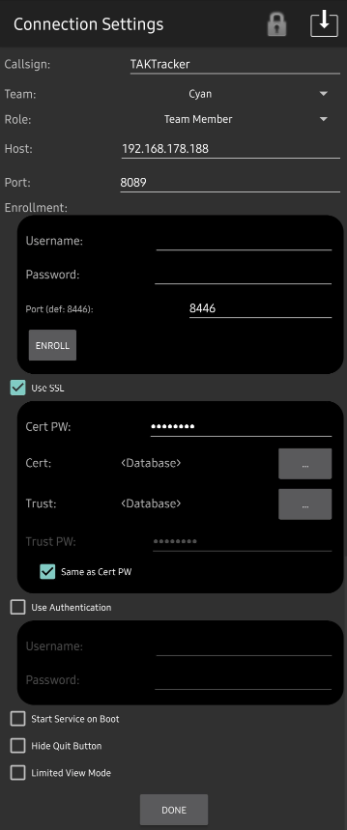
- Enter a
Callsign, select theTeamandRole - Enter the TAK Server information under
Host. TheHostcan accept an IP Address or a fully qualified domain name or hostname - Enter 8089 under
Port - Check the box
Use SSL - Enter the certificate password in the
Cert PWprompt - Click (⋯) under
Certand select our client certificate to install- For example, this is the wintak.p12 we downloaded earlier
- Click (⋯) under
trustto install the TAK Server public certificate truststore- For example, this is the truststore-TAK-ID-CA-01.p12 we downloaded earlier
Once we have entered all the required information we can click Done and we should see that we are connected to our TAK Server.

TAK Tracker via the Google Play Store
iTAK-Tracker
In this guide we will use a iTAK Data Package created using the guide found here. Launch iTAK-Tracker, if this is the first time running the application proceed through the initial configuration prompts.
- Select
Data Packageand navigate to the data package to upload. - When the data package is selected the contents will automatically configure and establish the connection to the TAK Server.
- Click
Nextto finish the setup process.
JR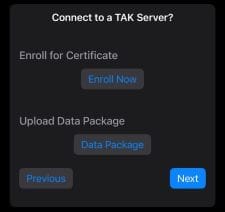
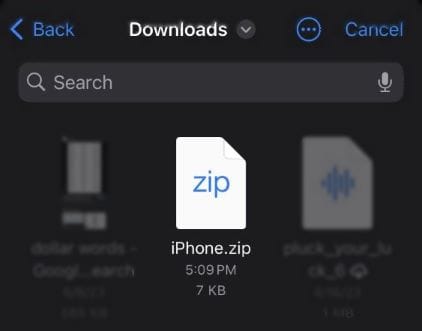
If the contents of the .zip are accurate iTAK-Tracker will display the configured TAK Server information.
From Marti administrative dashboard, click on the hamburger menu (≡), select Monitoring > Client Dashboard, and verify the connected client. Under the TAK Client column, we can see that iTAK-Tracker is connected with associated information.

TAK Tracker via the Apple Store
