Let's build a TAK Server - RPM Edition


Change Log
03Mar2023 - Added the Renewing a Root CA and CA procedures if expired
12Sept2023 - Added the callout for CRL information w/in the CoreConfig.xml
23Sept2023 - Added the Java 17 preinstallation TAK for 4.10
30Sept2023 - Added Disabling FIPS for JAVA
An updated article can be found here.
The purpose of this guide is to build and familiarize ourselves with the TAK Server using the RPM installer and connect some clients. For this, we will only be covering using the RPM installer provided by the TAK Product Center at TAK.gov. The overall difficulty of this should be fairly simple if you're familiar with the Linux environment but may be challenging for those without experience. Take your time and read through the steps first before you execute to better understand the process if you are new to Linux in general. The Linux command line can be challenging if you're not cognizant of what directory you're in. This can lead to some command-line confusion if you're not careful.
Don't worry we will get there together!
In general, the TAK clients do not require a server if your clients are all within the same subnet. Think of your home network behind your router from your Internet service provider. All of the clients within that network can see and share information on the network. To communicate outside of that network, they go through the router to connect them to external networks. It's a bit more detailed than that obviously but it paints a picture. The TAK server acts as a router between networks to connect clients of different networks.
Let's get started!
Prerequisites
To build a TAK server we need an RPM-based Linux operating system. We will avoid subscription-based distributions like Red Hat Enterprise or SUSE Linux Enterprise just because you may not have that type of service. I personally prefer Fedora since it's closely aligned with RHEL and that's primarily what I'm accustomed to. Rocky Linux is close behind in this guide since CentOS went to CentOS Stream, TAK has transitioned from using CentOS within its environment if you're looking for another alternative solution. I will cover both Fedora and Rocky Linux since you will require the Extra Packages for Enterprise Linux (EPEL) when using Rocky Linux.
System Requirements
The TAK server requires very limited system requirements and is small and compact enough to fit on an 8GB Raspberry Pi 4 on a 32GB SD.
- Min. 8GB RAM
- Min. 20GB Storage
Supported Operating Systems
Pre-Installation Tasks
Preparing the Environment
In this section, we will cover the following tasks:
- Increasing the number of file handles
- Installing EPEL for Rocky and Red Hat Enterprise Linux 8
- Installing PostgreSQL and PostGIS
Increasing the number of file handles
After you have installed your operating system and performed any OS updates, we will need to increase the number of file handles within the Linux OS; by default, the value is 1024.
To edit the default handles use vi to edit the limits.conf file located in /etc/security directory:
sudo vi /etc/security/limits.confUse vi editor to modify /etc/security/limits.conf
When prompted, enter the root or administrator password created during the operating system install. Once opened, append to the end of the file the following strings by pressing i to switch to insert mode once you reach the end of the file:
* soft nofile 32768
* hard nofile 32768
Once entered save the file by pressing ESC, pressing SHIFT+; which will present the colon (:) and typing wq to write and quit the vi editor.
Installing EPEL
We need to install EPEL to provide Linux with the extra packages required to meet some of the dependencies required for the installation. If you're using Rocky or RHEL you will need to copy the below set of commands to import the public key and then install the rpm binary. Otherwise, skip this step.
# Install the RPM Public Certificate
sudo rpm --import https://dl.fedoraproject.org/pub/epel/RPM-GPG-KEY-EPEL

# Install the EPEL RPM
sudo yum install https://dl.fedoraproject.org/pub/epel/epel-release-latest-8.noarch.rpm
Installing Extra Packages for Enterprise Linux for Rocky and RHEL 8
Installing PostgreSQL and PostGIS
Next, we need to install the database engine to store our data. For this step depending on your distribution, you will need to perform different steps outlined below.
# Install the RPM Public Certificate
sudo rpm --import https://download.postgresql.org/pub/repos/yum/RPM-GPG-KEY-PGDG

# Install the PostgreSQL repository RPM
sudo yum install https://download.postgresql.org/pub/repos/yum/reporpms/EL-8-x86_64/pgdg-redhat-repo-latest.noarch.rpm

# Disable the build in system PostgreSQL
sudo dnf -qy module disable postgresql

# Enable PostGIS
sudo dnf config-manager --set-enabled powertools
Installing PostgreSQL and PostGIS on Rocky and RHEL 8
If your using Fedora Server your commands will be:
# Install the RPM Public Certificate
sudo rpm --import https://download.postgresql.org/pub/repos/yum/RPM-GPG-KEY-PGDG

# Install the PostgreSQL repository RPM
# Fedora Server 36
sudo yum install https://download.postgresql.org/pub/repos/yum/reporpms/F-36-x86_64/pgdg-fedora-repo-latest.noarch.rpm

# Fedora Server 37
sudo yum install https://download.postgresql.org/pub/repos/yum/reporpms/F-37-x86_64/pgdg-fedora-repo-latest.noarch.rpm

# Fedora Server 38
sudo yum install https://download.postgresql.org/pub/repos/yum/reporpms/F-38-x86_64/pgdg-fedora-repo-latest.noarch.rpm
Installing PostgreSQL and PostGIS for Fedora Server 36+
Installing Java 17 OpenJDK
With newer installations of TAK Server (4.10) noticeably, Java 17 is required pre-installation as some script changes were made to the TAK Server installation rpm.
sudo yum install java-11-openjdk -yPerform a system update and upgrade
Finally, before we install the TAK Server we should perform a system update and upgrade.
sudo yum update -y && sudo yum upgrade -yDisabling FIPS within Java
How to Disable FIPS within Java
By default, Java will inherit the FIPS system settings and properties. To break this setting, we need to edit the java.security file located in the following directory, replace <java-openJDK> with the appropriate version:
/usr/lib/jvm/<java-openJDK>/conf/security
To break this setting change the security.useSystemPropertiesFile=true to security.useSystemPropertiesFile=false prior to installing the TAK Server.
Installing the TAK Server
Once you have completed all the pre-installation tasks it's time to install the TAK Server from the RPM binary. Just like before we need to import the public key to trust the installer and then perform the installation. At the time of this documentation, the current version is TAK Server 4.8 Release 31.
Copying over the RPM installer
For this task, we will use secure copy which is built-in into most modern operating systems. To do so we will open a command prompt or terminal and type the following commands to copy them from our host system to our destination TAK Server. Navigate to the directory in which the RPM files are located. In our example, our files will be located in our Downloads directory.
For Windows Users
cd %userprofile%\Downloads
scp takserver-* <user>@<ipaddress>:~/
For Linux // your distribution may vary
cd ~/Downloads
scp takserver-* <user>@<ipaddress>:~/
macOS
cd ~/Downloads
scp takserver-* <user>@<ipaddress>:~/

Next, go back to your TAK Server and issue the following commands to import the public certificate for the RPM and then install the TAK Server using the RPM installer.
# Install the TAK Server RPM Public Certificate
sudo rpm --import takserver-public-gpg.key

# Install the TAK Server
sudo yum install takserver-4.8-RELEASE31.noarch.rpm
Installing the TAK Server
When prompted to download additional files press Y to accept and continue the installation.
Post-Installation Tasks
Modifying group membership
To make executing commands a bit easier let's add ourselves to the tak user group to make things a bit easier to perform tasks. Replace <username> with the user you wish to add to the group.
sudo usermod -aG tak <username>

# Example
#sudo usermod -aG tak takadminSELinux
SELinux stands for Security-Enhanced Linux and is a security feature developed initially by the National Security Agency (NSA) that provides a technical control for supporting access security and mandatory access controls. In some installations of Linux SELinux is enabled to Enforce security configurations. To determine if SELinux is enforcing we will use the getenforce command to get the SELinux status.
getenforceWhat to do if SELinux is Enforcing? If SELinux is enforced we need to apply the SELinux profile for the TAK Server. If you're using Rocky Linux you will need to install an extra package before you apply the SELinux profile.
sudo yum install checkpolicyRocky Linux prerequisite installer configuring SELinux
Before we apply the policy we need to edit the shell script to remove the word sudo in line 12 sudo semodule -i takserver-policy.pp.
sudo vi /opt/tak/apply-selinux.shEdit the apply-selinux.sh
Your end shell script should look like this:
#!/bin/bash
# Script to apply SELinux policy if SELinux is enforcing

is_enforcing=`getenforce`

if [ "$is_enforcing" == "Enforcing" ]
then
    echo "SELinux Enabled. Applying policy."
    checkmodule -M -m -o takserver-policy.mod takserver-policy.te
    semodule_package -o takserver-policy.pp -m takserver-policy.mod
    echo "Enforcing policy"
    semodule -i takserver-policy.pp
    rm -f takserver-policy.pp  takserver-policy.mod
else
    echo "SELinux is not enforced. Ignoring policy."
fi

exit
Modified apply-selinux.sh
Next, we need to navigate to the script directory and execute it. To do so change the directory to /opt/tak and then execute the script as a super user.
# Change our current working directory
cd /opt/tak

# Apply the SELinux profiles
sudo ./apply-selinux.sh
Executing the apply-selinux.sh script
Preparing the Database
Before we can start the TAK Server we need to prepare the database to contain data. To do so we will execute the below command:
sudo /opt/tak/db-utils/takserver-setup-db.shStarting the Service
If everything has successfully been installed and executed with no errors. It's time to start and enable the TAK Server to start on reboot.
sudo systemctl daemon-reload
sudo systemctl enable takserver
sudo systemctl start takserver
Configuring the TAK Server
Prerequisites to Client Connections
In this section, we will be covering a lot of topics from establishing and creating a one-tired public key infrastructure (PKI) environment. This will allow us to create a self-signed server and client certificate to ensure secure communications. As long as our server access is limited and secured. We will cover modifying the core configuration by removing insecure configurations and modifying our host firewall rules. Finally, we are going to create an administrative certificate and access the web dashboard. A more detailed guide will be published at a later date on that!
Establishing Secure Certificates
Before we can administer or add any clients to our TAK Server we must create the public key infrastructure (PKI). For this, we will create a root and issue certificate authority in our TAK Server. To create the certificate information we need to edit the cert-metadata file located in the /opt/tak/certs directory.
sudo vi /opt/tak/certs/cert-metadata.shEdit the following lines, replacing the items in bold with information specific to your deployment:
COUNTRY=US
STATE=${STATE}
CITY=${CITY}
ORGANIZATION=${ORGANIZATION:-TAK}
ORGANIZATIONAL_UNIT=${ORGANIZATIONAL_UNIT}
By default the certificate password is atakatak, change this as required for your deployment making note of this password for future use.
CAPASS=${CAPASS:-atakatak}
An example cert-metadata file will look like this:
COUNTRY=US
STATE="New York"
CITY="Rochester"
ORGANIZATION="myTeckNet-TAK"
ORGANIZATIONAL_UNIT="Users"

CAPASS=${CAPASS:-atakatakPassword1234!@#$}
Example cert-metadata.sh file
Once that step is completed we will then create and start issuing our certificates. To first create our TAK Server we need to change our current working directory to execute the certificate script. Then create our root and issuing CA. This step requires you to change your sessions for the tak user.
# Change our current working directory
cd /opt/tak/certs

# Change to the TAK user
sudo su tak

# As the tak user your prompt will look like this: bash-4.4$
# Type pwd to verify your still in the /opt/tak/certs directory

# Create our root certificate authority
./makeRootCa.sh --ca-name <commonname>

# EXAMPLE
#./makeRootCa.sh --ca-name TAK-ROOT-CA-01

# Create the issuing certificate authority
./makeCert.sh ca <commonname>

# Do you want me to move files around so that future server and client certificates are signed by this new CA? [y/n]
# Type Y to accept this

# Example
#./makeCert.sh ca TAK-CA-01
Creating the TAK Root Certificate Authority
Renewing a Root CA and CA procedures if expired
The steps below only apply if the TAK Server is acting as the CA.
How to Renew your Root CA or CA
In the event that your CA is expiring, you have the option to generate a new CA which will generate a new signature, or renew the CA using the previous signature.
If you generate a new CA all previous clients signed by this CA will be invalid. This is because the signature of the signed client certificates no longer matches the signature of the signing and issuing authority. To maintain the same signature we will reuse our private key generated from the original request. We need to generate a new CSR using the original certificate and private key generated the first time to do this. The steps covered in this section will reference TAK-CA-01 as the issuing CA and TAK-ROOT-CA-01 as our Root CA. Replace these with your respective CA's within your environment.
NOTE: The steps covered below were executed in a lab environment, before executing the below in your production recommend testing this in your own lab to work out the process seamlessly.
Renewing the CA
openssl x509 -sha256 -req -days 730 -in TAK-CA-01.csr -CA root-ca.pem -CAkey root-ca-do-not-share.key -out new-TAK-CA-01.pem -set_serial ${RANDOM} -extensions v3_ca -extfile ../config.cfg
openssl x509 -in new-TAK-CA-01.pem -addtrust clientAuth -addtrust serverAuth -setalias TAK-CA-01 -out new-TAK-CA-01-trusted.pem
Importing the new CA into the existing CoreConfig trust store JKS
keytool -import -alias new-TAK-CA-01 -file new-TAK-CA-01-trusted.pem -keystore truststore-TAK-CA-01.jks
Bundling the Root CA with the new CA Certificate
cat root-ca.pem >> new-TAK-CA-01.pem
cat root-ca-trusted.pem >> new-TAK-CA-01-trusted.pem
Verify the CA against and issued Certificate
openssl verify -CAfile new-TAK-CA-01.pem -verbose takserver.pem
Converting the X509 to PKCS12 and JKS
openssl pkcs12 -export -in new-TAK-CA-01-trusted.pem -out truststore-new-TAK-CA-01.p12 -nokeys
keytool -import -trustcacerts -file new-TAK-CA-01.pem -keystore truststore-new-TAK-CA-01.jks -noprompt
Creating the new CA signing keystore
openssl pkcs12 -export -in new-TAK-CA-01.pem -inkey TAK-CA-01.key -out new-TAK-CA-01-signing.p12 -name new-TAK-CA-01
keytool -importkeystore -destkeystore new-TAK-CA-01-signing.jks -srckeystore new-TAK-CA-01-signing.p12 -srcstoretype PKCS12 -alias new-TAK-CA-01
Renewing the Root CA
openssl x509 -x509toreq -sha256 -in root-ca.pem -signkey root-ca-do-not-share.key -out new-root-ca.csr
openssl x509 -sha256 -req -days 3652 -extensions v3_ca -extfile ../config.cfg -in new-root-ca.csr -signkey root-ca-do-not-share.key -out new-root-ca.pem
openssl x509 -in new-root-ca.pem -addtrust clientAuth -addtrust serverAuth -setalias TAK-ROOT-CA-01 -out new-root-ca-trusted.pem
Converting the X509 to PKCS12 and JKS
openssl pkcs12 -export -in new-root-ca-trusted.pem -out truststore-new-root.p12 -nokeys -caname TAK-ROOT-CA-01
keytool -import -trustcacerts -file new-root-ca.pem -keystore truststore-new-root.jks -alias TAK-ROOT-CA-01 -noprompt
Verify the Root CA against the CA certificate
openssl verify -CAfile new-root-ca.pem -verbose TAK-CA-01.pem
Next, we need to create our TAK Server certificate signed by our newly created issuing CA. This time we will use the makeCert.sh script to do this task. The general syntax of this command looks like this:
./makeCert.sh server <commonname>
For this step use takserver as the common name.
# Create the TAK Server certificate
./makeCert.sh server takserver
Creating the TAK Server signed certificate
Modifying the Core Configuration
Currently, our TAK Server is configured in an unsecured state. We need to remove the plain text or unsecured ports from our configuration to ensure that clients connect to our service in a secure manner. Additionally, we will need to allow these connections through our host firewall.
While still logged in as the tak user change the directory to the /opt/tak directory. If you accidentally exited from the tak user type sudo su tak to enter the session again.
# Change back to the tak user if not already
sudo su tak

# Move to the /opt/tak directory
cd /opt/tak
Changing directories
The CoreConfig will be covered in detail later, however for this step, we are going to remove the following lines from the base configuration file. For this, we will edit the CoreConfig.example.xml file.
# Edit the CoreConfig.example.xml
vi /opt/tak/CoreConfig.example.xml
vi to edit the CoreConfig.example.xml
Remove the following lines from the CoreConfig.example.xml:
<input _name="stdtcp" protocol="tcp" port="8087" auth="anonymous"/>
<input _name="stdupd" protocol="udp" port="8087" auth="anonymous"/>
<input _name="streamtcp" protocol="stcp" port="8088" auth="anonymous"/>
Additionally, we will uncomment the following line by removing the starting <!-- and the ending -->
<input _name="stdssl" protocol="tcp" port="8089"/>
Next, remove this line to remove the legacy TAK Server federation port:
<connector port="8444" useFederationTruststore="true" _name="fed_https"/>
Finally, we need to comment out the connector port ="8446" and remove the HTTP port connector:
<!– <connector port="8446" clientAuth="false" _name="cert_https"/> -->
<connector port="8080" tls="false" _name="http_plaintext"/>
Your <network> section should look like this if you followed all of the above:
<network multicastTTL="5">
    <!-- <input _name="SAproxy" protocol="mcast" group="239.2.3.1" port="6969" proxy="true" auth="anonymous" /> -->
    <!-- <input _name="GeoChatproxy" protocol="mcast" group="224.10.10.1" port="17012" proxy="true" auth="anonymous" /> -->
    <!--<announce enable="true" uid="Marti1" group="239.2.3.1" port="6969" interval="1" ip="192.168.1.137" />-->
    <input _name="stdssl" protocol="tls" port="8089"/>
    <!--<input _name="sslauth" protocol="tls" port="8090" auth="ldap"/> -->
    <!--<input _name="stdtcpwithgroups" protocol="tcp" port="8087" auth="anonymous">-->
        <!--<filtergroup>group one</filtergroup>-->
        <!--<filtergroup>group two</filtergroup>-->
	<!--</input>-->
    <!--<input _name="stdtcpwithfilters" protocol="tcp" port="8087" auth="anonymous">-->
        <!--<filter>-->
            <!--<geospatialFilter>-->
                <!--<boundingBox minLongitude="-80" minLatitude="34" maxLongitude="-70" maxLatitude="36" />-->
                <!--<boundingBox minLongitude="-100" minLatitude="34" maxLongitude="-90" maxLatitude="36" />-->
            <!--</geospatialFilter>-->
        <!--</filter>-->
    <!--</input>-->

	<!-- web connectors -->
    <connector port="8443" _name="https"/>
    <!-- <connector port="8451" _name="https" enableAdminUI="true" enableWebtak="false" /> -->
    <!-- <connector port="8452" _name="https" enableAdminUI="false" enableWebtak="true" /> -->
    <!-- <connector port="8453" _name="https" enableAdminUI="false" enableWebtak="false" enableNonAdminUI="false"/> -->
    <!-- <connector port="8446" clientAuth="false" _name="cert_https" enableWebtak="false"/> -->
    <!-- <connector port="8446" clientAuth="false" _name="cert_https"/> -->
</network>
Example of an edited CoreConfig.example.xml file
Optionally, if you changed the default certificate password in the cert-metadata.sh file annotated by:
CAPASS=${CAPASS:-atakatak}
You will need to edit the following in the <security> and <federation> sections to ensure the services start up again. Replace atakatak with your changed password annotated in the cert-metadata.sh file.
We will additionally need to replace truststore-root.jks with truststore-TAK-CA-01.jks since we created an issuing CA during the setup. Replace TAK-CA-01 with the common name you used during the issuing CA setup.
<security>
	<tls context="TLSv1.2" keymanager="SunX509" keystore="JKS" keystoreFile="certs/files/takserver.jks" keystorePass="atakatak" truststore="JKS" truststoreFile="certs/files/truststore-TAK-CA-01.jks" truststorePass="atakatak">
    <crl _name="TAKServer CA" crlFile="certs/files/TAK-CA-01.crl"/>
	</tls>
</security>
 <federation>
	<federation-server port="9000">
    	<tls context="TLSv1.2" keymanager="SunX509" keystore="JKS" keystoreFile="certs/files/takserver.jks" keystorePass="atakatak" truststore="JKS" truststoreFile="certs/files/fed-truststore.jks" truststorePass="atakatak"/>
	</federation-server>
</federation>
Changing the default certificate password and Certificate Authority
This completes our basic editing of the CoreConfiguration. Once you have saved the CoreConfig.example.xml we need to delete these two files and restart the takserver service:
CoreConfig.xml
CoreConfig.xml.backup
# Removing CoreConfig.xml
rm CoreConfig.xml

# Removing CoreConfig.xml.backup
rm CoreConfig.xml.backup

# Restarting the TAK Server service
# When prompted enter the super user password
systemctl restart takserver
Resetting the Core Configuration
What this does is takes what changes we made in the CoreConfig.example.xml and applied it to the CoreConfig.xml. The CoreConfig.xml is the active configuration for the TAK Server and the CoreConfig.example.xml is the startup configuration file. This is very useful when you have made active changes to the TAK Server via the web administrative dashboard and you want to ensure this is carried over if you reset the CoreConfiguration. All you need to do is compare the CoreConfig.xml to the CoreConfig.example.xml files and add the modified lines from the CoreConfig.xml to the CoreConfig.example.xml.
# Change directories if not currently in the /opt/tak directory
cd /opt/tak

# Execute the validateConfig.sh
./validateConfig.sh
Using the validateConfig.sh script
Modifying the host firewall
Now that our CoreConfig is modified and we have restarted the services next, need to modify our host firewall to accept inbound connections to our server. To do that we will use the firewall-cmd and edit the default firewall profile zone, public.
# Allow 8089/TCP (client to server connection port)
sudo firewall-cmd --zone=public --add-port 8089/tcp --permanent

# Allow HTTPS
sudo firewall-cmd --zone=public --add-port 8443/tcp --permanent

# Reload the firewall rules
sudo firewall-cmd --reload

# View changes
sudo firewall-cmd --list-all
Modifying the host firewall using firewall-cmd
Accessing the Web Dashboard
Creating our admin certificate
Before we can access the web administrative dashboard we need to create an administrative certificate for ourselves. To do this we will follow similar steps used to create our takserver certificate.
# Change directory to the /opt/tak/certs directory
cd /opt/tak/certs

# Change to the TAK user
sudo su tak

# Create our webadmin certificate
./makeCert.sh client webadmin
Creating our administrative certificate
Next, we need to promote this certificate to the administrator role. To do this we will use the UserManager tool using the java command.
# Promote our webadmin to an administrator
java -jar /opt/tak/utils/UserManager.jar certmod -A /opt/tak/certs/files/webadmin.pem
Promoting our webadmin cert to an administrator
Now that we have promoted our webadmin certificate we need to copy it from our TAK Server to our destination administrator workstation. To do this we will use the secure copy command which is built into most modern Windows 10 and higher workstations, Linux, and macOS. Before we do this we must move the webadmin certificate to a location we can copy it from. To do this we will exit out of the tak user and copy the webadmin.p12 to our user's home directory (~).
# If our prompt is bash-4.4$ exit from the tak user
exit

# change to our home directory
cd ~

# copy the webadmin certificate to our home directory
sudo cp -v /opt/tak/certs/files/webadmin.p12 .

# Take special attention to the period (.) at the end of the line.
# This means copy to the current working directory

# Next, we need to change the ownership of the webadmin.p12 file
# Replace <user> with the user you created
sudo chown -v <user>:<user> webadmin.p12

# Example using takadmin as our user
#sudo chown -v takadmin:takadmin webadmin.p12
Moving our webadmin certificate
Transferring our certificate
From our administrative workstation, we will now copy the file from the TAK Server to our workstation using the secure copy command or SCP. First, open a terminal or command prompt and navigate to the directory in which you wish to transfer this file. Once you are in a place you want to transfer the file using the SCP command copy the file from the TAK Server to the current directory.
# Take special attention to the period (.) at the end of the line.
# This means copy to the current working directory

# Basic syntax
#scp <username>@<ipaddress>:~/webadmin.p12 .

# Example
#scp [email protected]:~/webadmin.p12 .
Using Secure Copy
Just like before, pay attention to the trailing period (.) at the end of the command which is used to identify the current directory. Once the webadmin certificate has been transferred to our workstation we need to add it to our workstation's trust store. Based on your OS your steps will vary. For the following instructions, we will use the Mozilla Firefox web browser to install our certificate and access the web administrative dashboard.
With your Firefox browser open navigate to about:preferences#privacy and scroll to the bottom and look for View Certificates. Select Your Certificates and click on Import to import our webadmin.p12 certificate file. When prompted type in the password used to create certificates. By default it is atakatak; however, if you changed it in the cert-metadata.sh file you will input that password.
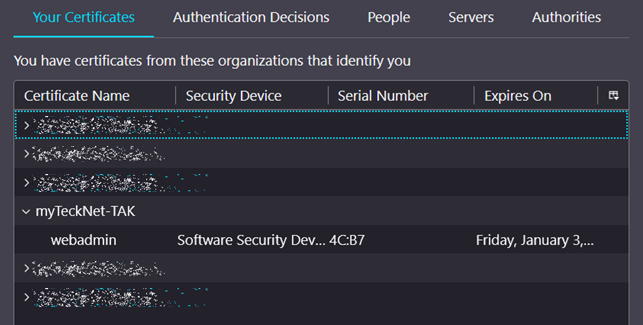
Once you have successfully imported your webadmin certificate open a new tab or browser and navigate to:
https://<takserverip>:8443/
You will be prompted to choose a certificate to authenticate with. Your only option will be the webadmin certificate we just imported. Select that and keep the Remember this decision checked and click OK to accept. Click on Advanced if the page does not reload and click on Continue to this website (unsafe) if present.
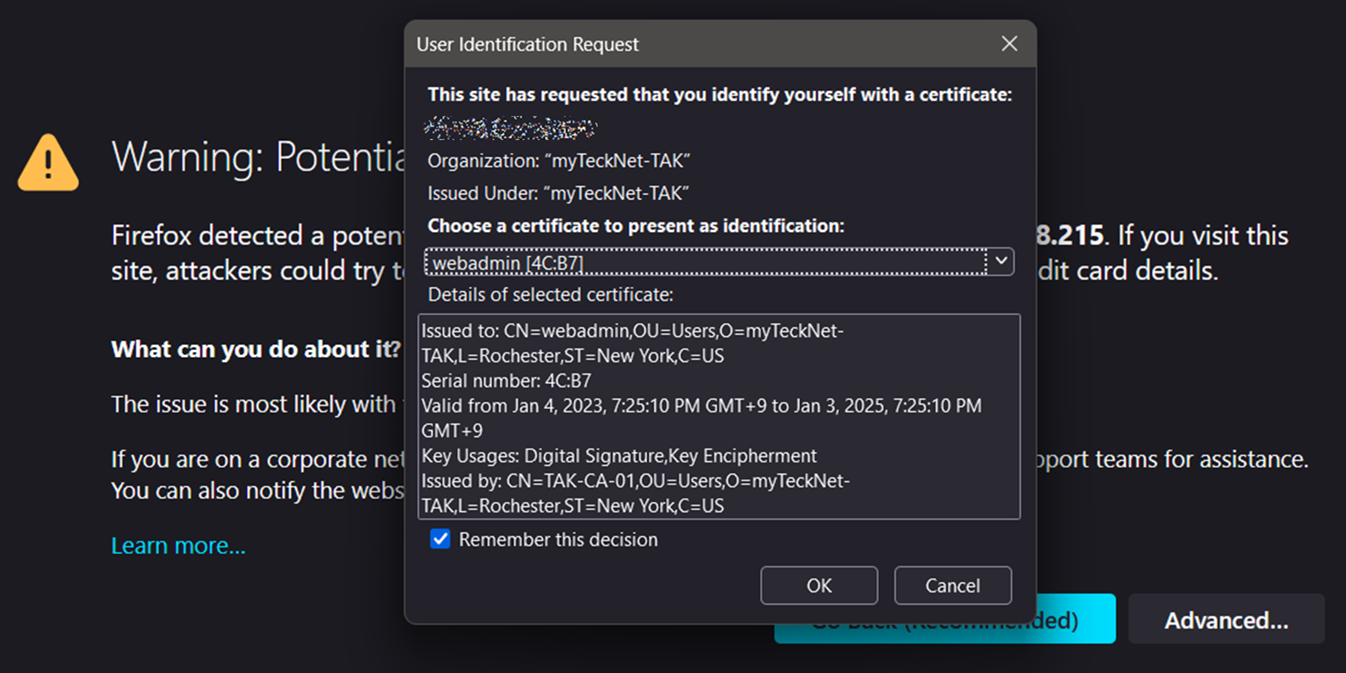
If you get the below picture you have successfully built and provisioned your TAK Server. Our next step is to create some client certificates and connect them to our TAK Server.
Connecting TAK Clients
Before we start connecting clients to our TAK Server we need to create some client certificates. This process is similar to how we created our TAK Server certificate using the ./makeCert.sh script that assisted us in this task. Once you're logged into the TAK Server we need to navigate to the /opt/tak/certs directory and then change into the tak user session.
# Navigate to the /opt/tak/certs directory
cd /opt/tak/certs

# Change users to tak
sudo su tak
Creating our client certificates
Next, use the makeCert.sh script we will create some client certificates. For this example, we will create a client common name called clientCert which we will reference when we connect our clients. The common name is what the certificate subject name will contain. For multiple clients use a unique identifier for each client for ease of management later on.
The basic syntax for this command is:
./makeCert.sh client <certificate common name>
For this step use clientCert as the common name.
# Create the client certificate
./makeCert.sh client clientCert

# Example client identifier using atak01
#./makeCert.sh client atak01

# Exit the tak user session
exit
Creating the client certificate
Once we have created this client certificate we need to move it similarly to how we created and moved our webadmin certificate.
# change to our home directory
cd ~

# copy the webadmin certificate to our home directory
sudo cp -v /opt/tak/certs/files/clientCert.p12 .

# Take special attention to the period (.) at the end of the line.
# This means copy to the current working directory

# Next, we need to change the ownership of the clientCert.p12 file
# Replace <user> with the user you created
sudo chown -v <user>:<user> clientCert.p12

# Example using takadmin as our user
#sudo chown -v takadmin:takadmin clientCert.p12
Moving and changing ownership of the clientCert.p12
Next, we need to copy over our TAK Server certificate trust store file. This will act as our Certificate Authority trust store for our clients later on.
# copy the truststore certificate to our home directory
sudo cp -v /opt/tak/certs/files/truststore-TAK-CA-01.p12 .

# Take special attention to the period (.) at the end of the line.
# This means copy to the current working directory

# Next, we need to change the ownership of the truststore-TAK-CA-01.p12 file
# Replace <user> with the user you created
sudo chown -v <user>:<user> truststore-TAK-CA-01.p12

# Example using takadmin as our user
#sudo chown -v takadmin:takadmin truststore-TAK-CA-01.p12

# Next rename truststore-TAK-CA-01.p12 to caCert.p12
mv truststore-TAK-CA-01.p12 caCert.p12
Moving and changing ownership of the truststore-TAK-CA-01.p12
Finally, we need to copy these two (2) files to our administrative workstation so that we can start connecting clients. From our administrative workstation, we will now copy the p12 files from the TAK Server to our workstation using the secure copy command or SCP as previously. First, open a terminal or command prompt and navigate to the directory in which you wish to transfer this file. Once you are in a place you want to transfer the file using the SCP command copy the file from the TAK Server to the current directory.
# Take special attention to the period (.) at the end of the line.
# This means copy to the current working directory

# Basic syntax
#scp <username>@<ipaddress>:~/*.p12 .

# Example
#scp [email protected]:~/*.p12 .
Moving files from Linux to your workstation
This finally completes our step for creating client certificates. Repeat this step if you would like to create and connect more clients. Remember to use a unique common name for each new client certificate.
Windows TAK (WinTAK)
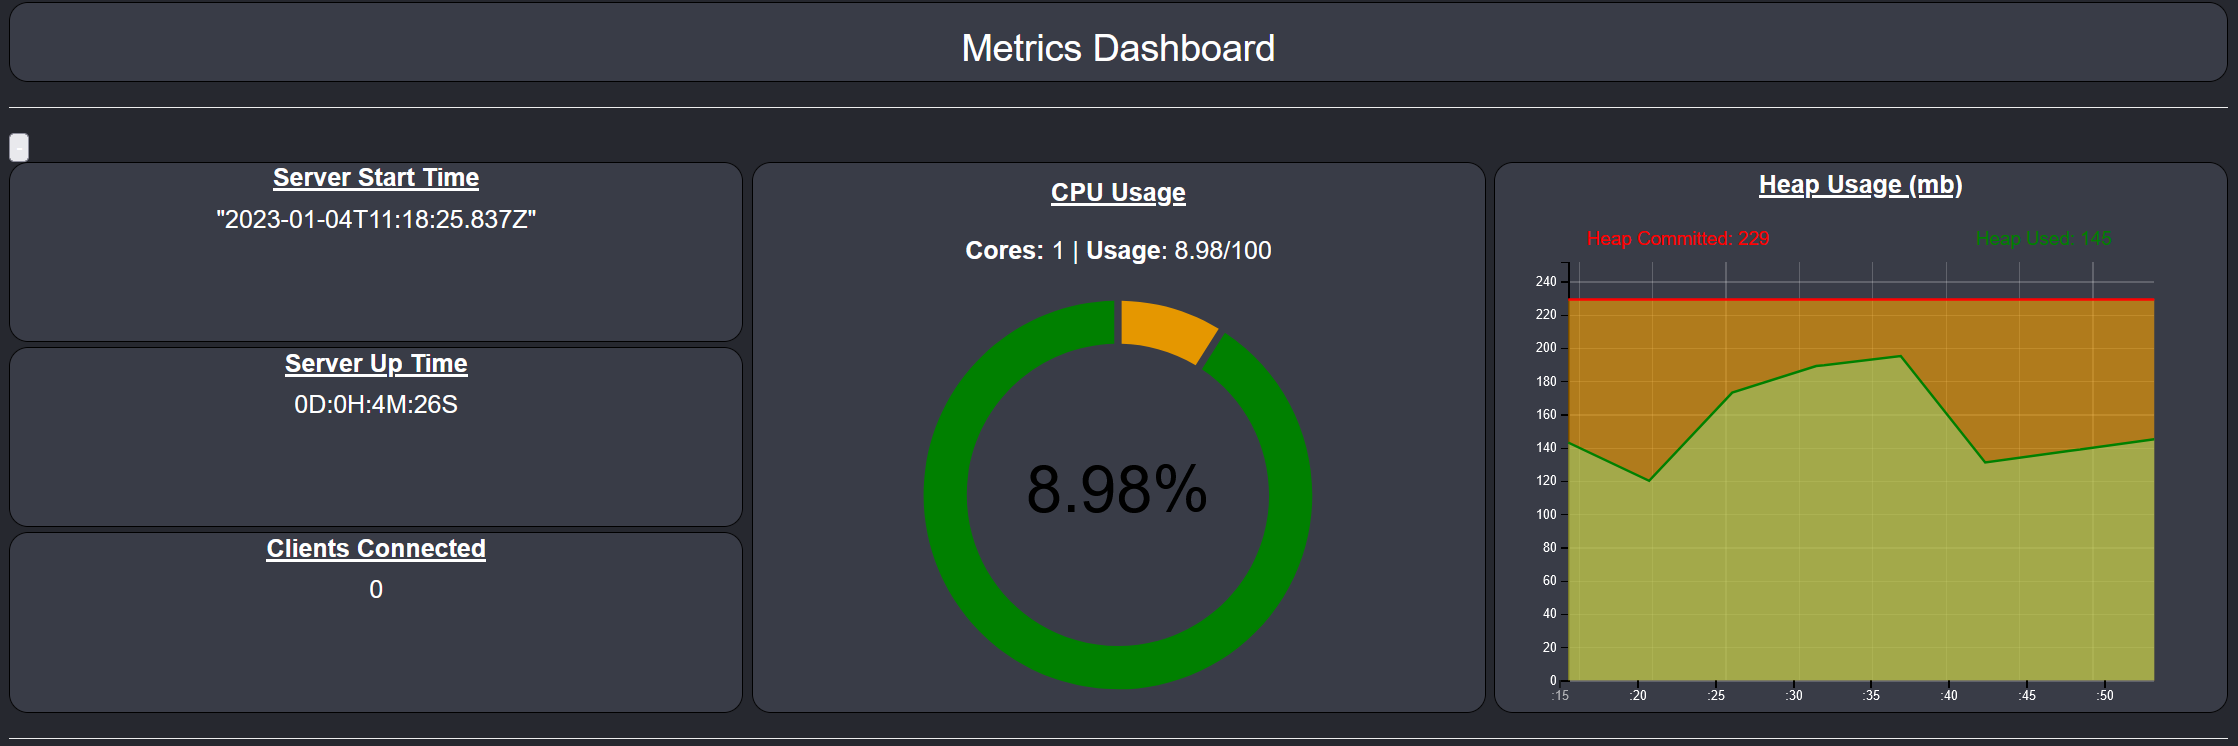
Launch the WinTAK application. If you do not have it you will need to download it from TAK.gov. Upon successful load select the hamburger menu (≡) (1) and select Settings (2) from the menu. Select Network Preferences (3) >> Manage Server Connections (4) or double-click the TAK Network Status icon at the bottom right of WinTAK.
Next, select Add Item, and fill in the TAK server information according to our installation. Leave the Port as 8089, Enroll for Client Certificate and Use Authentication checkboxes remain unchecked.
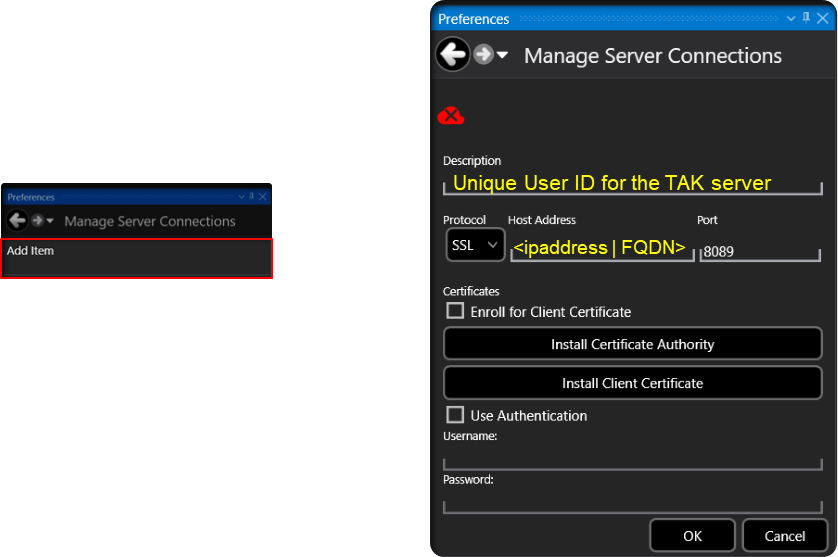
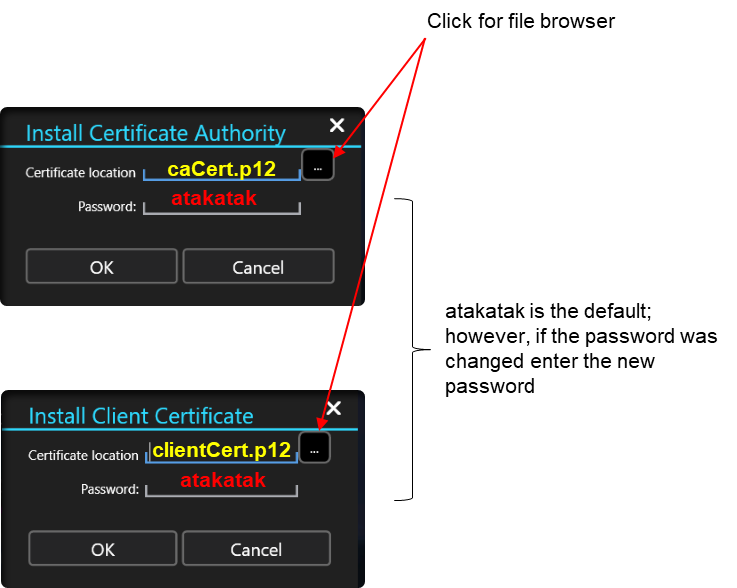
Click on Install Certificate Authority and browse to our caCert.p12 and enter atakatak as the password. If you changed this during the setup enter the changed password instead. Next, click on Install Client Certificate and this time browse to the clientCert.p12 and enter the same password as before.
Once you have entered all the information click Ok to attempt to connect to our TAK Server and establish the connection. If all passwords and files are correct the TAK Network Status icon will change from Red to Green and you will get a notification stating you have successfully connected.
Android TAK (ATAK)
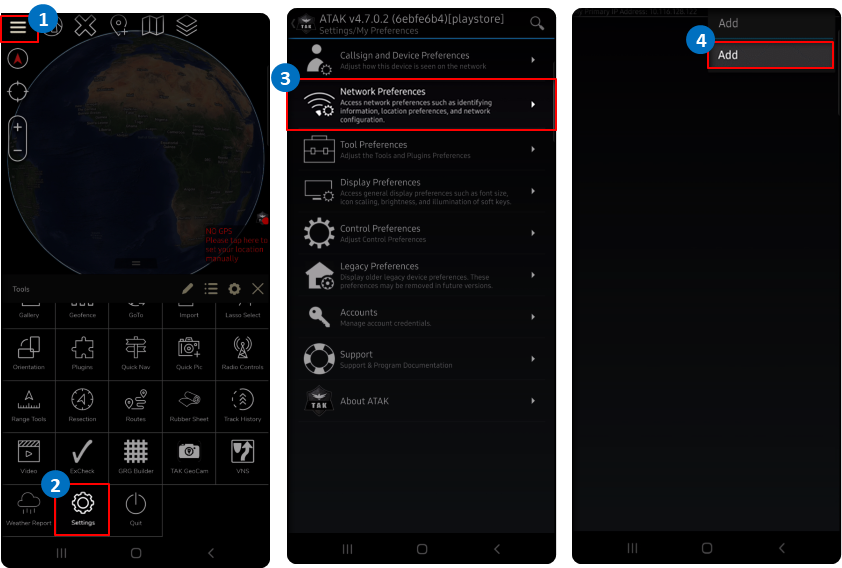
Launch the ATAK from your phone. ATAK can be downloaded from the Google Play Store or TAK.gov. Upon successful load select the hamburger menu (≡) (1) and select Settings (2) from the menu. Select Network Preferences (3) >> Server Connections. Select the hamburger menu at the top right and select Add (4) or click on the TAK Network status icon at the bottom right on the main screen identified by the red status on the TAK logo.
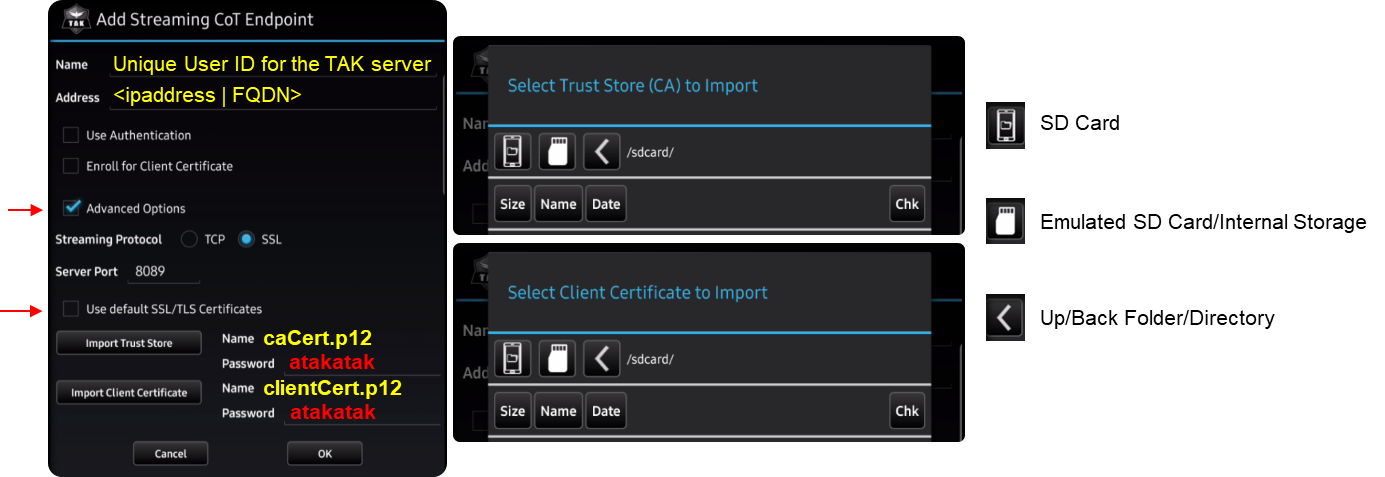
Fill in the TAK server information according to the deployment. Check the Advanced Options to view certificate trust store configuration, and uncheck Use default SSL/TLS Certificates. Click on Import Trust Store and browse to where the caCert.p12 is saved. Enter atakatak if the password was not changed during the TAK Server setup; otherwise, enter the new password here. Repeat this same step for importing the Client Certificate except select the clientCert.p12.
Once you have entered all the information click Ok to attempt to connect to our TAK Server and establish the connection. If all passwords and files are correct the TAK Network Status icon will change from Red to Green.
iPhone TAK (iTAK)
Currently, the only way to connect iTAK to a TAK server is to use a Mission/Data Package (.zip) to onboard the client to the server. This requires three files within the root of the Mission Package:
config.pref
caCert.p12
clientCert.p12
Copy the contents below into a notepad and name it config.pref in notepad or text editor of choice and replace values as required.
<?xml version='1.0' standalone='yes'?>
<preferences>
    <preference version="1" name="cot_streams">
        <entry key="count" class="class java.lang.Integer">1</entry>
        <entry key="description0" class="class java.lang.String">TAK Server</entry>
        <entry key="enabled0" class="class java.lang.Boolean">true</entry>
        <entry key="connectString0" class="class java.lang.String"><takserverip>:8089:ssl</entry>
	</preference>
	<preference version="1" name="com.atakmap.app_preferences">
        <entry key="clientPassword" class="class java.lang.String">atakatak</entry>
        <entry key="caPassword" class="class java.lang.String">atakatak</entry>
        <entry key="certificateLocation" class="class java.lang.String">cert/clientCert.p12</entry>
        <entry key="caLocation" class="class java.lang.String">cert/caCert.p12</entry>
	</preference>
</preferences>
config.pref contents
A completed config.pref file will look like this when you are done, items in bold identify configurable values:
<?xml version='1.0' standalone='yes'?>
<preferences>
<preference version="1" name="cot_streams">
<entry key="count" class="class java.lang.Integer">1</entry>
<entry key="description0" class="class java.lang.String">TAK Server</entry>
<entry key="enabled0" class="class java.lang.Boolean">true</entry>
<entry key="connectString0" class="class java.lang.String">192.168.1.100:8089:ssl</entry>
</preference>
<preference version="1" name="com.atakmap.app_preferences">
<entry key="clientPassword" class="class java.lang.String">atakatak</entry>
<entry key="caPassword" class="class java.lang.String">atakatak</entry>
<entry key="certificateLocation" class="class java.lang.String">cert/clientCert.p12</entry>
<entry key="caLocation" class="class java.lang.String">cert/caCert.p12</entry>
</preference>
</preferences>
Select all three files, right-click >> sent to >> Compressed (zipped) Folder if you're on Windows, or compress to ZIP file depending on your operating system.
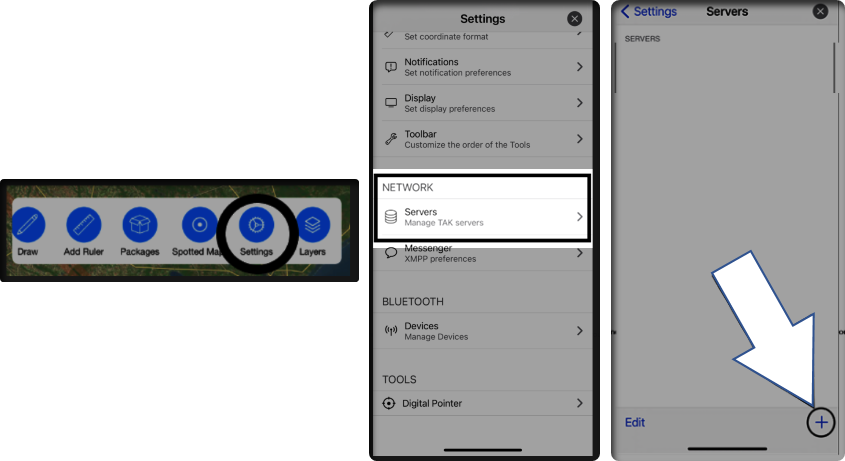
Launch the iTAK application. iTAK can be downloaded from the Apple Store. Upon successful load select Settings from the bottom menu. Under Settings select Servers, and at the bottom click the plus-sign (+). This will bring up the file selection view and navigate to the Mission/Data Package.
Managing our TAK Clients
Certificate Management
As with any certificate management, we need to either issue, renew, or revoke certificates. The process to revoke a client certificate requires one long command and knowing three (3) things; however, you only need to know one of them:
The client certificate common name
The remaining two (2) items are standard and do not change.
Revoking client certificates
To revoke the cert, we need to navigate to the /opt/tak directory and change our login session to the tak user. Before we revoke the cert we need to know the certificate to revoke, the CA private key, and the CA public certificate. The script syntax is as follows:
./revokeCert.sh /opt/tak/certs/file/<commonname> /opt/tak/certs/files/<issuingCA> /opt/tak/certs/files/<issuingCA>
In our environment, TAK-CA-01 is our issuing CA so this is the CA we will reference. We will need to restart the takserver service after we are done revoking the certificate. If revoking multiple certificates perform this task last.
# Navigate to the /opt/tak/certs directory
cd /opt/tak/certs

# Change users to tak
sudo su tak

# Revoke the client certificate
./revokeCert.sh /opt/tak/certs/files/<commonname> /opt/tak/certs/files/TAK-CA-01 /opt/tak/certs/files/TAK-CA-01

# Example
#./revokeCert.sh /opt/tak/certs/files/clientCert /opt/tak/certs/files/TAK-CA-01 /opt/tak/certs/files/TAK-CA-01

# Restarting the takserver service
# When prompted enter the super user password
systemctl restart takserver

# Exit the tak user session
exit
Revoking client certificates
Renewing client certificates
To renew an expired client certificate we first need to follow the steps above to revoke the client certificate. Once that task is completed we issue a client certificate using the ./makeCert.sh client command as we did previously. The only difference is you will get prompted to overwrite the existing certificate alias which we respond with Y to overwrite and create a new client certificate and keys.
# Navigate to the /opt/tak/certs directory
cd /opt/tak/certs

# Change users to tak
sudo su tak

# Create a client certificate using the same common name as the revoked certificate
./makeCert.sh client <commonname>

# When prompted to overwrite the existing certificate respond with Y

# Exit the tak user session
exit
Renewing the client certificate
Conclusion
This completes the general setup and management of the TAK Server for now. Come back for more advanced management topics such as certificate auto-enrollment, certificate groups, and TAK Server to server federations.
