TAK PKI: Rotating Intermediate Certificate Authorities

So, you've deployed a TAK Server, which has been operational for a while. Then one day your clients are unable to connect. You do some digging and discover that your certificate authority (CA) has expired. You have some choices: (1) delete the entire PKI environment and start over or (2) rotate your intermediate CA because your root CA is still valid. Then, create a redistribution plan to update all the public and client certificates in your organization. Depending on the number of clients you support, this could be hundreds or more. It's not a position I want to be in, but it could happen. To avoid this, I recommend setting a reminder or documenting key CA expiration dates and renewing them when operationally feasible.
• Root CA - 10 Years // 3652 Days
• Intermediate CA - 2 Years // 730 Days
• [Server | Client] Certificates - 2 Years // 730 Days
In summary, your intermediate and server certificates will expire on the same day, taking down your TAK Server environment.
--fips flag when creating the environment.TL;DR
sudo su tak
cd /opt/tak/certs
cp files/root-ca.pem files/ca.pem
cp files/root-ca-do-not-share.key files/ca-do-not-share.key
cp files/root-ca-trusted.pem files/ca-trusted.pem
echo y | ./makeCert.sh ca TAK-ID-CA-02
echo y | ./makeCert.sh server takserver
cd /opt/tak
sed -i 's/TAK-ID-CA-01/TAK-ID-CA-02/g' CoreConfig.example.xml
sed -i 's/TAK-ID-CA-01/TAK-ID-CA-02/g' CoreConfig.xml
exit
sudo systemctl restart takserver
Setting up the Lab
The following process assumes you're attempting this before your certificate authority (TAK-ID-CA-01) expires. If your CA has already expired, the same steps will apply; however, you will not bundle the expired certificate that will be passed to your clients. To set this up in a lab, I used the date command to backdate one of my TAK Servers to simulate an upcoming expiration. If you want to do this in a lab, use the command below, replacing the desired date. Additionally, this server's PKI environment is not set up. This allows us to lab/validate the steps before execution in a production environment.
# Set the date
sudo date -s "07 July 2023 21:52:00"
date command to change the system time.date command again.The Process
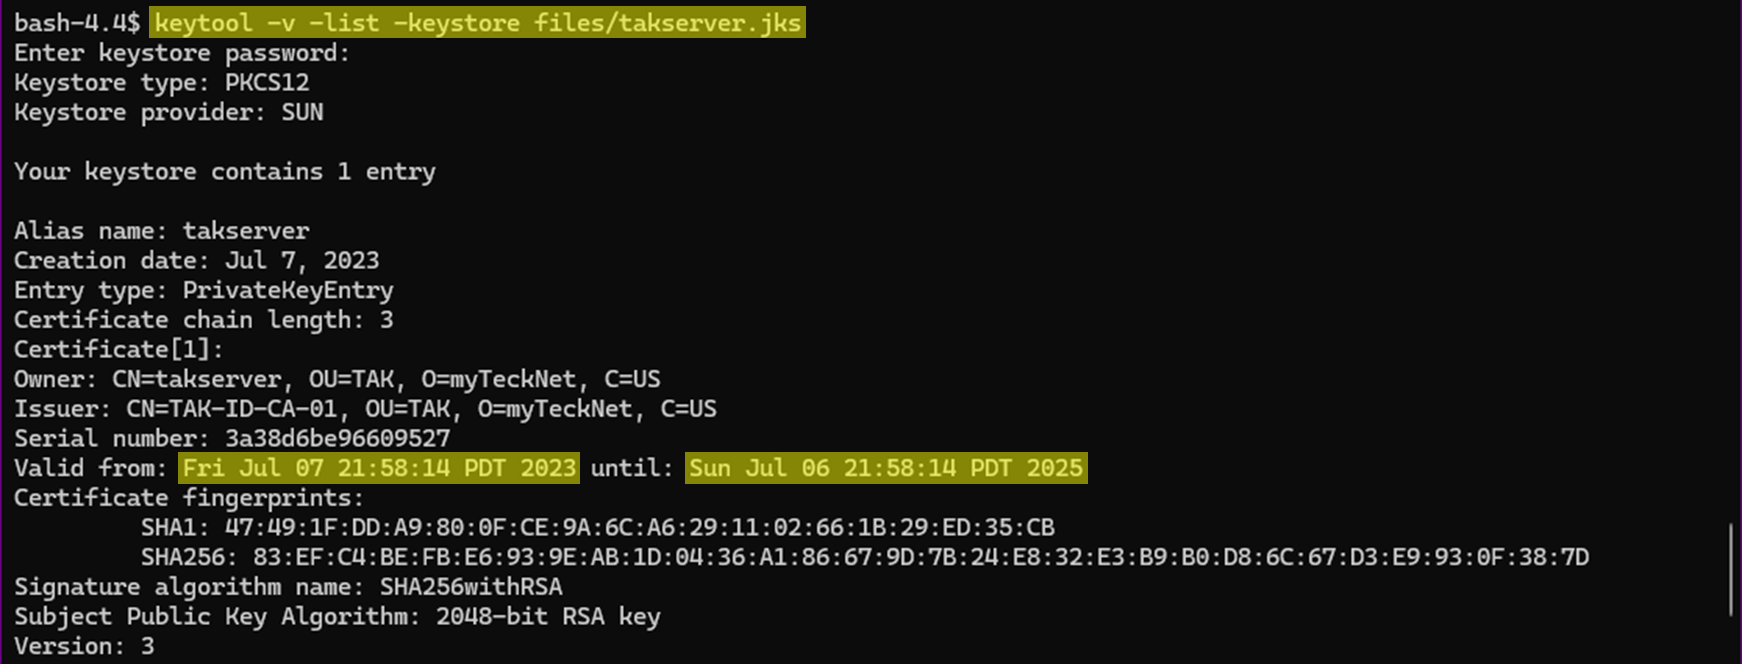
keytool command to show certificate validity.This requires a few modifications to our existing files, updating the CoreConfig.xml, and if you're executing this early enough, you will need to update your shared caCert.p12. Start by logging in as the tak user, then navigate to the certs directory.
sudo su takcd /opt/tak/certs
date command to change the system time.Restoring the Root CA
Before creating our new issuing CA, we must restore our root CA files by replacing the current issuing CA-referenced files. This will overwrite the existing files that reference the active-expired intermediate CA.
cp files/root-ca.pem files/ca.pem
cp file/root-ca-do-not-share.key files/ca-do-not-share.key
cp file/root-ca-trusted.pem files/ca-trusted.pem
Create the new Issuing CA
Next, we create our new issuing CA by giving it a new name or incremental number. During the installation, we used TAK-ID-CA-01 as our first issuing CA in our environment. Since we are rotating CA's, we do not want to use the same name, thus we increment up to TAK-ID-CA-02 or follow your organization's naming standard.
echo y | ./makeCert.sh ca TAK-ID-CA-02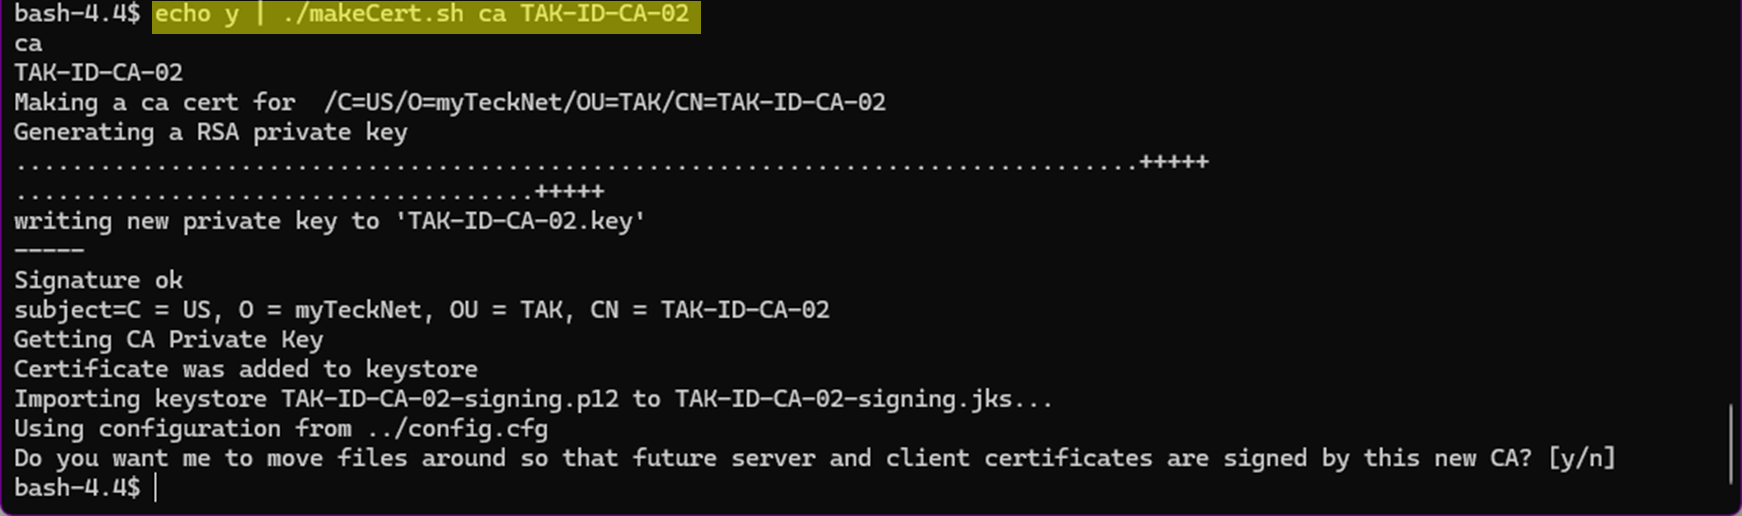
./makeCert.sh ca command.Issue and Sign the TAK Server
With our new issuing CA active now, we need to sign a new TAK Server certificate. This will overwrite our existing signed TAK Server certificate and issue a new one under the new CA we just created. This step reduces the number of updates we need to do to our core configuration files.
echo y | ./makeCert.sh server takserver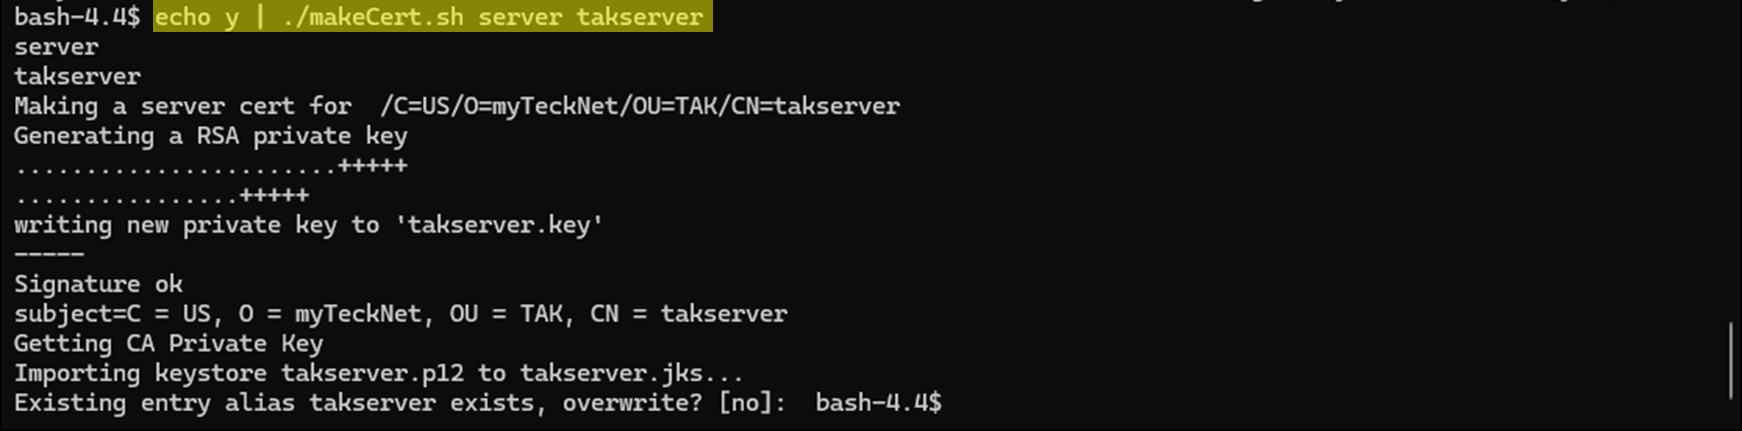
To verify our new certificate trust, we can use the keytool command again to inspect our certificate chain. This should reflect today's date and two years later. Make note of this future take as you will need to perform these same steps again. A future article will cover how to roll over to a new root CA while maintaining a previous root and issuing CA.
keytool -v -list -keystore /opt/tak/certs/files/takserver.jks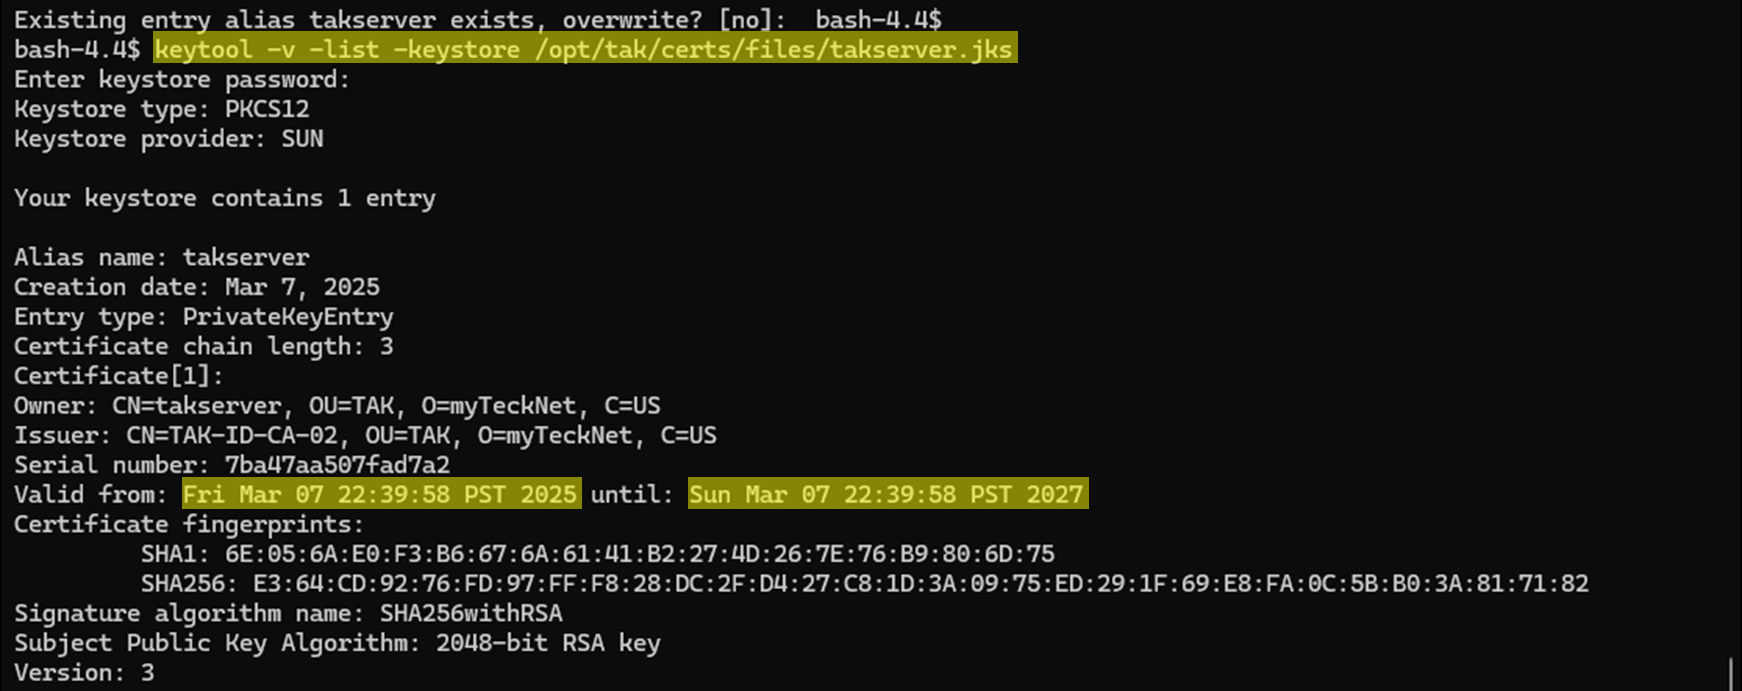
[Optional] Add previous issuing CA
This step is only required if your current issuing CA is still valid (e.g. TAK-ID-CA-01) and are creating a new Issuing CA to rotate. Otherwise, if your issuing CA (TAK-ID-CA-01) is expired, DO NOT perform this step.
keytool -import -trustcacerts -file files/TAK-ID-CA-01.pem -keystore files/truststore-TAK-ID-CA-02.jks -alias "TAK-ID-CA-01" -deststorepass atakatak
Update the CoreConfig
After we have created the new issuing CA and a new TAK Server certificate, we need to update our CoreConfig to reflect these new changes. This will update the truststore and the signing trust used to automatically enroll certificates to authenticated clients.
cd /opt/taksed -i 's/TAK-ID-CA-01/TAK-ID-CA-02/g' CoreConfig.example.xml
sed -i 's/TAK-ID-CA-01/TAK-ID-CA-02/g' CoreConfig.xml
grep TAK-ID-CA-02 CoreConfig.xmlThis concludes the steps needed to be executed as the tak user, type 'exit' to return to the logged-in user.
exitTAK Server Public CAs
Finally, we will move over our new TAK Server public CA so that we can easily reference this to share with our clients.
[Optional] Add previous issuing CA
This step is only required if your current issuing CA is still valid (e.g. TAK-ID-CA-01) and are creating a new Issuing CA to rotate. Otherwise, if your issuing CA (TAK-ID-CA-01) is expired, DO NOT perform this step.
openssl x509 -trustout -in /opt/tak/certs/files/TAK-ID-CA-01.pem > ./caBundle.pem
cat /opt/tak/certs/files/TAK-ID-CA-02.pem >> ./caBundle.pem
openssl pkcs12 -export -in caBundle.pem -out caBundle.p12 -nokeys
sudo cp -v /opt/tak/certs/files/truststore-TAK-ID-CA-02.p12 ./caCert.p12
Since we copied the truststore-TAK-ID-CA-02.p12 as root we need to restore the ownership to our user. This step assumes that takadmin is the logged-in user.
sudo chown takadmin:takadmin caCert.p12
Applying the new Issuing CA
Once we have successfully updated the CoreConfig.xml and moved our new Public CA certificate (caCert.p12) we need to restart the takserver.service to apply the update.
sudo systemctl restart takserver
takserver.service now applies the new CA configuration. Otherwise, the currently running configuration remains the same. This allows you as the administrator to distribute the files ahead of time and schedule a planned outage and rollover plan to the users. The outage will only be as long as it takes to restart the
takserver.service. It could take longer for spelling and/or case sensitive misspellings.Conclusion
Using the steps above, you have successfully rolled over your expired or soon-to-be-expired CA. Depending on the onboarding method of connecting clients, the following procedures will need to be taken:
- Manual Certificates - This process is the exchanging of the TAK Server public certificates and the client certificates. Share the new caCert.p12 and a new clientCert.p12 to all clients within your environment. Clients can select the existing TAK Server connection and click on Install Certificate Authority and Install Client Certificate to update the existing connection.
- If your previous Issuing CA is still valid, ensure to pass the caBunble.p12 which contains both Issuing CAs, and that you updated the truststore-TAK-ID-CA-02 by importing the previous Issuing CA: TAK-ID-CA-01
- Certificate Enrollment - This process is when you share the TAK Server public certificate (caCert.p12) and the client selects Enroll for Client Certificate and Use Authentication. Share the new caCert.p12 to all clients within your environment. Update any enrollment data packages and redistribute them. Clients will need to delete the existing TAK Server connection and establish a new connection to the TAK Server. The clients will not lose the data they have already.
- Quick Connect - This process is when your TAK Server is signed publicly (Let's Encrypt, etc) and the user is connecting using credentials. Clients will need to delete the existing TAK Server connection and establish a new connection to the TAK Server. The clients will not lose the data they have already.
Regarding Certificate Enrollment and Quick Connect methods, we need to delete the existing connections because we cannot use the existing Client Certificate that was issued under the old issuing CA.
